
How to Delete a Facebook Business Page on Mobile and Desktop (2026)


A Facebook business page is an important asset for any business. No doubt. However, there might come situations where you need to delete it.
Maybe you are starting a new business. Or maybe you are rebranding your old one. Whatever the reason it is, learning how to delete a Facebook business page can be essential knowledge.
Facebook updates its interface and navigation quite so often. So, it can be a little confusing to remember the processes. But don’t worry. We’ll help you.
In this article, we will walk you through the most up-to-date methods in 2026 to delete a Facebook business page using Android devices, iPhones, or a web browser.
Stay with us to the end and see which method you’ll need.
Prerequisites to delete a Facebook business page
Before you start deleting your Facebook business page, keep the following information in mind:
- Make sure that you have admin access to the page. Many users ask questions in different forums about being unable to delete their pages, only to find out that they are not admins.
- Back up all your data before deleting the page. You might have your reasons, but we recommend that you keep essential data in case you need it in the future. Better safe than sorry!
Bonus Tips: If you are deleting your Facebook page to start anew, learn how to grow followers quickly and effectively.
How to delete a Facebook business page on iPhones and Androids
The process of deleting a Facebook business page is almost the same on both iPhones and Android devices. While the position of some buttons may be a little different, the overall steps and settings are similar.
Follow this step-by-step guide to delete a Facebook business page on iPhone and Android:
1. Open the Facebook app on your iPhone or Android device and log in to the account that has full admin access to the page.
2. Tap Menu or your profile picture.
- On iPhones, this option appears at the bottom of the app.
- On Android devices, it appears at the top.
3. Tap Options, then select the Facebook business page you want to delete. This will switch your profile into page mode.
4. Once the page is selected, tap Menu or your profile picture again.
5. Go to Settings & privacy, then tap Settings.
6. From the settings menu, tap Access and control.
7. Select Delete Page, then tap Continue.
8. Follow the on-screen instructions to confirm the deletion. You may be asked to enter your Facebook password to complete the process.

How to delete a Facebook business page from web browsers
If you prefer using a desktop or laptop, you can also delete a business page from Facebook directly from a web browser. The steps are also very simple and easy. All you’ll need is the admin access.
Here are the step-by-step processes to delete a business page in Facebook from web browsers:
1. Log in to Facebook from your preferred web browser, such as Chrome, Safari, Firefox, etc.
2. Click your profile picture in the top-right corner of the screen.
3. Select See all profiles, then choose the Facebook business page you want to delete. This will switch your account into page mode.
4. Once the page is selected, click the page profile picture in the top-right corner.
5. Go to Settings & privacy, then click Settings.

6. From the left-hand menu, click Access and control.

7. Select Delete Page, then click Continue.

8. Follow the on-screen instructions to confirm the deletion. You may be asked to re-enter your Facebook password to complete the process.

What happens when you delete a Facebook business page
Whenever you delete a business Facebook page, the platform immediately deactivates your account for 30 days. That means no one will be able to find or see your page.
However, you can cancel the deletion within 30 days. After that, Facebook will delete your page permanently, and there will be no other way to get it back.
How to cancel the deletion of your Facebook business page
As we mentioned earlier, you can cancel or delete your Facebook business page within 30 days. All you’ll need to do is reactivate your page.
Here’s how to reactivate your page from iPhones and Androids:
1. Open the Facebook app and make sure you are using your personal Facebook profile, not the page profile.
2. Tap Menu or your profile picture.
- On iPhones, this appears at the bottom of the app.
- On Android devices, it appears at the top.
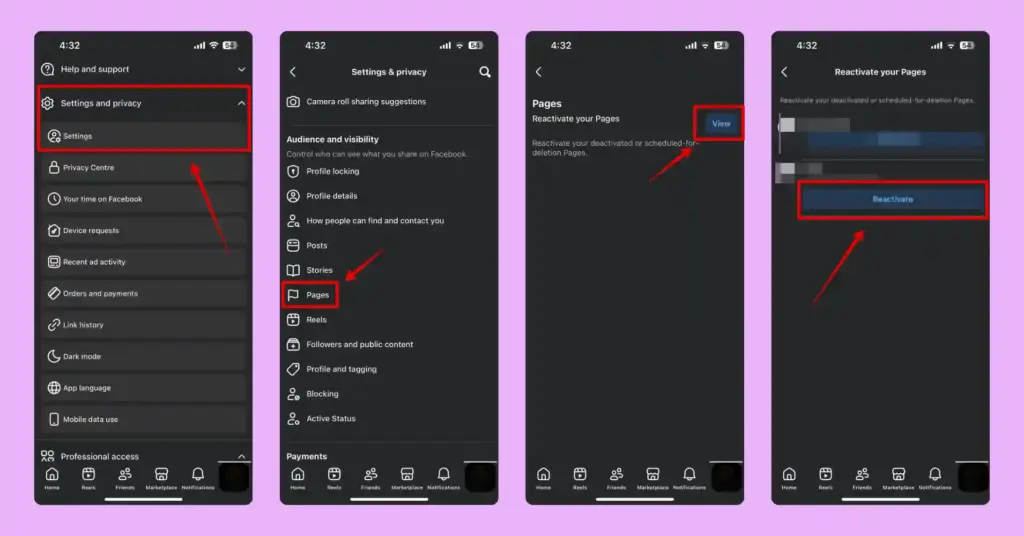
3. Scroll down and tap Settings & privacy, then tap Settings.
4. Scroll down and tap Pages.
5. Next to Reactivate Your Pages, tap View.
6. Find the Facebook business page you want to restore and tap Reactivate.
Here’s how to reactivate your page from web browsers:
1. Log in to Facebook using your personal Facebook profile.
2. Click your profile picture in the top-right corner.
3. Select Settings & privacy, then click Settings.
4. Under Your activity, click Reactivate a Page.

5. Find the page you want to restore and click Reactivate.

Wrapping up
Deleting your Facebook business page is not easy. But sometimes, you may need to make this hard choice. And with Facebook changing its interface often, even simple actions can feel confusing.
But now you know the latest procedures on how to delete a Facebook business page. You should be able to easily delete your Facebook business page whenever it’s necessary.

Get exclusive social media marketing tips and tutorials in your inbox!
Before you delete a page permanently, make sure it’s really what you want. Check your access, back up anything important, and remember that you still have a short window to cancel the deletion if you change your mind.

Subscribe To Get
Weekly Email Newsletter
Connect, Customize, and Display Social Feeds, Reviews, and Chat widgets


Leave a Reply