
How to Add Testimonials in WordPress Websites (2026)


Do you want to display testimonials on WordPress websites to attract your visitors?
While casually visiting a website, we are sure you have noticed testimonials on any WordPress website. Well, the data will blow your mind. Studies show that 96% of consumers read online testimonials for local businesses.
Exhibiting social proof on your WordPress website is the most effective way to highlight social proof and improve brand credibility.
Furthermore, it immediately increases sales and creates positive word-of-mouth marketing. Displaying testimonials allows you to establish a brand presence and encourage visitors to stay longer on your site.
This article will explain why you need testimonials in WordPress websites and how to add them. Let’s go!
Why does your website need testimonials?
People don’t like to be the first person to buy a new and unfamiliar product and take the risk. We always look for someone who has bought the product and given it a try, and based on the verdict, we decide whether to buy it.
Today, social reviews are the most powerful content that you display on your website. It reassures that the product works fine and it’s safe to purchase it.
Moreover, your WordPress testimonials can hook visitors instantly and convert them into buyers. A strong testimonial is more effective than a review. Reviews give a general idea about the product or service, whereas testimonials focus on prominent customer feedback!
Approximately 92% of B2B buyers are more likely to buy a product after reading a user review. Social proofs are an impactful marketing tool that directly hits your sales. And showcasing the best social reviews on your WordPress website lets you put your best foot forward and connect with real-life experiences.
How to collect powerful testimonials in WordPress?
Powerful testimonials leverage brand authority and build trust. However, managing a testimonial plugin for WordPress is not an easy task. What if you can add your beautiful testimonials without a dedicated testimonial plugin?
Today, we will show you how an all-in-one social media plugin, WP Social Ninja, can collect testimonials in WordPress and endorse your products and services. Ready?
Step 1: Install and activate WP Social Ninja
If you are familiar with installing WordPress plugins, WP Social Ninja is no different. It will take only a few steps.
You can do that in two ways:
- From your Dashboard
- From WordPress Repository
Here’s how to install it from your Dashboard:
- Navigate to the WordPress Admin panel. From the WordPress Dashboard, go to Plugins > Add New
- Next, in the search input field, type WP Social Ninja and wait for a moment for it to come up
- Now, click on the Install Now button
- Then Activate
If you decide to install from the WordPress Repository:
- Search WP Social Ninja in the WordPress Repository, and it will appear at the top. Once you click it, hit the Download button
- Now go to the Dashboard and go to Plugins > Add New > Upload Plugin > Choose the zip file
- After that, click the Install Now button and then Activate
Win your customers’ hearts with exceptional features
Discover how WP Social Ninja can assist you in designing outstanding customer experiences.

Step 2: Embed testimonials in WordPress with WP Social Ninja
First of all, go to the WP Social Ninja dashboard and click on the Testimonials from the top or left side of the page.
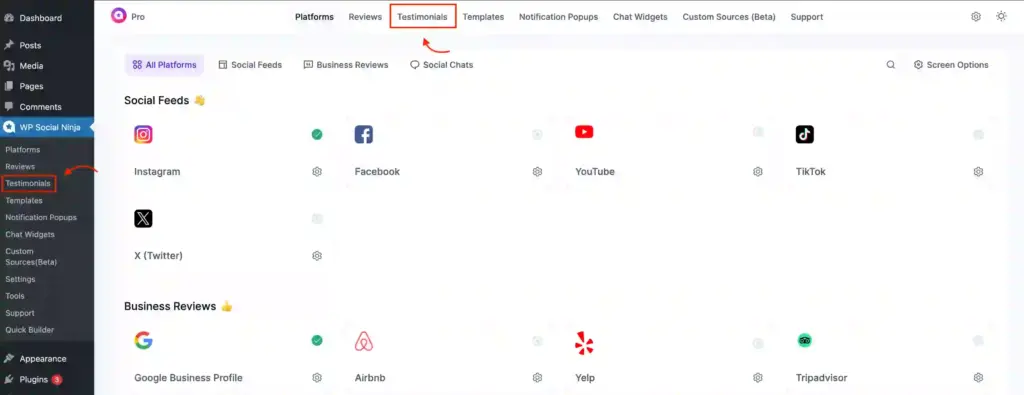
Next, a section will come up; you can add testimonials by clicking on the Add a Testimonial button.

Now, a testimonial section will pop up on your screen. Here, we have 10+ input fields to add a Testimonial.
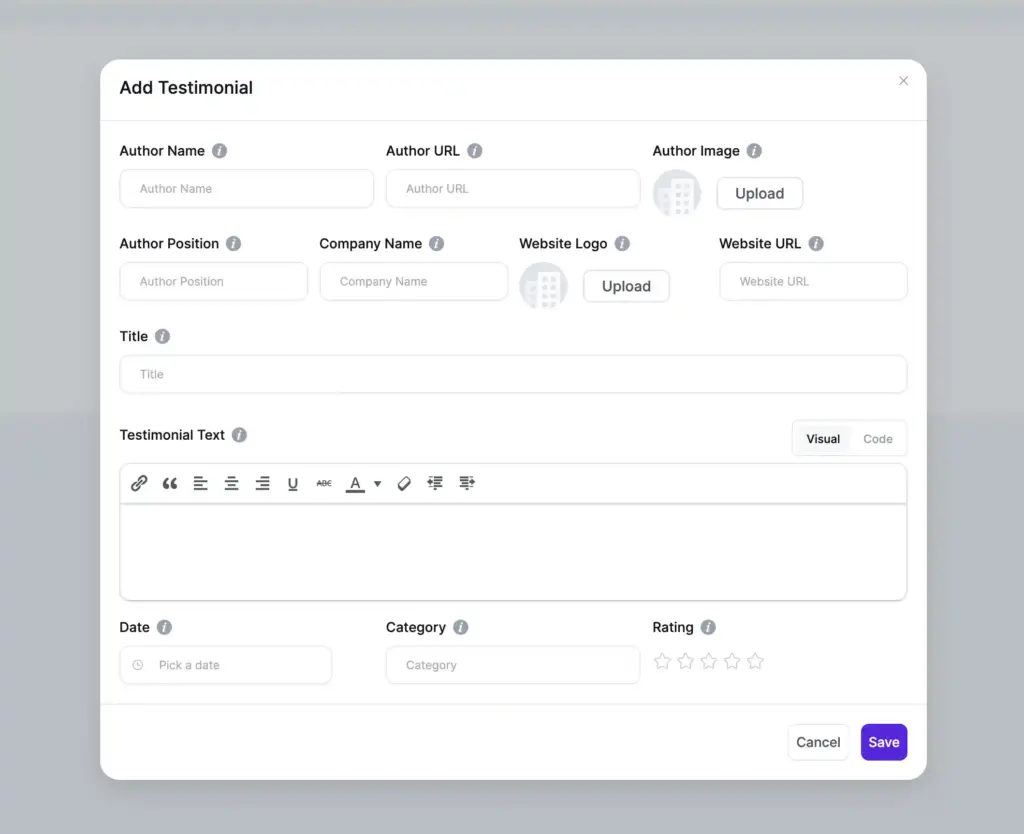
Testimonial field includes:
- Author Name
- URL
- Image
- Position
- Company Name
- Website Logo
- Website URL
- Title
- Testimonial Text
- Rating
- Date
- Category
To create a testimonial, insert all your credentials and give your Author details, company details, title, testimonial caption, and rating and date.
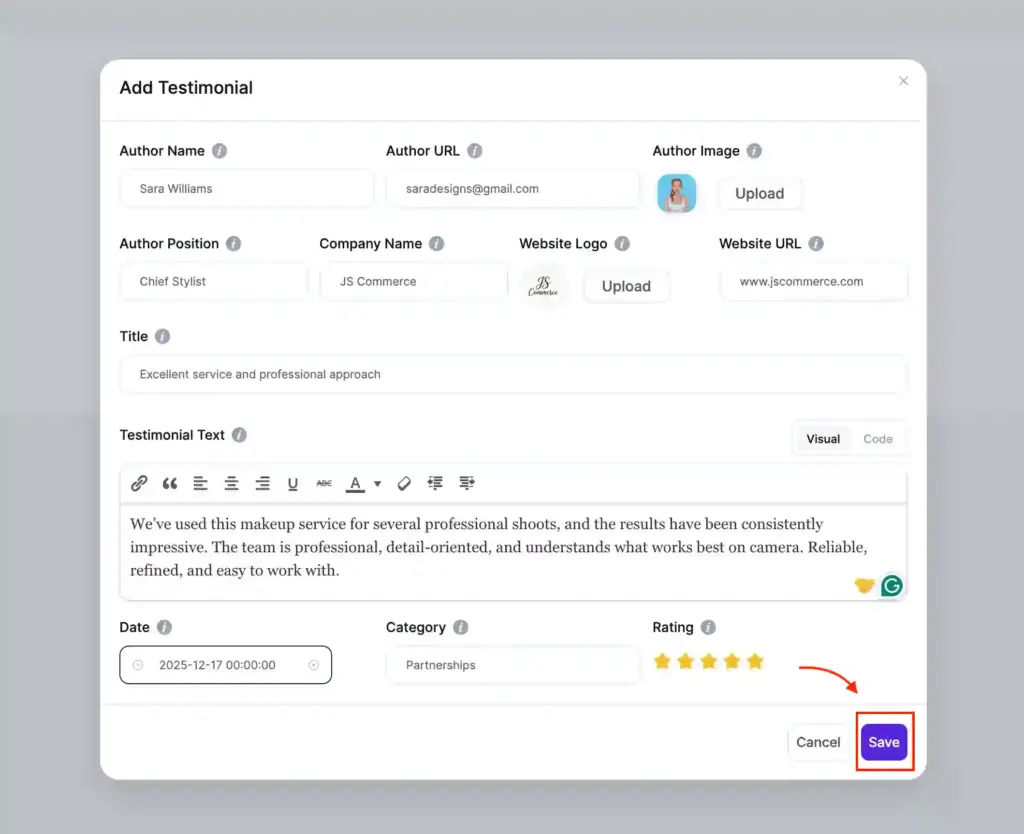
Once you’re done inserting all the credentials, click on the Save button.
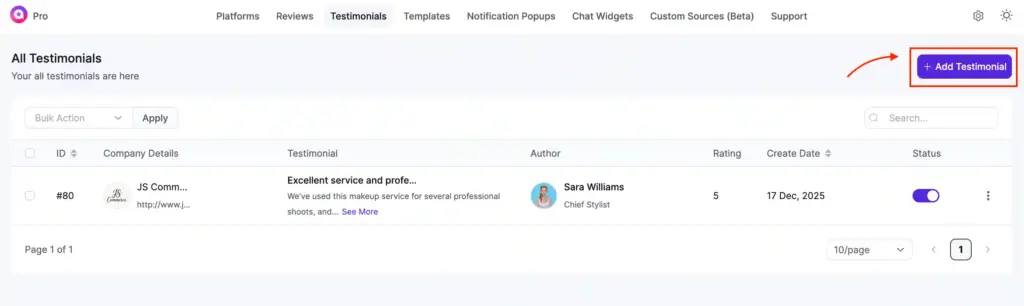
If you want to add more testimonials, click on the Add Testimonial button, and you can add as many testimonials as you want.
Once you’ve created your testimonial, it’s time to create beautiful templates and design them according to your taste!
Step 3: Customize testimonial template to fit your site design
Go to the Templates section. Click on the Create Template button and then select Add Testimonial Template.
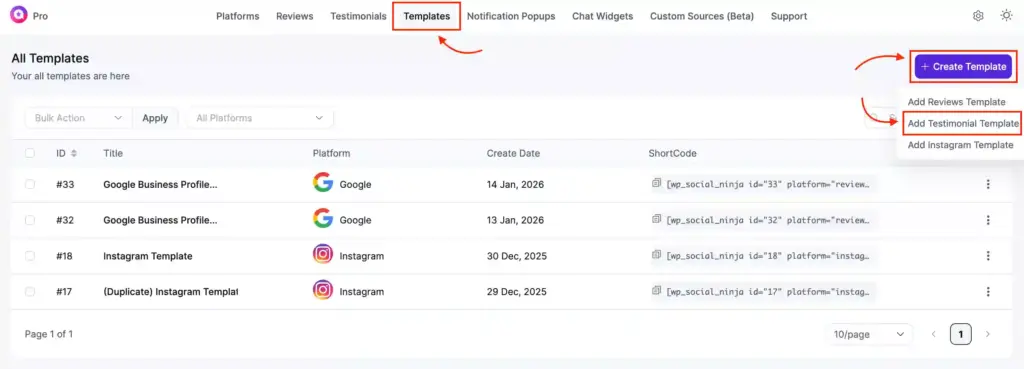
This will take you to the WP Social Ninja template editor settings panel.

Here, you can control your template design and adjust the Layout Type, Select a Template, Filter your Testimonials, sort out the minor details from the Settings, and set the Pagination.
Let’s see how to do that.
1. Layout Type: Testimonial Template is super flexible in terms of its functionality. Moreover, it offers diversified template options to represent your brand smartly. Here, we will allow you to adjust your Template Layout type from three different options Grid, Slider, and Masonry.
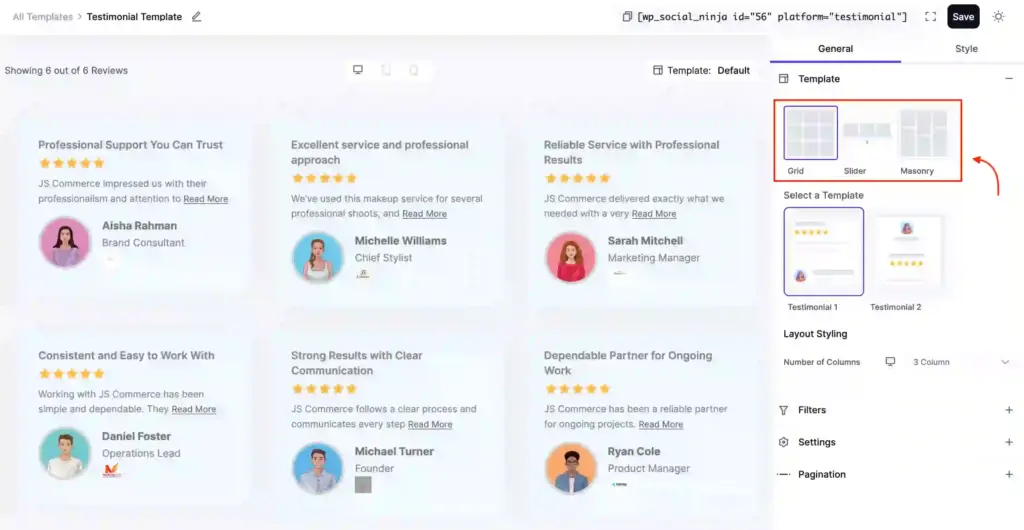
Here, we have selected Grid. You may select any! However, a new section would come up if you select the Slider layout type.
2. Slider: From testimonial Slider, you can turn on the Autoplay button. After turning on the button, all the reviews will be displayed. Moreover, you can set the Autoplay Speed. You can even determine how many slides you would like to display and scroll from the Slides to Show and the Slides to Scroll options.
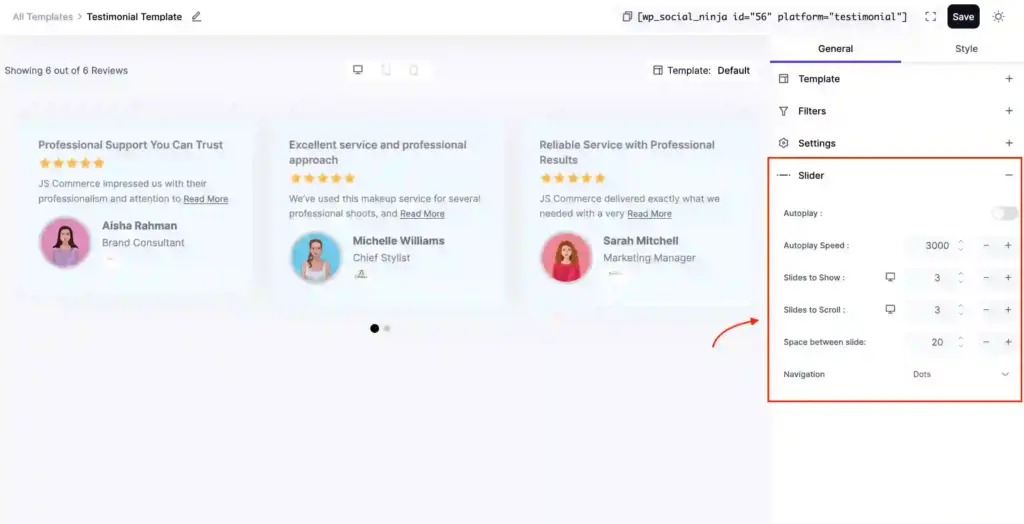
Next, you will find the Navigation Type, so here you will find different options, but today we have picked the Arrows and Dots option.
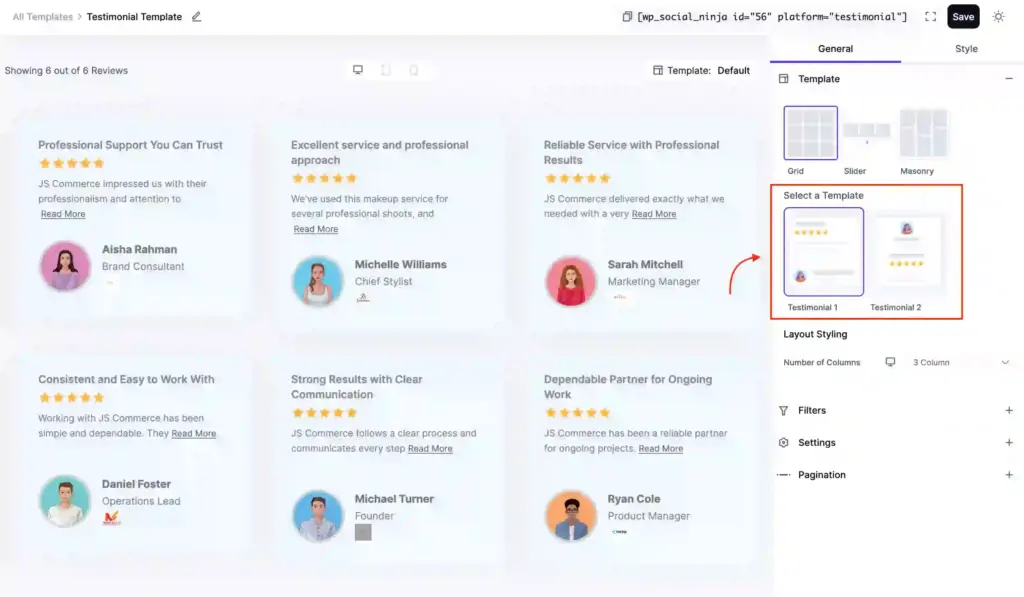
3. Template Type: In this step, you can adjust your testimonial template styles. It offers two different styles; you can pick from Testimonial 1 or Testimonial 2. Here is an example:
4. Filters: From the WPSN editor settings panel, you can take full control of your testimonials and make them more user-friendly. Here, you can sort out the Number of Testimonials. You can even set your ratings from Filters by Minimum Rating.
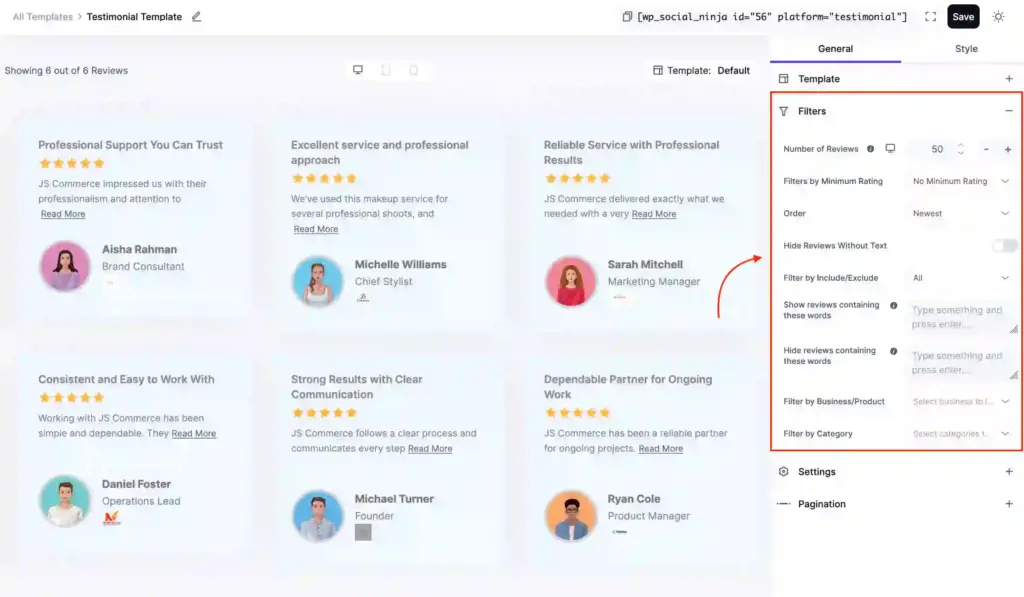
Moreover, it will help you set your testimonial in Ascending, Descending, or Random order. Apart from that, you can Hide Testimonials Without Text and filter any specific testimonials using the Filter by Include/Exclude option.
You can even show your testimonials for a specific business or product from the Filter by Category. For example, you can display your Retail Business testimonials, so you can categorize your business using a filter by category.
Now, you can display all the testimonials for a specific product or business name.
5. Settings: What if you have more control over your testimonials in WordPress websites? With the Settings option, you can pick the smallest details and enable or disable them from displaying.
First of all, you have the Display Rating. If you turn on the button, a new option comes up: Rating Style. From rating style, pick Number Style Rating or Icon with Number Style Rating to exhibit the best testimonials.

You also have the Author Name, Position, Company Name, Website Logo, Author, and Image. Moreover, you can customize the Testimonial Title, Testimonial Text, Content, Trim Words, Equal height, and Display Date to make the testimonials even more vibrant and business-friendly.
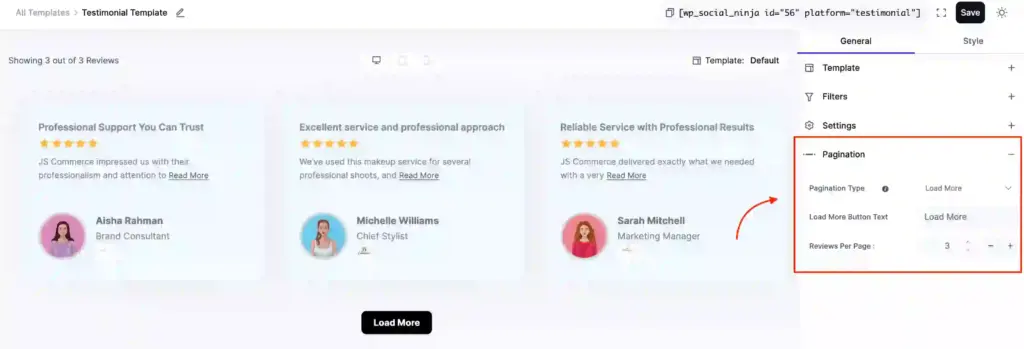
6. Pagination: Lastly, the Pagination. If you select the Load More option, it’ll ask you to customize the Load More Button Text and adjust your Reviews per page. Adjust it according to your choice.
Once you’re done, don’t forget to click on the Save button, and you’ve successfully customized your Testimonial. Now, let’s see what the testimonials in WordPress look like on your website.

So, there you have it! Now you know how to add testimonials in WordPress without even a testimonials plugin for WordPress.
Last words
We hope this article helped you understand the ins and outs of WordPress testimonials and how to add testimonials in WordPress websites.
Win your customers’ hearts with exceptional features
Discover how WP Social Ninja can assist you in designing outstanding customer experiences.
If you liked this article, then please subscribe to our YouTube Channel and join our Facebook community for WordPress tips and tricks. You can also find us on X (Twitter), Facebook, Instagram, and LinkedIn.
You may also want to check out:

Subscribe To Get
Weekly Email Newsletter
Connect, Customize, and Display Social Feeds, Reviews, and Chat widgets


Trending Posts
-

-
 Mashfik Upal Aumy
 -
 Mashfik Upal Aumy


Leave a Reply