A Step-By-Step Guide to Build Mega Menu in Gutenberg Block Editor
One of the key elements to a great user experience is having a well-organized, visually appealing navigation menu. When visitors get the whole picture of the website’s pages, products, and categories, they’re more likely to explore and stay engaged.
This is where the mega menu comes in. Unlike a traditional menu, a mega menu lets you present content in a more structured layout, with multiple columns, images, icons, buttons, and more—all in a single dropdown.
In this guide, we’re taking you on a step-by-step journey to building a mega menu in the Gutenberg block editor. So let’s start with the tools and tips that’ll help you create a powerful and visually engaging mega menu in your WordPress site.
Explaining mega menu
Mega menu is a more advanced and organized kind of dropdown, multi-column menu that provides a more organized navigation for websites.
Unlike traditional dropdowns which often display a single column of links, mega menus can feature multiple columns, images, icons, and even interactive elements like CTA buttons.
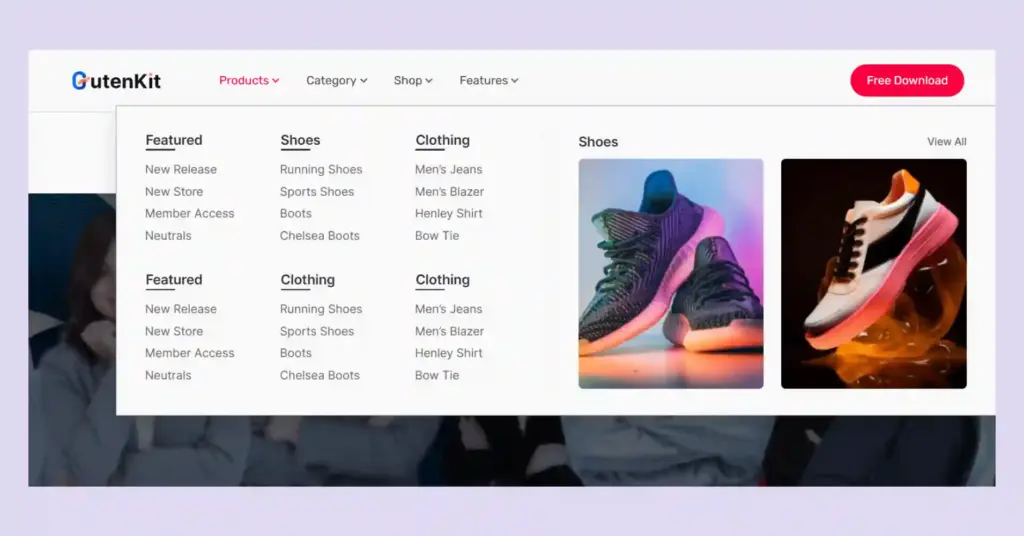
This makes it particularly useful for a website with a complex structure with multiple categories, content, and products, allowing users to quickly find the categories, content, or products they’re looking for.
The advantage of using the mega menu over the conventional menus
Mega menus bring some clear advantages over traditional dropdown menus, particularly when your website is loaded with content or products.
They’re all about improving user experience, making it easy to keep visitors engaged. This is a real plus for content-heavy sites like eCommerce stores, business sites, or large blogs.
So, what makes mega menus a great choice for these sites? Let’s break it down:
- Improved navigation: With multiple levels of navigation in one view, mega menus make it easier for users to navigate large websites.
- Better organization: It lets you group related items together, making it easier for users to find specific categories or products. This is particularly useful for e-commerce sites with numerous product categories.
- Flexibility in design: You get the freedom to create layouts that perfectly fit your brand, giving your site a polished and professional look.
- Visual appeal: Mega menus can include images, icons, and even videos, which can help users quickly identify the content they are looking for. This visual element can make the navigation experience more engaging.
But, there’s a bit of a balancing act here. Designing mega menus requires thoughtfulness to avoid overwhelming users with too many options. Keeping it clean and well-organized is key to maintaining a smooth user experience.
How do you create a WordPress Mega Menu in Gutenberg block editor?
Building a mega menu in WordPress may seem complex as no default blocks are available in the Gutenberg editor. However, there are some plugins that offer a simpler and more straightforward way to build mega menus in Gutenberg.
For this tutorial, we have used the GutenKit block editor plugin. This plugin allows you to create and customize menus using blocks, offering the flexibility to design visually engaging, functional mega menus without touching a line of code.
Here is how to create a mega menu in WordPress using Gutenberg.
Step 1: Plan the structure of your menu
Before jumping into the technical steps, it’s important to first map out how you want your mega menu to look and function. Think about these key elements you’ll include:
- The pages, categories, or products you’ll include.
- Plan the layout of the mega menu.
- Number of columns you want in the menu.
- Content types including text, images, and links for each menu item.
Having a clear structure will make the design and building process much smoother.
Step 2: Install a block editor plugin (GutenKit) that supports mega menu blocks
As mentioned earlier, you’ll need a plugin that supports mega menu block. Taking all things into consideration, GutenKit can be a great option.
It’s a page builder block for the Gutenberg editor that includes a block specifically for mega menus—making it easy for the users.
Note that the mega menu is a premium feature, so you’ll need to install the GutenKit Pro version to access it.
To get started, log in to your WordPress dashboard, navigate to Plugins > Add New > Upload Plugin, and upload the GutenKit Pro plugin to your website.
Step 3: Enable the menu block from the dashboard
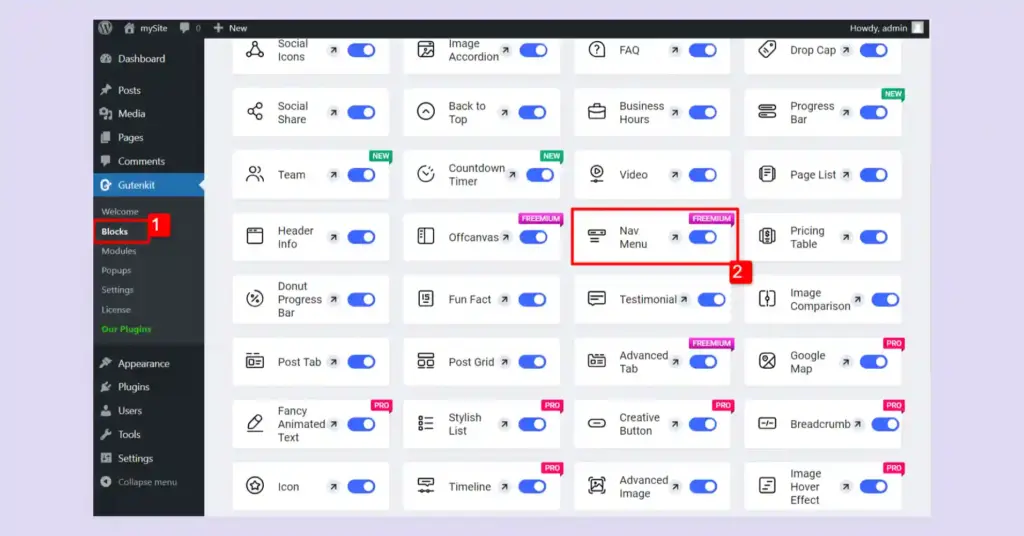
Since the mega menu feature is an extension of the Nav Menu block in GutenKit, you’ll need to activate the Nav Menu block first.
To do this, simply head over to your WordPress dashboard, head to GutenKit > Blocks, and find the Nav Menu in the list. Once you find it, just flip the toggle button to ON and you’re all set.
Step 4: Create a menu in the Gutenberg editor
Now, when it comes to designing your mega menu, you have two options: you can either create a single-page menu or design a global mega menu for your entire site.
For a single-page menu, simply open that page in the Gutenberg editor and start designing with the nav menu block and mega menu block.
However, if you want to create a global header with a mega menu for the entire site, you can do it from the Full Site Editor (FSE). For that,
- Go to the Appearance > Editor from WordPress dashboard.
- In the editor select Header and click on Edit.
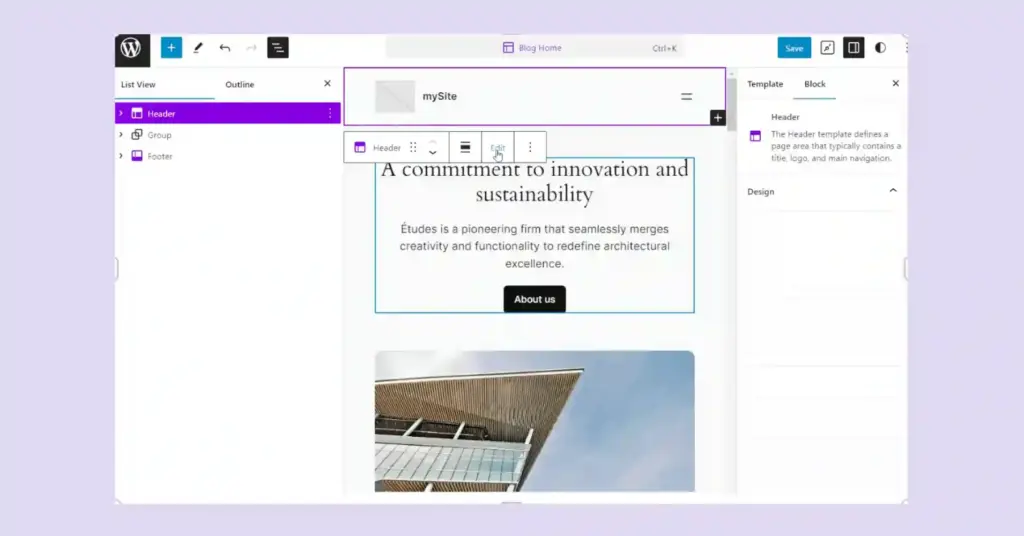
- In the header editor, pick the Nav Menu block.
- For the Nav menu, you can either start with the ready-made patterns or start from scratch.
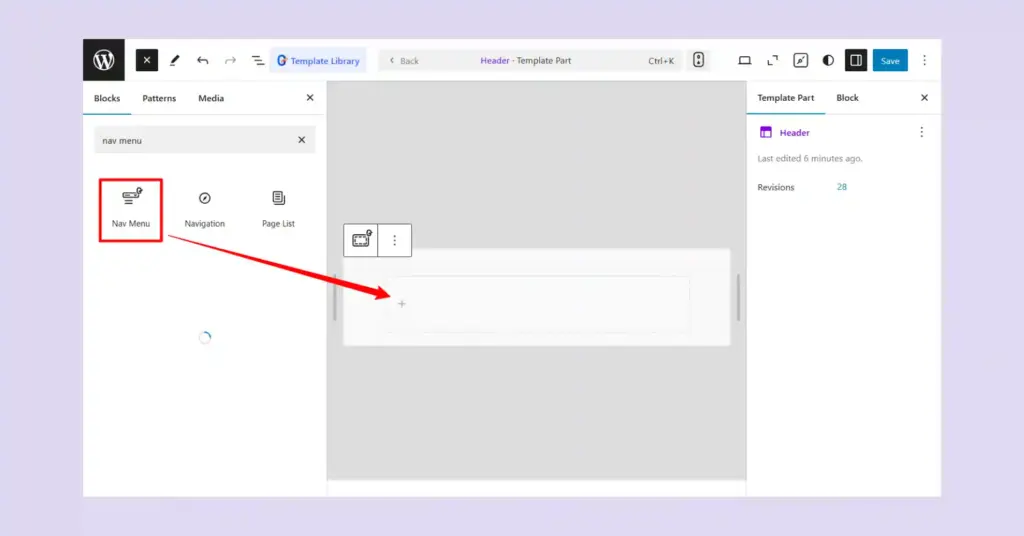
Step 5: Add menu items
Next, in the block editor, adding menu items is simple. Just click on the plus (+) icon, and for the GutenKit Nav menu, you can easily pull in existing pages from your website. When you click on the plus icon, you will see a list of existing pages on your website.
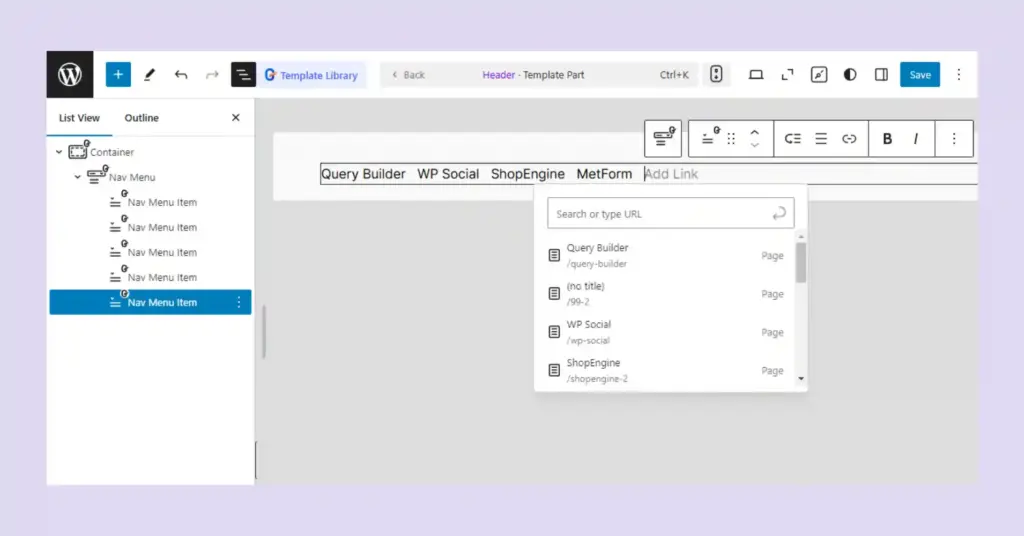
Besides, you can include custom links and labels to menu items to further customize your mega menu items.
And here’s something special — GutenKit lets you create new pages right from the Nav menu. These pages will automatically be saved as drafts on your website, ready for you to edit later.
Step 6: Adding a mega menu as a submenu
At this stage, let’s dive into the core part of creating your WordPress mega menu in Gutenberg.
When you click on a navigation menu item, you’ll see the option to enable a sub-menu. Once you activate it, you can choose between a dropdown or a mega menu. To turn your navigation into a multi-dimensional mega menu, select the mega menu option as a submenu.
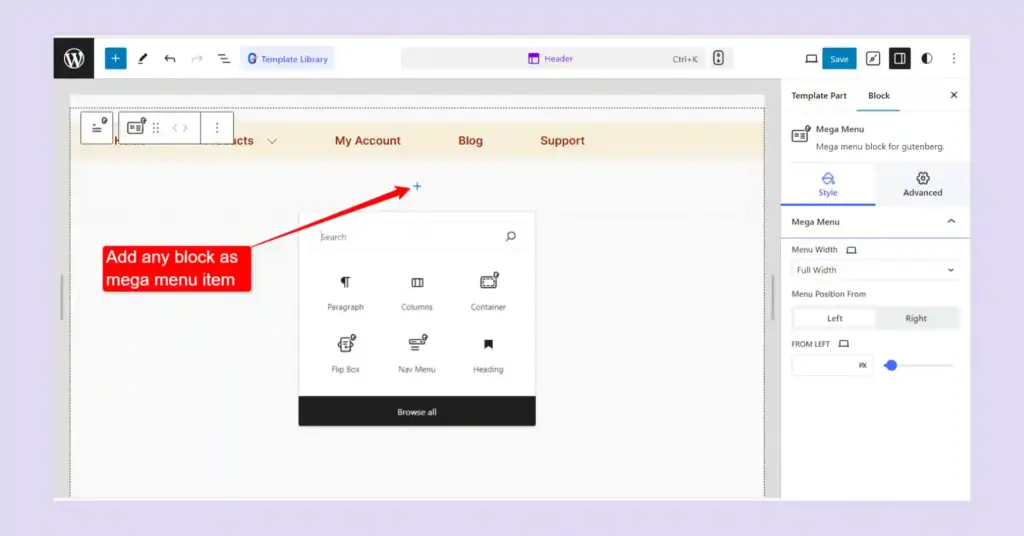
You can also add the mega menu as a submenu by clicking the “Add Mega Menu” icon in the block toolbar.
Step 7: Build mega menu with any Gutenberg block
After that, you can use any Gutenberg block or a combination of multiple blocks to design a mega menu for your WordPress site.
When you select Mega Menu as a sub menu you will have a container block in the sub-menu. Under that container, you can add any blocks and patterns including GutenKit’s 65+ blocks and 500+ ready patterns.
Step 8: Customize the appearance of the WordPress menu menu
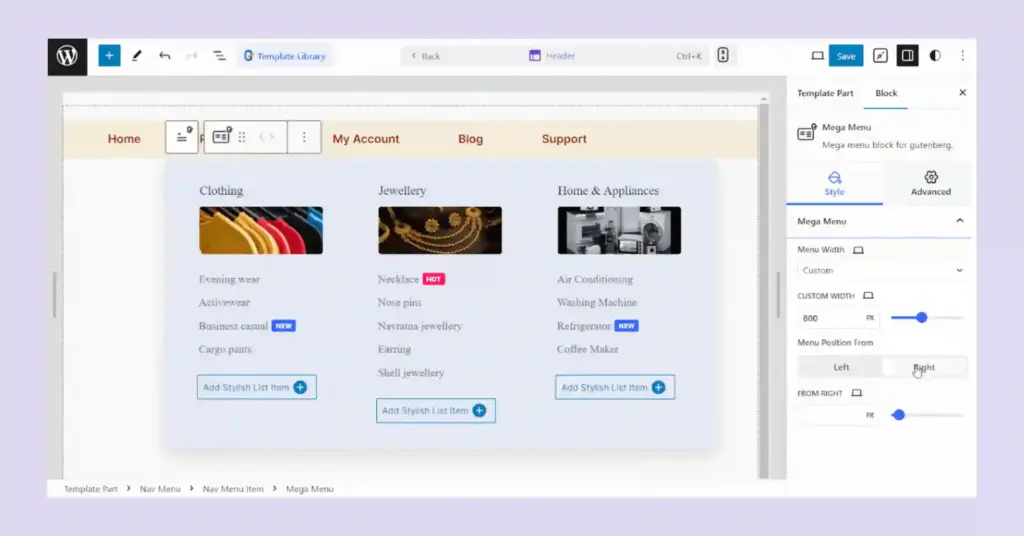
Now you can customize the styles of your mega menu. You can set the drop-down width, menu position, and space from the left.
- Menu Width: You can set the mega menu dropdown width to Full Width, Inline (automatically sets the width), and Custom Width. For the Custom width, you can adjust the dropdown width manually to your convenience.
- Menu Position From: This control basically gives you the option to align the mega menu to the left or to the right.
- From Left: You can adjust the space from the left for the mega menu dropdown.
Use pre-designed patterns for a quick solution
If you want a professionally designed mega menu quickly, consider using pre-designed patterns from the GutenKit template library. These patterns provide a ready-made framework that you can easily adapt to your site’s needs.
To use a ready-designed pattern:
- Open the Template Library from the editor.
- Under the Patterns tab, go to the Mega Menu category.
- Select a pattern and insert it into your editor.
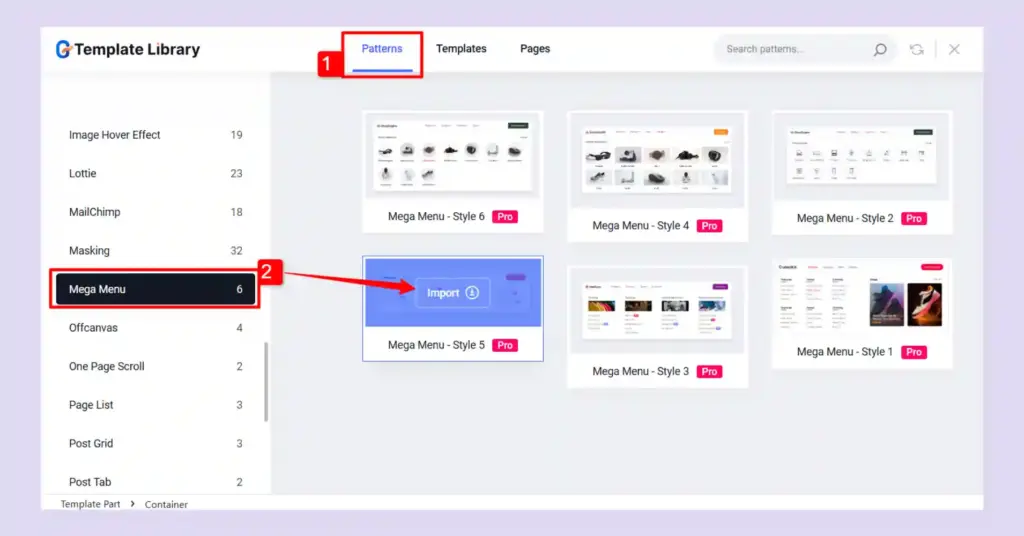
From there, just customize the mega menu content and style to match your brand, and you’re all set!
Make your mega menu responsive for mobile devices
In this era, mobile-first designs have turned into a necessity. So ensuring your mega menu is responsive is essential.
Designs made with GutenKit are automatically optimized for mobile devices. However, you can further adjust the layout and display options to ensure that your menu fits perfectly on any screen.
For the menu, you can easily set menu breakpoints for tablets, mobile devices, or even custom sizes. In the Mobile Menu Settings, you can also personalize it further by adding a separate mobile menu logo, menu links, and selecting your preferred hamburger icon.
With these settings, you can ensure your mega menu looks seamless and functions perfectly across all devices, giving users a smooth experience.
Wrapping up
This is probably the easiest way to build a flexible, mobile-responsive mega menu in Gutenberg.
With the organized mega menu layout, you can let the visitors quickly find the information or products they need, keeping them engaged and making your site more accessible.

Get exclusive social media marketing tips and tutorials in your inbox!
Just remember to keep your menu design clean and mobile-friendly for a seamless browsing experience across all devices. Thanks for reading, and happy building!
Editorial Team
The WP Social Ninja Editorial team brings together expert insights, practical tips, and success stories from guest posts and our community. We share strategies on social media integration, customer engagement, and smart marketing to help businesses connect better and grow faster.

Subscribe To Get
Weekly Email Newsletter
Connect, Customize, and Display Social Feeds, Reviews, and Chat widgets





Leave a Reply