
How to Add Google Analytics to WordPress Websites (2026 Complete Guide)


Why did you build your WordPress website?
Perhaps you want to be more visible or credible in your niche, increase sales, make your customer communication better, build a loyal community, or establish your authority among peers.
Whatever the goal is, you can not achieve it without understanding your website traffic first, and you will naturally feel lost. This is where adding Google Analytics to WordPress websites can become a game changer.
When you set up Google Analytics to WordPress, you will get detailed insights into how visitors interact with your website, where they come from, and what elements, pages, or posts they like most.
All this information will help you improve your website for better performance, create effective content strategies, and better target your ad campaigns.
After spending many years in the WordPress industry, onboarding thousands of visitors, and launching countless successful campaigns based on data from Google Analytics, we can say for sure that the tool is truly worth its reputation.
In this article, we will show you how to add Google Analytics to your WordPress website and use it like a pro to make data-driven decisions from our hands-on experience. Stay with us.
What is Google Analytics?
Google Analytics is a data analysis tool that offers free service provided by Google. As WordPress doesn’t come with built-in analytics, Google Analytics is a popular choice among website owners.
Google Analytics 4, or GA4, is the latest version of this tool. Understanding GA4 is extremely important when learning how to add Google Analytics to WordPress. It is the successor to Universal Analytics(UA), which has no longer processed data since 1 July 2023.
The most significant shift that GA4 has made is focusing more on events rather than sessions. UA would offer session-based data, mostly generic information. But GA4 treats any kind of user interaction as an individual event which provides more detailed user behaviour.
WordPress and Google Analytics can offer several significant benefits to website owners. It allows you to:
- Understand your audience better: GA4 can provide a detailed overview of your audience’s demographics and interactions with your website. When you connect Google Analytics to WordPress, this information will allow you to produce more personalized content and launch effective marketing campaigns.
- Track cross-platform engagement: GA4 can give clear information about how users behave differently on various platforms and devices. When you know such information, you’ll be able to understand your audiences’ preferences better and make your website more interactive.
- Measure conversions more effectively: GA4 tracks and treats any information as events. That’s why it becomes easy to understand different forms of actions. For example, actions like form submissions, sales, or sign-ups for newsletters. All these details make it digestible to understand what influences conversions and how to preserve it.
- Improve user experience: Looking closely at user behaviour will help you identify areas that need improvement and optimize your site for a better user experience. For example, you can identify pages with higher and lower bounce rates. Then, you can compare them to figure out what is working and upgrade your low-performing pages.
By now, you should have some questions on your mind. The benefits you’ll get are clear, but what sort of information will you learn that can manifest such massive benefits? GA4 will allow tracking versatile data regarding your audience.
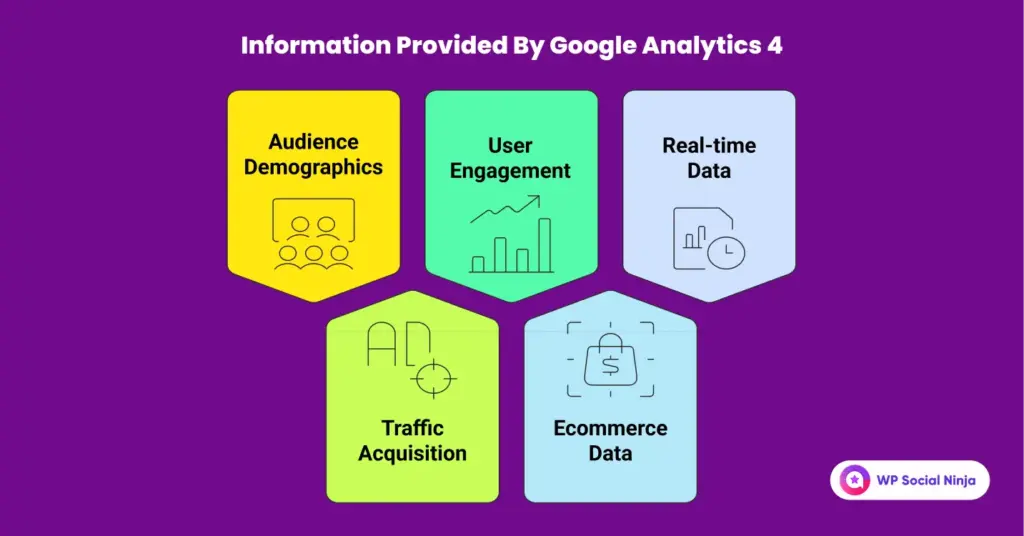
Here’s a list of information that Google Analytics 4 provides:
1. Audience Demographics
- Demographics: Age, gender, location, language, and interests of your users
- Technology: Browsers, devices (mobile, desktop, tablet), operating systems, and screen resolutions used by your visitors
- User behavior: New vs. returning users, frequency of visits, time spent on site, pages per session, and engagement metrics
2. Traffic Acquisition
- Traffic sources: Where your traffic is coming from (organic search, paid ads, social media, referrals, direct)
- Campaign tracking: Performance of your marketing campaigns, including clicks, conversions, and cost data
- Search queries: Keywords users are searching for to find your website
3. User Engagement
- Page views: Which pages are most popular, time spent on each page, and bounce rate
- Events: Tracking specific actions users take on your site (e.g., button clicks, form submissions, video plays)
- Goals and conversions: Measuring how effectively your website is achieving its objectives (e.g., purchases, sign-ups, leads)
- User flows: Understanding the paths users take through your website
4. Ecommerce Data (if applicable)
- Product Performance: Sales, revenue, and conversion rates for individual products
- Transactions: Details of each purchase, including order value, items purchased, and shipping information
- Ecommerce Funnels: Analyzing the steps users take to complete a purchase and identifying areas for improvement
5. Real-time Data
- Active Users: Number of users currently on your site
- Page Views: Pages being viewed in real-time
- Events: Events happening in real-time
Understanding data is the ace behind the success of any business in the digital industry. Reliable tools like Google Analytics 4 can provide all sorts of information you’ll need to improve your decision making by attracting more visitors to achieve your goal.
If you are already thinking about setting up Google Analytics on WordPress, we understand your excitement. So, let’s move forward to the next section.
Are you struggling to increase your Ecommerce sales and facing blocks?
Pre-requirements to add Google Analytics to WordPress
Setting up Google Analytics on WordPress is actually an easy task. You don’t need any technical knowledge or certain expertise to do so. However, before adding Google Analytics to WordPress, you’ll need the following things:
- A Google Analytics account
- A Google Analytics tracking or measurement ID
- Access to your WordPress admin dashboard
Signing up for Google Analytics is simple, easy, and free. All you’ll need is a Google account.
Follow this step-by-step guide to sign up for Google Analytics:
1. Go to analytics.google.com from your device
2. Log in to your existing account, or you can create a new account if you want, and you’ll be on the homepage of Google Analytics
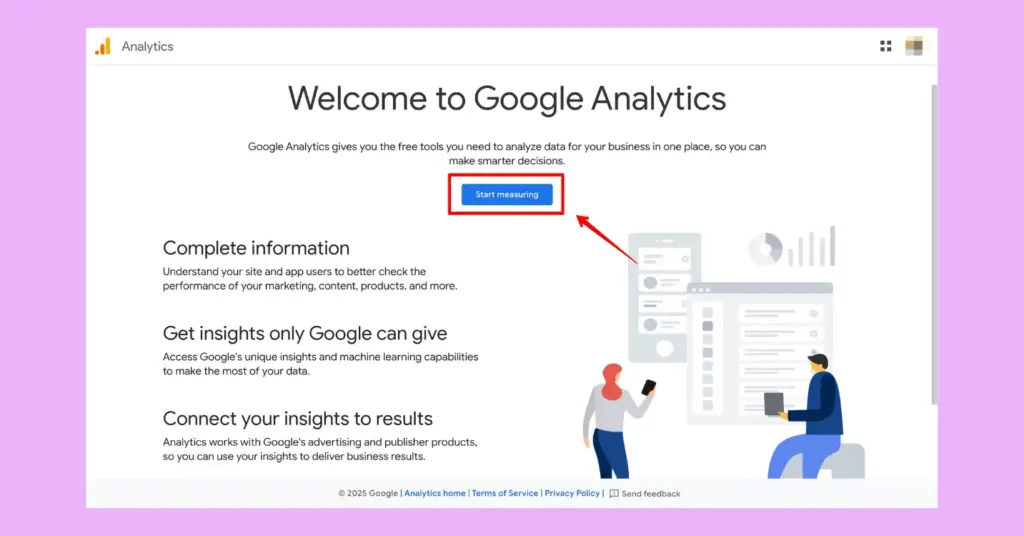
3. Click on the Start measuring button on the homepage to get started setting up your account
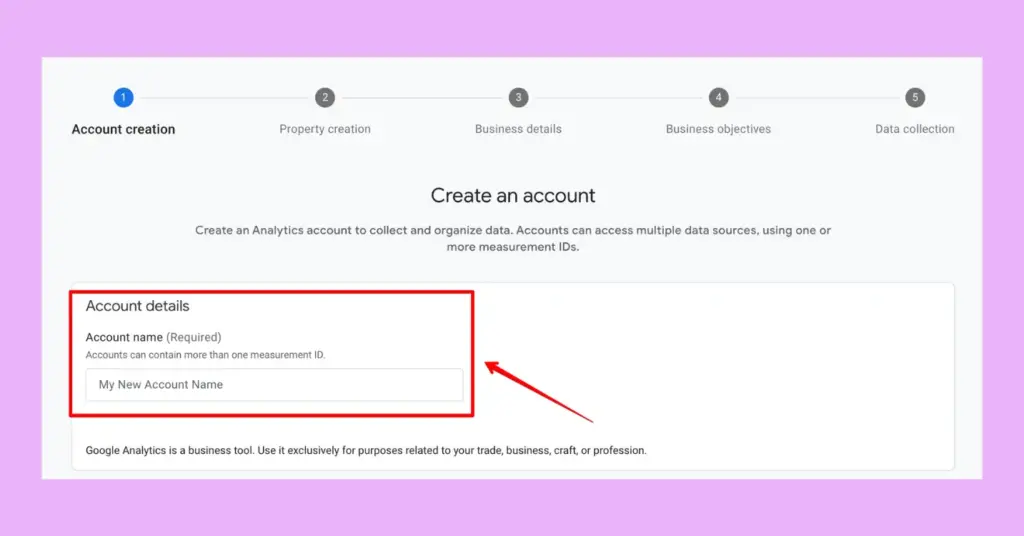
4. Create an Account name for your Google Analytics and make sure that it is associated with your business
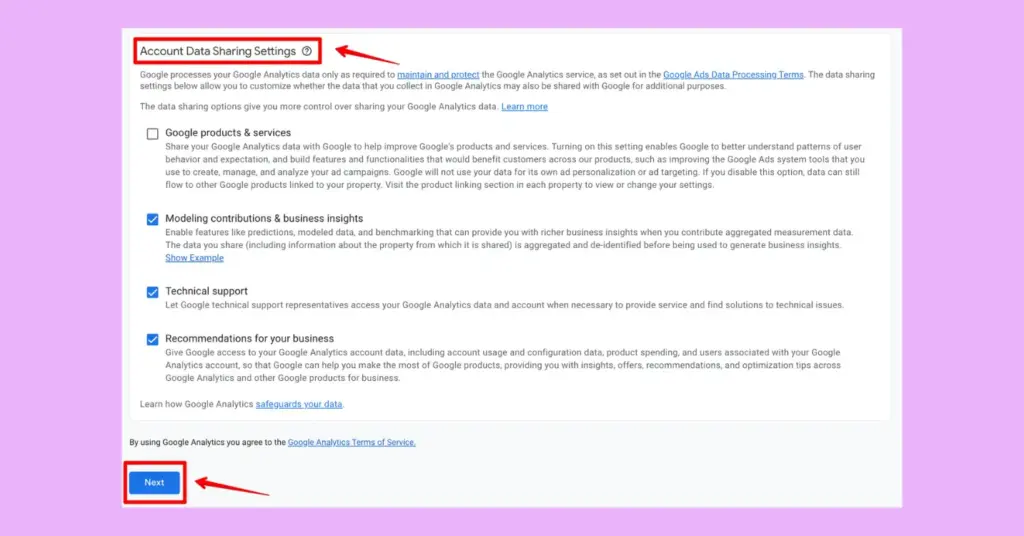
5. Select Account Data Sharing Settings options to ensure how much information you want to share with Google and click on the Next button
6. Now you have to enter your Property name, name your business, select your Reporting time zone and Currency, and then click the Next button

7. In this section, you have to select your Industry category and Business size available from the options and then click on the Next button
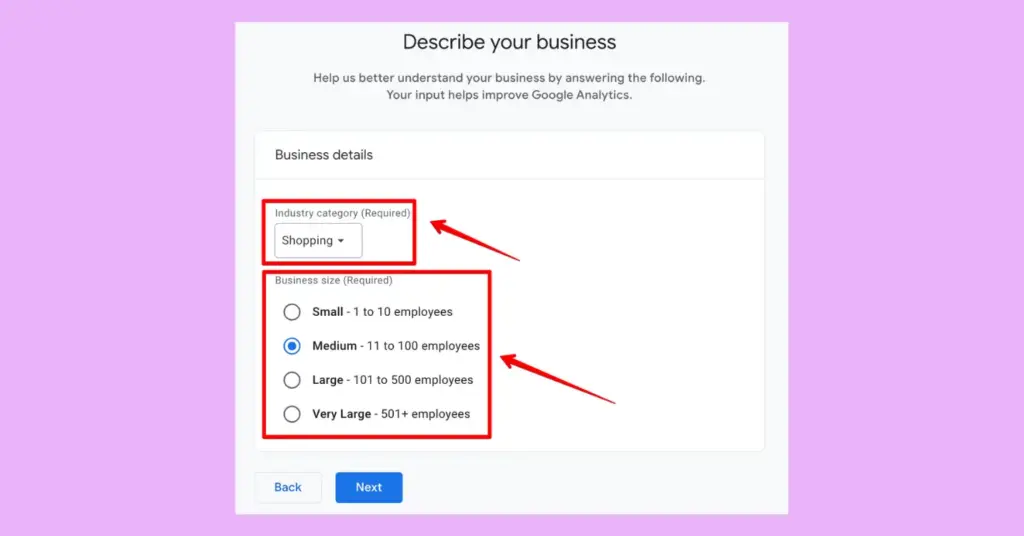
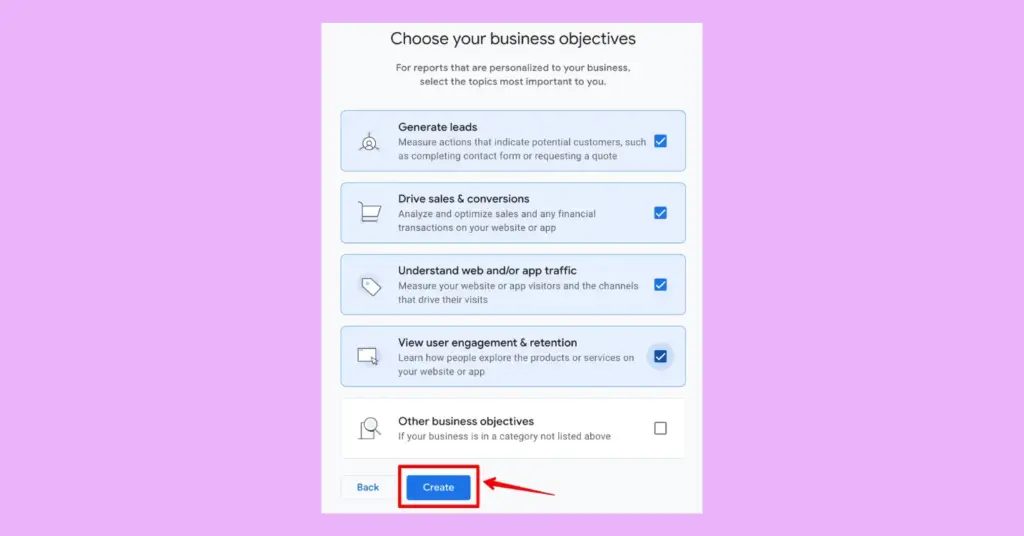
8. Now, Choose your business objectives; you can select multiple options and then hit the Create button
9. After that, the Google Analytics Terms of Service Agreement pop-up will appear, telling you to accept their terms and conditions

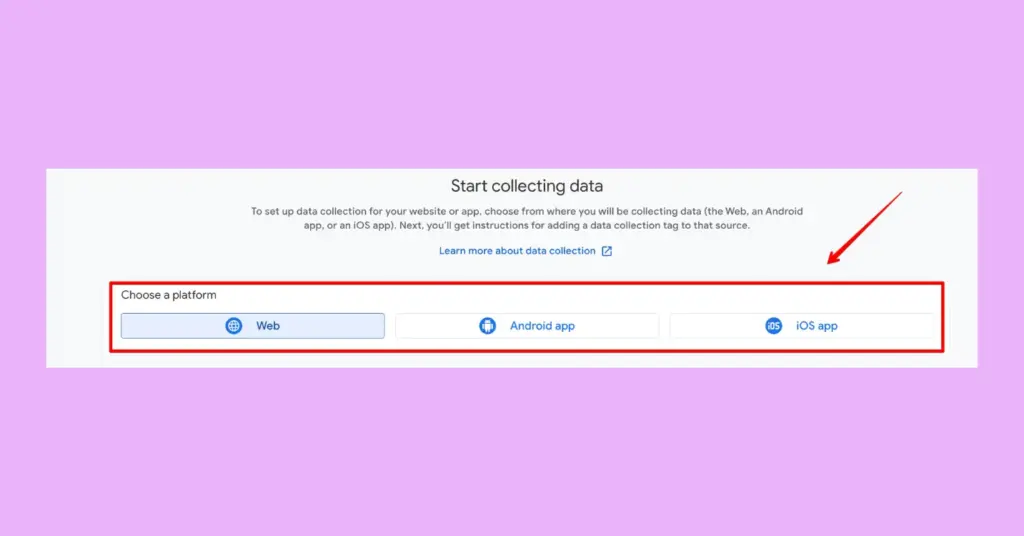
10. Next, you have to Choose a platform from where you want to collect data, and we will choose the Web as an example
11. Then, you need to Set up data stream by providing the Website URL and Stream Name, and after that, click on the Create & continue button
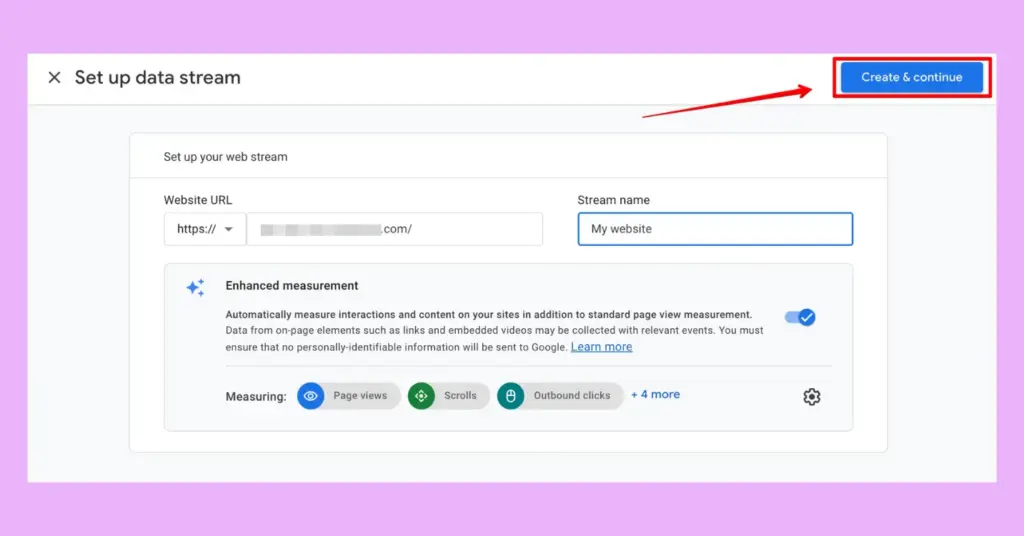
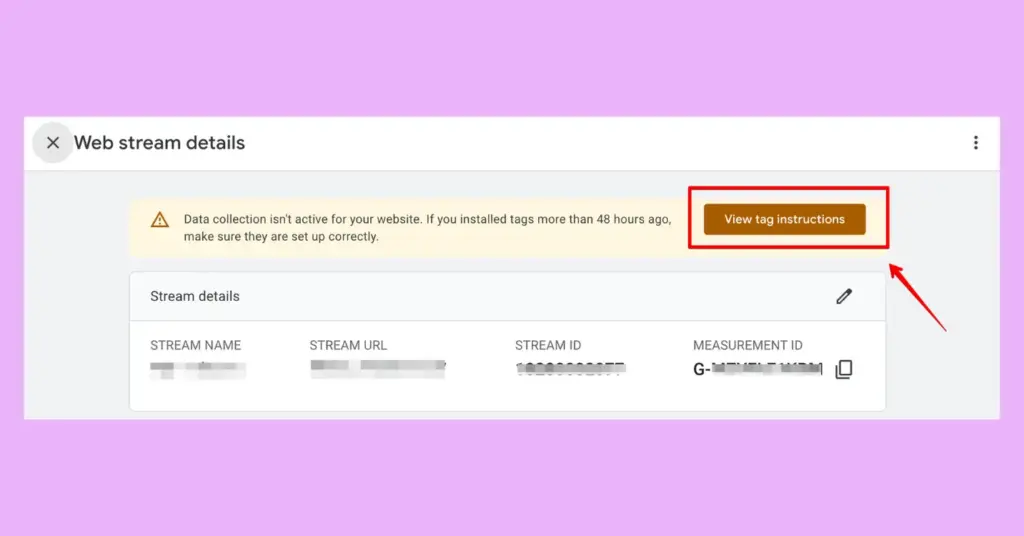
12. Now you will see the Web stream details screen indicating that your account has been created and show you the MEASUREMENT ID
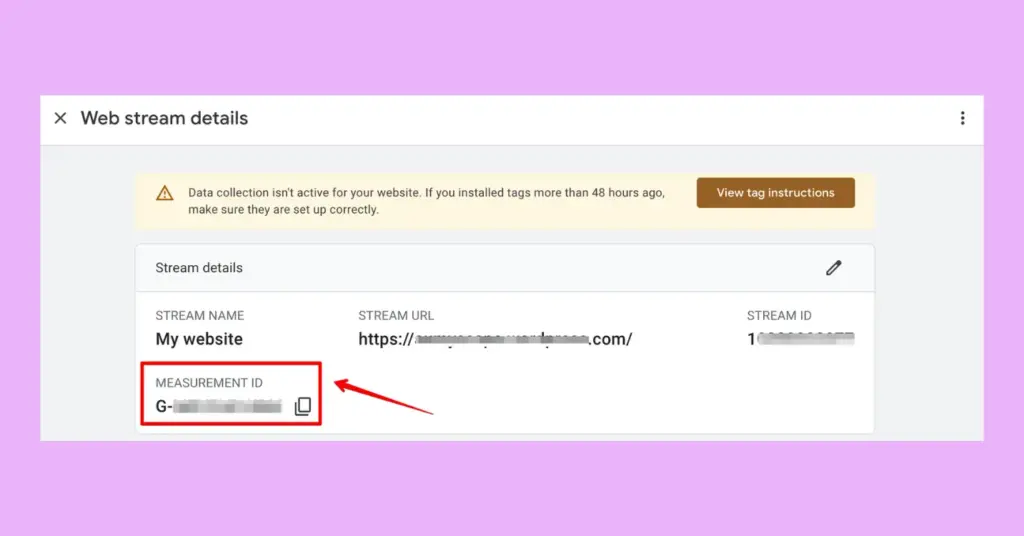
Congratulations! You’ve opened your first Google Analytics account.
P.S.: Keep this tab open; we’ll need the measurement ID later.
Methods to Add Google Analytics to WordPress
By now, you’ve prepared a Google Analytics account, ready to be added to your WordPress website. However, you have also noticed a warning.
The warning stays there because you haven’t added a Google tag yet. But don’t worry. It is pretty easy. Stay with us, and we will guide you through all the methods to do so.
How to add Google Analytics tag to WordPress
Remember the tab we told you to keep open?
If you click on the View tag instructions on the Web stream details tab, you’ll find two options to add Google Analytics tag:
- Install with a website builder or CMS
- Install manually
As our website builder or CMS is WordPress, the first option of adding Google Analytics tag will require using a plugin.
The second option, manual installation, is also available for WordPress, as it is an open-source platform. However, it’s a bit tedious and requires a little technical expertise.
Besides these two options, there is another way to connect Google Analytics 4 to WordPress websites with local hosting.
We will discuss all three methods in our next section. So, stay tuned.
How to add Google Analytics to WordPress with a plugin
The easiest and most straightforward way to add Google Analytics in WordPress is to use a plugin. When talking about plugins, the WordPress directory has more than 59,000 plugins.
There are many popular Google Analytics 4 WordPress plugins, such as Site Kit by Google, MonsterInsights, Analytify, ExactMatrics, and more.
Each has its own perks. However, as Site Kit by Google is the official Google Analytics 4 WordPress plugin, we will use that for demonstration.
Site Kit by Google is free and integrates data from several Google products. It automates most of the labor. Except for asking for permission sometimes, it does its job without making a fuss.
Now, let’s learn how to set up Google Analytics on WordPress using Site Kit by Google:
1. Log in to your website’s admin panel from: wordpress.org/wp-admin/
2. Click Plugins from the left side of your dashboard and select the Add New Plugin option
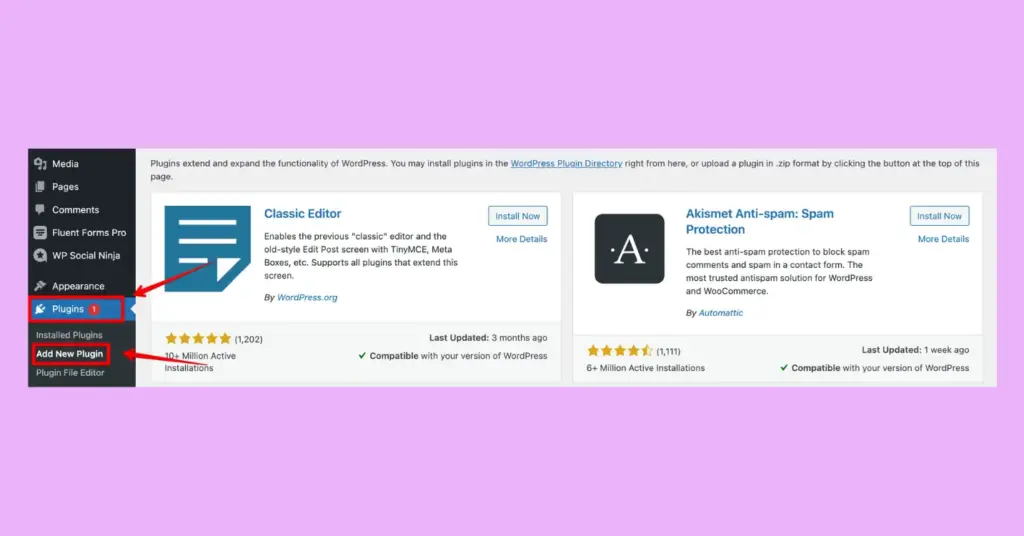
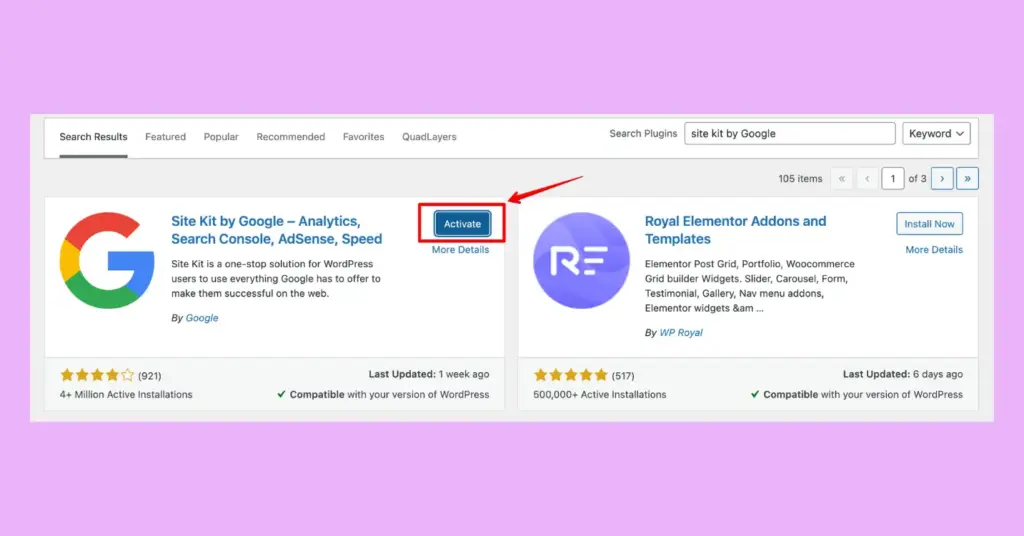
3. Type Site Kit by Google in the search bar, and the plugin will appear as the first result
4. Click on the Install Now button and then hit the Activate button
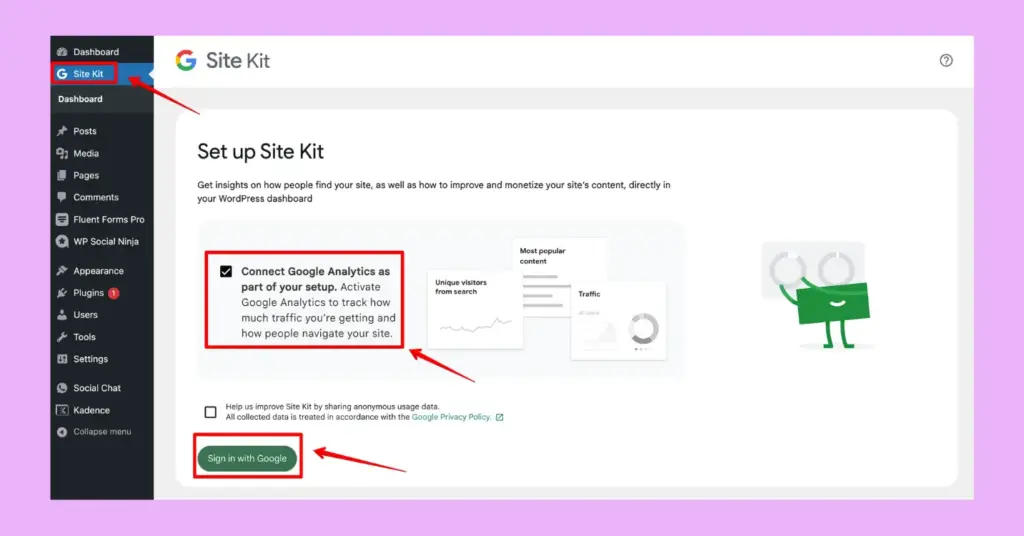
5. You’ll find Site Kit in your dashboard after activation, and then you have to click on it to start setting up Google Analytics on your WordPress website
6. Click the checkbox next to Connect Google Analytics as part of your setup, and then click Sign in with Google
7. Now, you need to complete the sign-up process by verifying that you’re the owner, giving the required access, and then clicking on the Next button
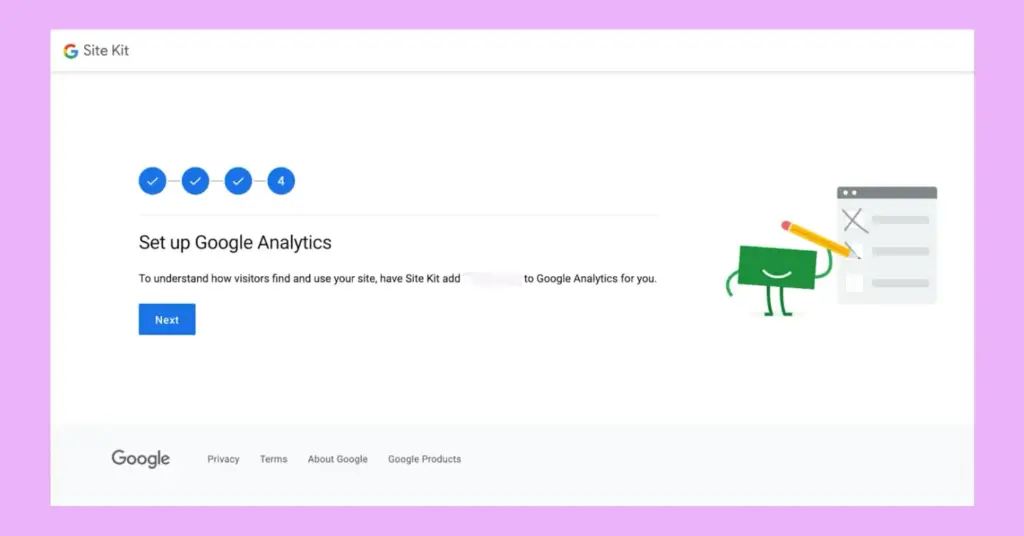
8. Site Kit will instantly connect with Google Analytics and show all the necessary account information, and then, you need to click the Complete setup button
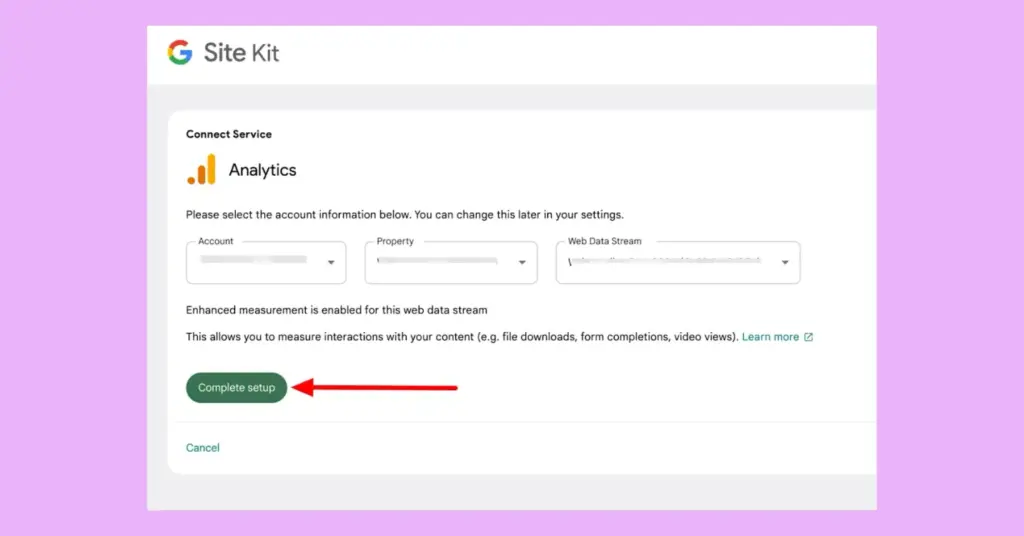
Hey, it’s done. If you have completed the steps with us, you’ve connected Google Analytics to your WordPress website, and you can now access all the information directly from your dashboard. Cool, right?
Bonus Tips: Don’t forget to check the best Google reviews plugin within your budget and also learn how Google reviews can help SEO.
How to add Google Analytics to WordPress manually
As mentioned earlier, manually installing Google Analytics on WordPress requires some technical expertise. To be honest, this process is a little hassle and hence not recommended.
Here are the challenges you might face while setting up Google Analytics on WordPress manually:
- The setup process is lengthy, time-consuming, and requires some familiarity with HTML
- Data accuracy can become an issue if not connected properly
- You can not access any data directly from your website; you need to open the Google Analytics dashboard for that
- A theme update may remove all the data and force you to install Google Analytics again from scratch
However, if you are still up for the challenge, we’re here for you.
We recommend you take the following precautions beforehand for manual installations:
- Back up your WordPress website before doing anything. That’s because any changes in your website might break your site. It’s safe to have backups.
- Install a child theme. Whenever you tweak anything in the parent theme, which we will do for manual installation, you risk losing data. A child theme will help you prevent that.
Let’s move on to the next steps if the precautions are taken. Now, you’ll need the Google Analytics tracking code for installations.

Get exclusive social media marketing tips and tutorials in your inbox!
How to find Google Analytics tracking code
1. Go to analytics.google.com and click Admin on the sidebar to the left
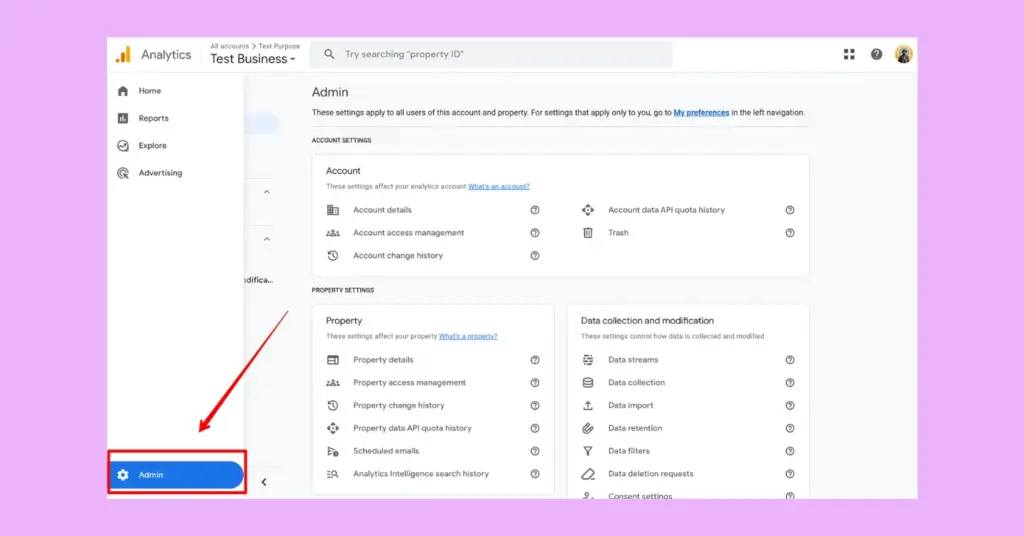
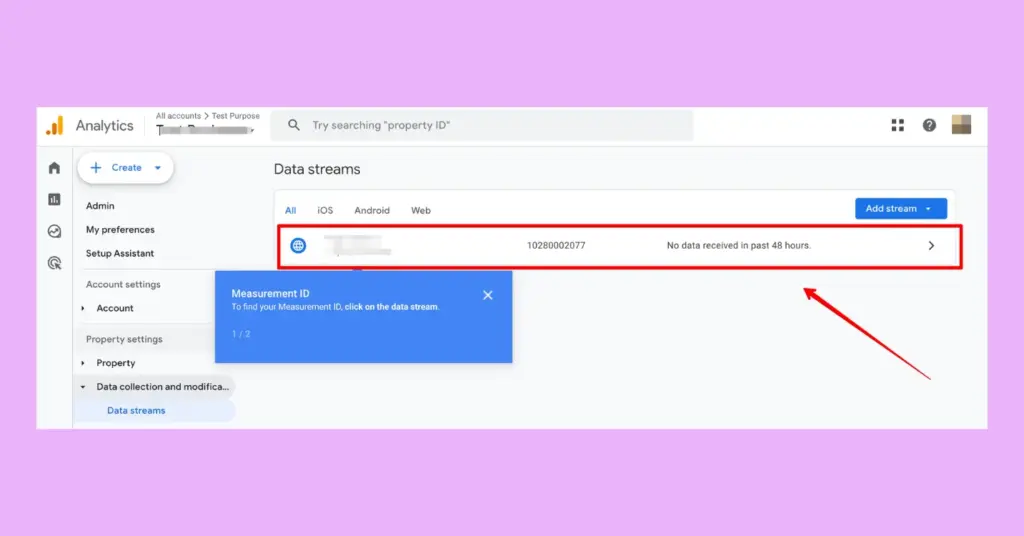
2. Click Data streams under the Data collection and modification section

3. Click the data stream you previously created
4. Click View tag instructions
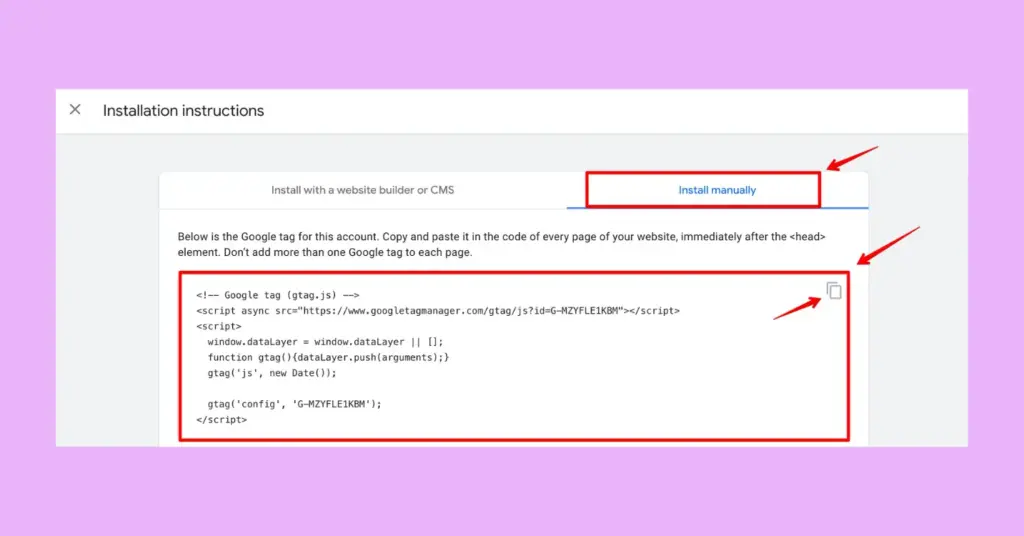
5. Select the Install manually option to find the Google Analytics tracking code and then click on the copy icon in the script box
Now that you have the Google Analytics tracking code, you have two options to add the Google tracking code to your WordPress website:
- Add Google tracking code to the header.php file
- Add Google tracking code to the functions.php file (recommended)
How to add Google Analytics tracking code to the header.php file of the WordPress website
1. Log in to your website’s admin panel: wordpress.org/wp-admin/
2. Click Appearance in the sidebar and select Theme File Editor

3. After that, you’ll see a warning, and you have to click on the I understand button
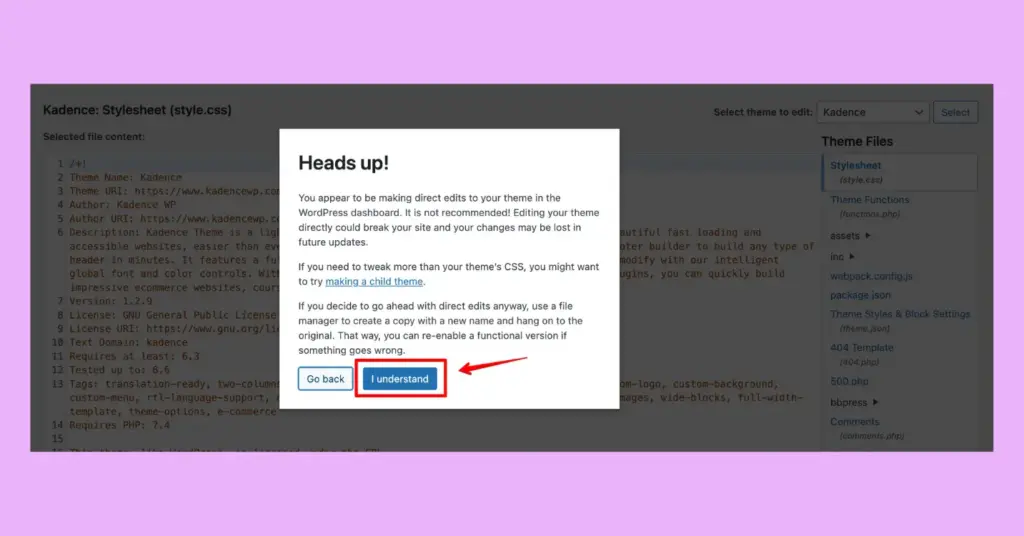
4. Click Theme Header (header.php) under the Theme Files section, paste the copied code right before the closing head tag (</head>), and click on the Update File button
And you’ve done it! You’ve successfully connected WordPress to Google Analytics.
Special Note: Wait for a few hours to get results after connecting WordPress to Google Analytics, as it might take up to 48 hours to activate.
How to add Google Analytics tracking code to the functions.php file of the WordPress website
1. Log in to your website’s admin panel: wordpress.org/wp-admin/
2. Click Appearance in the sidebar and select Theme File Editor
3. After that, you’ll see a warning, and you have to click on the I understand button
4. Click Theme Functions (functions.php) under the Theme Files section, and paste the following code snippet at the end:
function add_google_analytics() {
?>
<!– Google tag (gtag.js) –>
<script async src=”https://www.googletagmanager.com/gtag/js?id=G-XXXXXXXXXX”></script>
<script>
window.dataLayer = window.dataLayer || [];
function gtag(){dataLayer.push(arguments);}
gtag(‘js’, new Date());
gtag(‘config’, ‘G-XXXXXXXXXX’);
</script>
<?php
}
add_action(‘wp_head’, ‘add_google_analytics’);
5. Replace the G-XXXXXXXXXX with your Measurement ID and click Update File
You’re all set.
Special Note: Adding Google tracking code to the functions.php file is recommended because it can withstand theme updates and always provide accurate results.
How to connect Google Analytics 4 to WordPress in local hosting
There is another method to add Google Analytics to WordPress with local hosting. If you are troubled with site speed loading issues this can be a great choice.
In local hosting, the tracking script is loaded from your own server, which can be faster than loading it from Google’s servers.
However, debugging becomes a major issue while hosting tracking code locally, and it requires certain learning curves as you progress. Sometimes, local hosting may conflict with other plugins and cause you some headaches.
In any case, if you decide to go with this process, you can do it either using a Google Analytics plugin for WordPress for local hosting or through manual programming.
Manual programming should be avoided if you lack a good grasp of programming knowledge. Some popular Google Analytics 4 plugins for local hosting are CAOS, Analitify, or Perfmatters.
Considering the pros and cons of these Google Analytics plugins for WordPress, we’ve decided to go with CAOS (Complete Analytics Optimization Suite) as this WordPress GA4 plugin is quite lightweight and supports GA4.
Follow the below-mentioned steps:
1. Go to your WordPress dashboard: wordpress.org/wp-admin/
2. Head to the Plugins section and Install and Activate CAOS
3. Now, click on the Plugins button again, find CAOS, and click Settings
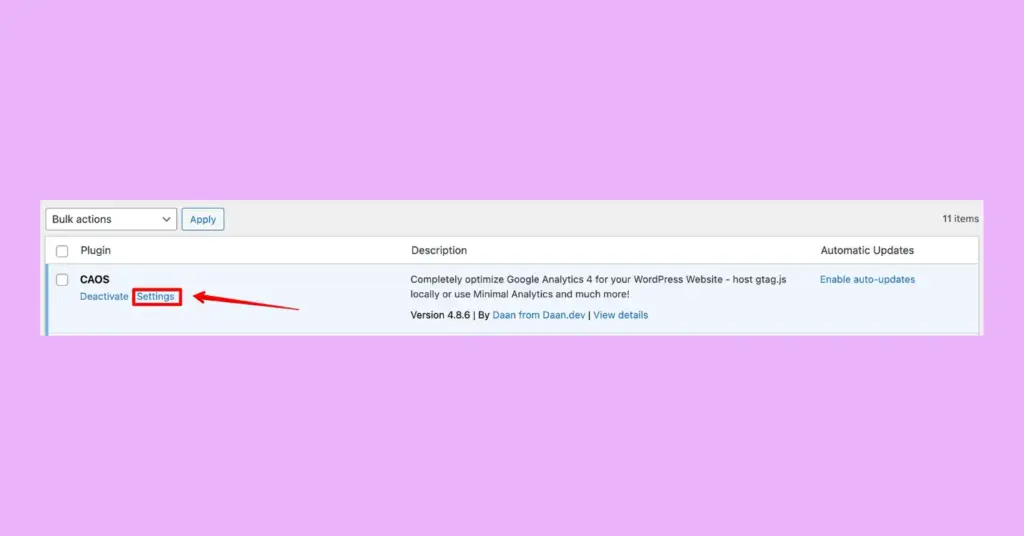
4. Enter your Measurement ID in the Basic Settings, and click on the Save Changes & Update button at the bottom

That’s it! You’re all set.
How to verify Google Analytics integration
As you’ve reached this section, you should have already chosen a suitable method to connect Google Analytics in WordPress. Now, it’s time to verify whether your setting up was a successful event or not.
You can easily verify your successful integration with the following steps:
1. Go to your Google Analytics dashboard
2. Click on the Realtime overview from the left sidebar
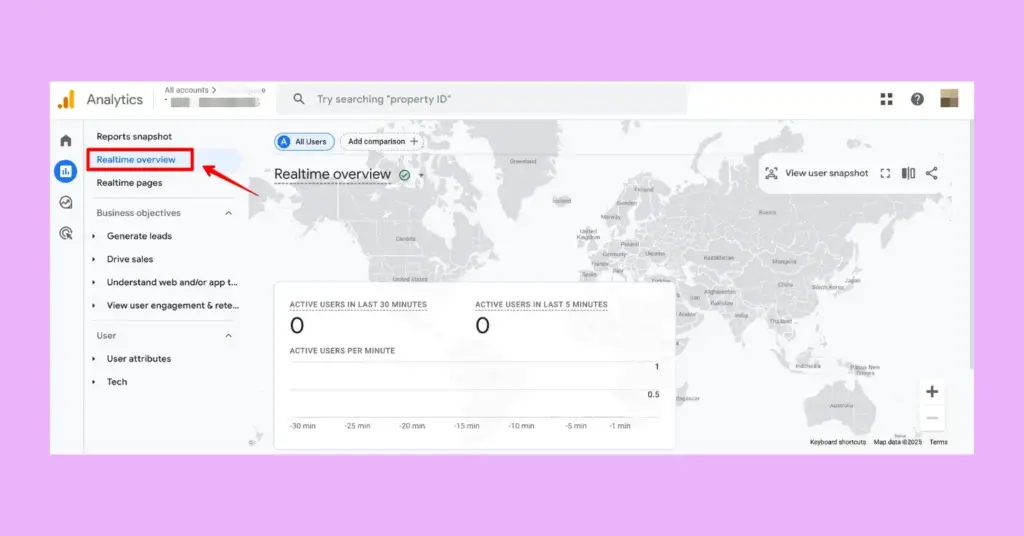
3. Visit your website in a separate browser window or incognito mode
Your visit should appear in the Real-Time reports within a few seconds. This means Google Analytics is tracking your activity, and your integration process is successful.
How to navigate Google Analytics report
Once you start using Google Analytics on WordPress, you’ll be bewitched by the amount and range of data it shows. It’s like finding Pandora’s box, and it knows everything.
However, Google Analytics may seem overwhelming at first. But once you understand the basic concept and grasp its interface well, everything will become easier. Let us help you with the basics.
First, go to your Google Analytics dashboard and select your Property. Now, take a look at our step-by-step breakdown of Google Analytics report.
1. Understand the Dashboard Structure
Google Analytics is organized into sections and subsections. The main sections are:
- Home: A quick overview of your site’s performance
- Reports: The core section where you’ll find detailed data
- Explore: Customizable reports and advanced analysis
- Advertising: Insights into ad performance (if linked to Google Ads)
2. Understanding Reports section
This is the main treasure trove of data. You’ll eventually spend more time here, and it’s divided into several categories and subcategories. Let’s learn about them.
A. Reports snapshot
- Provides a general overview of your traffic activities
B. Realtime (overview and pages)
- Shows what’s happening on your site right now
- Useful for tracking live user activity, such as active users, page views, and events
C. Life cycle (Acquisition, Engagement, Monetization, Retention)
- Acquisition: Tracks where your traffic is coming from (e.g., organic search, social media, paid ads)
- Engagement: Analyzes user behaviour, such as pageviews, events, and session duration
- Monetization: Tracks revenue and e-commerce performance (if set up)
- Retention: Measures how often old users return to your site
D. User (User attributes, Tech)
- User attributes: Provides insights into your audience, such as demographics, interests, and location
- Tech: Shows device types, browsers, and operating systems used by visitors
3. Understanding the Explore section
The Explore section is a powerful feature of GA4 to understand data deeply and diagnose advanced analysis. It provides a blank canvas to build custom reports by using various analytical techniques.
Take a look at some techniques:
- Free-form exploration: Create tables, bar charts, scatter plots, and more
- Funnel analysis: Track user journeys and identify drop-off points
- Path analysis: Visualize how users navigate through your site or app
- Segment overlap: Compare different user segments to find commonalities
- Cohort analysis: Analyze groups of users who share common characteristics
- User lifetime: Track user behavior over their entire life cycle
4. Important notes on customizing reports
- Date Range: Use the date picker in the top-right corner to analyze data for a specific period
- Segments: Compare different user groups (e.g., new vs. returning users)
- Secondary Dimension: Add additional data points to your report (e.g., city + device category)
- Filters: Narrow down data to focus on specific metrics or user behaviour
5. Interpreting key metrics
- Users: Total number of visitors
- Sessions: Total visits to your site
- Bounce rate: Percentage of users who leave after viewing only one page
- Average session duration: Average time users spend on your site
Okay, we have covered all the basics of Google Analytics on the WordPress website here. We understand this might feel too much to take, but you will get used to it.
How to troubleshoot common issues of Google Analytics on WordPress
Don’t get us wrong! But no matter how perfectly you pull out the installation process, problems can pop up at any time.
However, we will make sure that you can get over them. In this section, we will talk about some common issues that might bother you after connecting Google Analytics to WordPress and how to troubleshoot them.
- Incorrect tracking ID: Providing the wrong tracking ID while installing Google Analytics on WordPress will surely give you a lot of headaches later. You will face issues with fetching the correct data. So, make sure to provide the right ID.
- Duplicate tracking code: The more the better. But not here! If you install multiple tracking codes, your collected might be rigged. So, be careful about it.
- Incorrect placement: Make sure that you’ve placed the tracking code correctly when manually setting up Google Analytics on WordPress. If not, you risk failing integration and getting inaccurate data.
- Data discrepancies: Never forget to check for any data discrepancies that might arise from session time limits or filter applications. So, make sure that all your settings are fine-tuned, and you’ll be just fine.
- Check real-time reports: Always keep a close eye on the real-time reports in Google Analytics. And stay alert. If you get wind of something that might not be a little right, start looking for reasons. This will save you from big issues in the future.
- Clear browser cache: Browser cache can sometimes seriously mess up your data collection. So, keep your cache and cookies clear, and you will keep getting the most accurate data.
- Update plugins: Keep your plugins up to date, especially those which are used for adding Google Analytics to WordPress. Outdated plugins often tend to spoil things for you and create different technical issues.
Understand your website visitor better with Google Analytics
It’s time to wrap up our complete guide on how to add Google Analytics to WordPress. We designed this article to keep industrial jargon aside and provide an easy installation guide. Hopefully, installing Google Analytics on WordPress has become easier for you.
However, installation is the easiest part. The real challenges come from making smart decisions based on data, so we’ve also covered basic navigation.
The virtual world is a rough place, and that is a fact. But that doesn’t mean your website should get lost. Understanding your audience and adjusting marketing policy accordingly will always get you out of any bad situation.
Google Analytics on WordPress can become your biggest trump card in understanding your audience and outsmarting competitors. We hope our article becomes your perfect guideline. Take care.
Don’t forget to subscribe to our email newsletter if you want to learn awesome WordPress tips, tricks, and guidelines for upgrading your online presence.

Subscribe To Get
Weekly Email Newsletter
Connect, Customize, and Display Social Feeds, Reviews, and Chat widgets


Trending Posts
-

-
 Mashfik Upal Aumy
 -
 Mashfik Upal Aumy


Leave a Reply