How to Add & Display Google Review Badge on Your Website (Full Guide)


Your website may look great, and your products may be perfect, but visitors still pause before taking action. Why? Because they want to see proof that real customers trust you.
That’s where a Google Reviews Badge becomes powerful. It brings your Google star rating and honest customer feedback straight onto your website, giving visitors instant confidence without making them search for you on Google.
Think of it as a quick proof point that shows visitors you’re reliable from the very first glance. It could be placed on your homepage, product pages, or anywhere people make decisions. It shows your credibility the moment someone arrives.
In this guide, you’ll learn exactly what a Google Reviews Badge is, why it matters, and how to add one to your website quickly and easily.
What is a Google Review Badge?
A Google review badge is a simple visual label that shows your business’s Google rating, star count, and total number of reviews directly on your website. It gives visitors a quick snapshot of your reputation based on real customer experiences.
The badge updates automatically, so your rating always reflects the latest reviews without any effort. Whenever someone leaves a new Google review, the badge refreshes, keeping your social proof accurate and current.
What a typical Google reviews badge includes:
- Average star rating (like 4.8 out of 5 stars)
- Total review count (like “Based on 287 reviews”)
- Google logo for instant recognition
- Link to your Google Business Profile, where visitors can read full reviews
The badge showcases customer satisfaction, positioned on your website to build credibility when visitors are making decisions.
What makes Google review Badge so effective
Adding a Google 5 star review badge to your website gives you instant advantages that help visitors trust your business faster:
- Easy to set up: You don’t need coding or design skills. Just customize the badge in a visual editor and place it where you want.
- Always up to date: Your reviews sync automatically from your Google Business Profile, so new feedback appears on its own without any manual work.
- Clean, space-saving design: The badge fits neatly into any page. It adds credibility without crowding your layout or distracting users from your main content.
- Show as many reviews as you want: Whether you have a handful of reviews or thousands, the badge can display and handle them smoothly.
- SEO-friendly markup: The badge includes schema markup, which helps your star ratings appear in Google search results. This increases clicks and brings more organic traffic to a site.
You can have a read on our blog on Google Map Pack seo to make your business show up in the top positions of Google search!
How to get a Google review Badge (The simplest way)
Adding a Google review badge is easier than most people think, especially when you use a plugin built for it.
With WP Social Ninja, a Google reviews widget for WordPress, you can choose from different layout styles. The badge layout gives you a quick, compact way to highlight your Google rating right on your site, without touching any code.

To get started, make sure WP Social Ninja is installed on your site. If you need help, you can follow the steps from: How to Install Plugins for WordPress (3 Easy Ways)
Why WP Social Ninja makes adding Badges easier
WP Social Ninja lets you add reviews from 9+ popular sources, including Google Business Profile, Airbnb, AliExpress, WooCommerce, and more. You also get advanced, detailed settings that make it easy to organize, style, and manage reviews exactly the way you want on your WordPress website.
Here are the key advantages of using a Google review badge with WP Social Ninja:
No coding required: You can set everything up with a simple visual editor, so there’s nothing technical to worry about.
Multiple badge layouts: Choose the style that fits your site’s design instead of sticking to one fixed look.
Cross-platform support: If you use reviews from other channels, you can show them together with your Google reviews.
Automatic updates: New reviews appear on their own, so you don’t have to update the badge manually.
Customizable design: Adjust the colors and layout so the badge blends naturally with your brand.
Mobile responsive: The badge adjusts nicely on phones and tablets, keeping everything clear and readable.
Flexible badge placement: Display the badge where you prefer, floating at the bottom-left, bottom-right, top corners, or using the default position.
Add Google Review Badge on WordPress website with WP Social Ninja (Step-by-Step)
Here’s how to embed a Google review badge on your WordPress website in minutes.
Step 1: Connect your Google Business Profile
First, you need WP Social Ninja installed on your WordPress site. Once activated:
- Go to WP Social Ninja → Platforms in your WordPress dashboard
- Find Google Business Reviews in the Social Reviews list and click Connect
- Log in with your Google account and grant permission
- Paste the access code in WP Social Ninja and click Verify Code
- Select your business location (if you have multiple)
- Your Google reviews will now sync automatically and are ready to display using a template
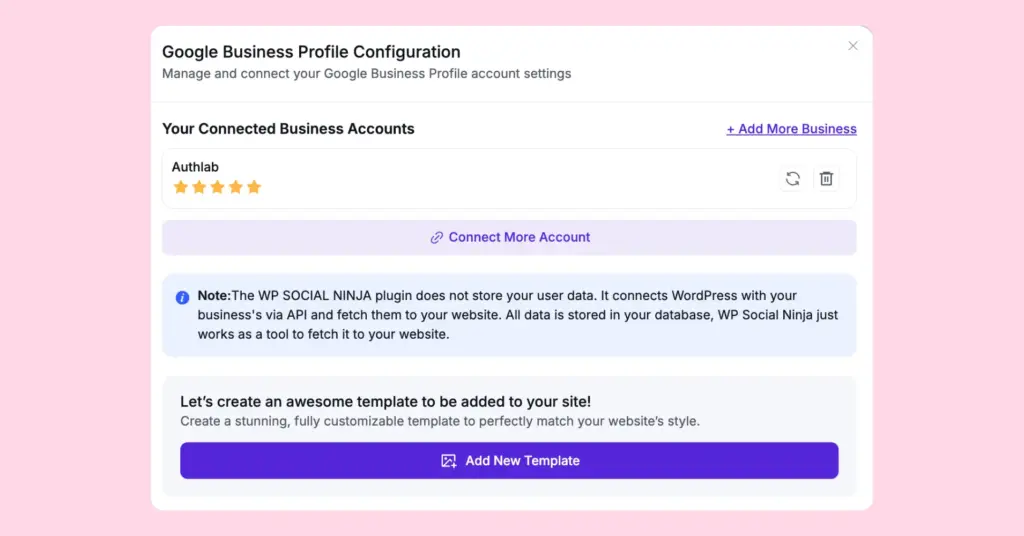
Done. WP Social Ninja now has access to pull your Google ratings and customer feedback. If you want to connect multiple accounts, you can connect them too, and if you need more help in configuration settings, check documentation.
Step 2: Create your Review template
Now it’s time to set up your badge display:
- Go to WP Social Ninja → Templates in your WordPress dashboard
- Click + Create Template
- Select Google Reviews as your platform
- Choose Badge from the template layout options
The visual template editor will open and let you customize the badge’s appearance exactly how you want.
Step 3: Customize your Badge design
Make the badge match your website’s branding:
- Template name: Give it a descriptive name like “Google Business Profile Template”
- Badge Template: Choose from multiple pre-designed badge template styles
- Style: Adjust background, text, and star colors
Badge settings:
Adjust your badge to fit your site perfectly:
- Badge Position: Choose the default, bottom-left, bottom-right, or floating top-left/top-right position
- Platform Icon: Option to display or hide the Google icon on the badge
- Custom Title: Add a title to make your badge more engaging
- Custom Button URL: Add a review button to collect more reviews. You can link it to a custom URL or a Fluent Form for easy review collection
Advanced Settings:
As you have the option to show all reviews, you can tweak your reviews settings:
- Rating filter: Display only 4-5 star reviews to highlight top feedback
- Filter reviews: Show or hide reviews containing specific words
- Adjust review length: Limit how many words or lines of each review appear for a cleaner look
- Reviewer details: Show or hide reviewer names, dates, and customize the format
- Verified Badge: Add a verified badge to make reviews appear authentic and trustworthy
- Schema Markup: Enable for SEO benefits and include your business details to improve search visibility
Preview in Dark Mode: While customizing your badge, you can preview how it looks in dark mode. WP Social Ninja lets you toggle between light and dark mode views right in the editor, so you can make sure your badge looks perfect regardless of your website’s theme or visitor preferences.
Simply click the dark mode toggle in the top corner of the preview panel, and watch your badge transform. Adjust style settings if needed to ensure readability and visual appeal in both modes.
Step 4: Save and embed your Badge
Once you’re happy with the design:
- Click Save Template
- Copy the shortcode from the top of the settings panel
- Paste the shortcode wherever you want the badge to appear
Your Google reviews badge is now live, displaying real-time customer ratings.
Win your customers’ hearts with exceptional features
Discover how WP Social Ninja can assist you in designing outstanding customer experiences.

Best placement for your Google Review Badge
Where you place your Google Review Badge can make a big difference. Put it where visitors see it easily, like your homepage, product pages, or checkout, to show trust, reassure customers, and help them make confident decisions.
Homepage: Place your badge in the hero section or just below. Visitors see immediate social proof the moment they visit your page.
Product pages: Position badges near “Add to Cart” buttons. This final reassurance converts hesitant browsers into buyers.
Checkout pages: Add a floating badge during checkout. It reduces cart abandonment by reminding customers that others trust you.
Landing pages: For paid traffic, badges near CTAs improve conversion rates significantly.
Want to stay private on Google? Learn how to leave anonymous-style reviews here: How to Leave An Anonymous Google Review
Add your Google Review Badge Today
Adding a Google Review Badge is one of the easiest ways to turn visitor hesitation into trust. With WP Social Ninja, you can display not just Google reviews, but feedback from multiple platforms like Facebook, Yelp, Airbnb, and more, all in beautifully designed badge templates.
Getting started is simple: connect your accounts, pick a badge template, customize it to match your brand, and embed it on key pages like your homepage, product pages, and checkout. With badges in place, visitors instantly see verified customer experiences, making them more confident to engage, purchase, or take action.
To learn more about Google’s guidelines so you can stay compliant and protect your Business Profile from penalties or removal, read our blog about Google review policy.
Your customers are already leaving Google reviews. Don’t let that social proof go unused. Display it prominently with a Google reviews badge and watch your credibility and conversions grow.
Common Questions About Google Review Badges
How do I get a Google review badge?
Connect your Google Business Profile to a reviews widget tool like WP Social Ninja, customize the badge design, and embed it on your website using a shortcode.
Can I customize the design of a Google review badge?
Yes. WP Social Ninja offers complete customization with colours, sizes, layouts, and display options to match your brand perfectly.
Are Google badges free?
Google reviews are free, and with WP Social Ninja, you can display a Google Review Badge on your website at no cost. The plugin lets you showcase verified reviews easily, with optional premium features if you want advanced customization.
How do I embed a Google review badge without coding skills?
Use WP Social Ninja’s visual editor and shortcode system. It doesn’t require any coding skill, just copy and paste a shortcode where you want the badge to appear.
What is the best way to collect Google reviews for a badge?
Make it easy for customers to leave reviews by:
- Sending review request emails after purchases
- Adding “Leave a Review” links on your website
- Using QR codes in physical locations
- Responding to existing reviews (encourages others)
Learn more from our blog: How to Ask for Google Reviews: 10+ Proven Ways to Get More Customer Feedback (With Templates)
What are the benefits of displaying a Google review badge on my site?
It builds trust, increases conversions, improves local SEO, encourages more reviews, saves time with automatic updates, and provides social proof at critical decision moments.

Subscribe To Get
Weekly Email Newsletter
Connect, Customize, and Display Social Feeds, Reviews, and Chat widgets


Trending Posts
-

-

-
 Mashfik Upal Aumy


Leave a Reply