


How to Add Google Review Button on Your Website (Complete Guide + Pro Tips)


You provide excellent service, yet your Google review count stays stubbornly low. Why does this happen?
Here’s the often-missed truth – your happy customers intend to leave a review, but the process on Google feels like solving a puzzle. They have to recall your business name, search for you online, hunt down the review button, and then actually write something.
By then, they’re distracted by a thousand other things. But if you add a Google review button right on your website, the scenario will be different!
With just one click, your customers land directly on your review page. No more searching, no confusion, and no reason for them to give up!
In this guide, you’ll discover how to put that Google review button on your website, either with basic HTML or automatically using a WordPress plugin like WP Social Ninja. We’ll also show you how to display those local business reviews using a Google reviews widget and share simple, practical tips on how to ask for reviews.
Let’s make getting reviews easy!
TL;DR
- A Google review button lets customers leave reviews instantly without searching for your business
- It makes leaving reviews quick and easy, boosting your chances of getting feedback
- Adding the button helps you collect more reviews consistently over time
- WP Social Ninja makes adding a Google review button to your WordPress site simple
- The plugin keeps your review counts updated automatically without extra work
- Place the button on thank-you pages, checkout pages, or contact pages for better results
- More reviews build trust, improve local SEO, and attract new customers
- Responding to reviews shows you care and encourages more people to share their feedback
What is a Google review button?
The Google Review button is a simple button on your website that takes customers directly to your Google review page with a click.
Instead of making customers search Google and click through pages to leave a review, a Google review button gives customers a direct and easy way to express their thoughts.
The best part is, you can see this button anywhere on your website. This can be on your homepage, product page, or a contact form. When customers click on the button, they are taken directly to Google’s review interface, where they can rate your business and share their experience without any hassle.
Why your business needs a Google review button
Let’s be cruelly honest, hoping customers will organically find and review your business is like waiting for rain in a desert. You might get lucky, but this is not a strategy on which you can rely.
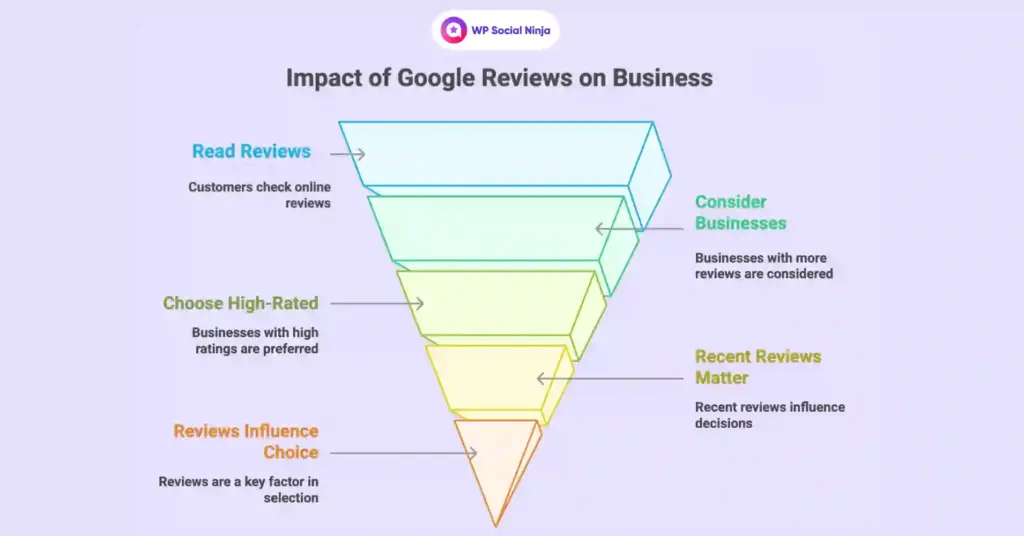
Here’s why you should add a review button on your website:
People leave a review with one click: Remember that last time you wanted to review a restaurant, but gave up because you could not get their Google listing? Your customers face the same frustration. A review button eliminates this friction. When someone clicks on your button, they are immediately taken to your review page, and you give a direct way to share your experience.
Ask for a review at the right time: Timing is crucial in the review collection strategy. Just delivered a product/service successfully? Add a review button on your Thanksgiving page. Customer downloaded the free resources? The right time for a review request. You are not interrupting their day – you are simply giving value to their positive response. Need a better way to ask for reviews? Start with a direct Google review link.
Make leaving a review feel natural: No one likes to be pressurized for a review. When you add the Google Review Button in the right locations on your website, it sounds like a favourable suggestion rather than begging. Your customers will not feel angry; they would really like to help.
Keep your button visible: You can place your Google review button anywhere. You can put it on different pages of your website or create a QR code for your business card. You have many ways to collect reviews, rather than relying on customers to find the hidden button.
Show you’re confident & invite feedback: Businesses that proudly display “Review us on Google” button send a powerful message that they’re confident in their own service and they welcome honest feedback. This transparency builds trust even before visitors become customers.
The takeaway? Customers won’t go out of their way to leave reviews. However, if you make it extremely easy, they’ll be happy to help your business grow.
Don’t let valuable feedback slip away! Discover step-by-step instructions on how to see Google reviews and use them to grow your business.
3 Ways to add a Google review button to your website
It is easy to add Google review buttons to your website. You have three simple options to choose from. They are all effective, but each is best for a different skill level and business requirement.
This guide will help you choose the perfect one for you.
Manual (no plugin required): This is your DIY route. Perfect for the hands-on business owner who wants to do everything manually. You’ll generate a Google review link and embed a custom button yourself using simple HTML code. It’s free and straightforward. Great for small businesses, single landing pages, or anyone who wants to try it out first before investing in other options.
With a WordPress plugin (the easiest one): This is the easiest option for WordPress users. You’ll get professional-looking buttons, automatic updates, advanced customization options, and features like QR code generation that help you collect reviews more conveniently. If you want to add a Google review button for a website without dealing with code, this method works best.
Using Google Places API (Advanced): This method is best for developers or businesses that need something custom-built for their specific situation. You’ll have unlimited control over design, functionality, and integration, but you’ll need technical skills and more time to make it happen.
No matter which path you choose, you’ll end up with the same goal – happy customers clicking one button and landing directly on your Google review page. We’ll go through each method so you can pick your perfect match.
Photo reviews are important for a business. So, if you are a consumer and want to leave review on a Google business, read the blog: How to Add and Delete Photos from Google Reviews on Desktop & Mobile.
Method 1: Add a Google review button manually (Custom HTML)
If you’re comfortable pasting code into your site, this is the fastest way without installing anything.
Step 1: Find your Place ID
Open Google’s official Place ID Finder. Type your business name into the map search. Click the marker that appears on your business. The Place ID shows up in a tooltip; it looks like ‘Ch*********************Y4. Copy it.
Step 2: Build your Google review link
Use this format:
Replace YOUR_PLACE_ID with the ID you just copied. Test the link in a fresh browser tab; it should open the Google review form for your business.
Note: The older “https://www.google.com/maps/place/…/data=reviewsection” format stopped working reliably in late 2024. Use the writereview endpoint above. It’s the format Google’s own Business Profile Help recommends.
Step 3: Wrap the link in an HTML button
Copy this code:
<a href=”https://search.google.com/local/writereview?placeid=YOUR_PLACE_ID”
target=”_blank”
rel=”noopener”
style=”background-color:#4285f4; color:#ffffff; padding:12px 24px;
text-decoration:none; border-radius:6px; font-family:Arial, sans-serif;
font-weight:bold; display:inline-block;”>
Write a Google Review
</a>
Paste this anywhere on your site; it could be a page, a post, a footer widget, or a thank-you template. Change the button text, colour, and corner radius to match your brand.
Pros: Free, requires no plugin, works on any platform (WordPress, Shopify, Wix, plain HTML).
Cons: You manage the link by hand. There will be no live review count, no auto-sync, no schema markup, and no QR code. If Google changes the URL format again, you’ll have to update every button manually.
Method 2: Add a Google review button using WP Social Ninja (Easiest)
If your site runs on WordPress, this is the route that scales. WP Social Ninja is a WordPress Google review plugin that handles the button, the review display, the schema markup, and the QR code from one dashboard.
Step 1: Install and activate the plugin
In your WordPress admin, go to Plugins → Add New, search for WP Social Ninja, click Install, then Activate. The free version handles everything in this guide.
Step 2: Connect your Google Business Profile
From the WordPress sidebar, open WP Social Ninja → Business Reviews → Google. Click Configure, then follow the prompts to authenticate your Google Business Profile.
If you manage more than one business, you can connect them all and pull reviews from each into a single template.
Step 3: Build the review template
Go to Templates → Add New. Pick a Layout Type (Grid, Slider, List, Masonry, or Badge), then choose how many reviews to show and which star ratings to filter by.
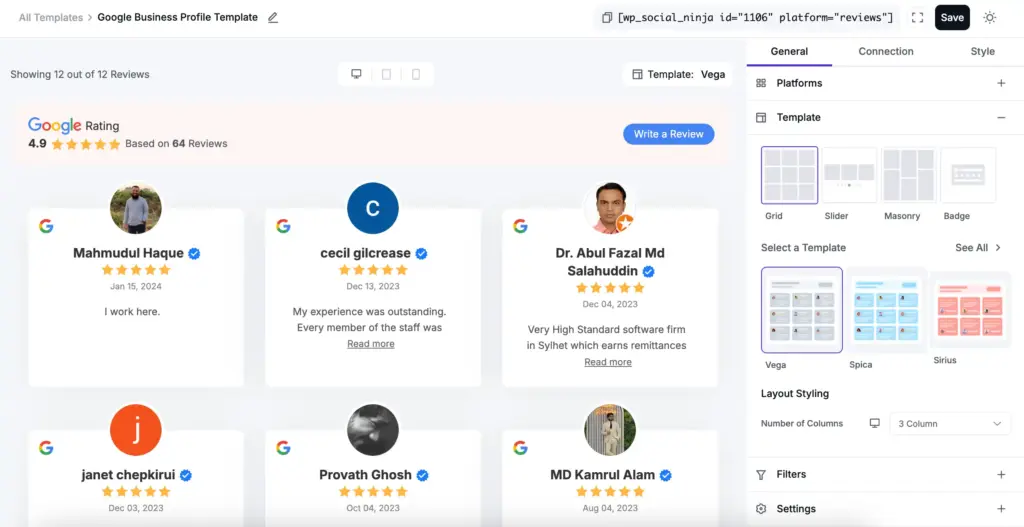
You can also turn on the AI review summarizer, which condenses your reviews into a one-paragraph summary visitors can read at a glance.
Step 4: Turn on the “Write a Review” button
In template settings, enable Display Header. This adds your average rating, total review count, and the review CTA button to the top of the embed.

Change the button text to whatever fits your tone, like “Write a Google Review”, “Share Your Experience”, “Leave Feedback”. You can also paste a custom URL if you want the button pointing somewhere other than your Google review page.
Step 5: Style the button and embed via shortcode
Open the Style tab. Adjust the button colour, hover colour, font, padding, and border radius. When the template looks right, save it. WP Social Ninja generates a shortcode like Provided platform name is not valid.. Paste that shortcode into any page, post, or widget area.
Pro tip: Generate a QR code for offline review collection
From WP Social Ninja → Settings → Get Reviews via QR Code, click Add New, name your code, pick Google as the platform, click Generate, then download the PNG. Print it on receipts, table tents, business cards, or a sticker near the register.
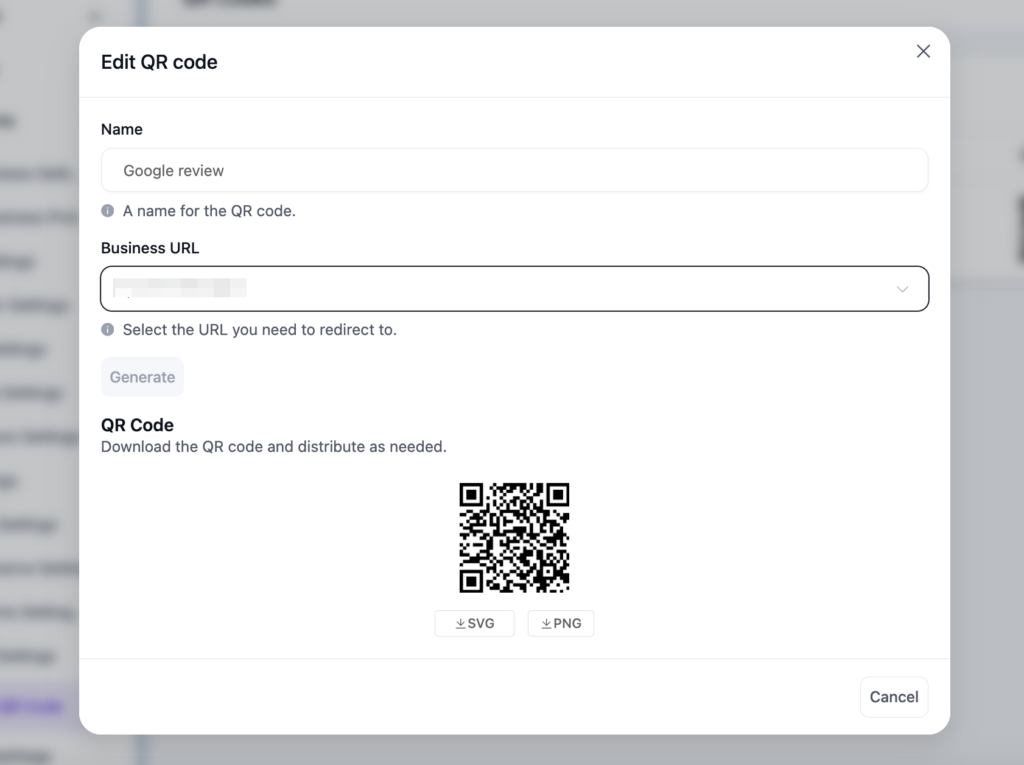
The plugin tracks scan counts so you can see which placements bring in the most feedback. Full instructions are in the QR code reviews documentation.
Using Elementor? See how to add a Google reviews widget in Elementor in under three minutes.
Method 3: Add a Google review button using the Google Places API (Developers)
This method is best for developers who want to build a custom review button or display Google review data on a custom-built website or application instead of using WordPress plugins.
Step 1: Create a Google Cloud project
Open the Google Cloud Console, create a new project, then in APIs & Services → Library, enable Places API (New).
Step 2: Generate an API key
Go to APIs & Services → Credentials, click Create Credentials → API Key. Restrict the key to Places API and to your domain. This stops anyone else from running up your quota.
Step 3: Build the button.
- Find your business Place ID with Google’s Place ID Finder
- Include the Places JavaScript library on your page
- Call the Places API with your API key and Place ID to confirm the business is reachable
- Construct the review URL: https://search.google.com/local/writereview?placeid=PLACE_ID
- Create an HTML button and link it to the review URL so customers can open the Google review form directly
For a full code walkthrough, see our guide on how to generate a Google Places API key.If you are new to Google APIs, our detailed guide on how to generate a Google Places API key will show you through enabling the Places API, create credentials, restrict API usage securely, and connect your business properly step by step.
Why most WordPress users pick the plugin route
The manual method is free, the API method is flexible; but if you’re on WordPress and want the button to keep working without monthly maintenance, WP Social Ninja saves time.
Here’s what you can get with this plugin:
- Auto-sync reviews: Automatically sync new reviews from your Google Business Profile directly to your website without manual updates.
- Built-in schema markup: Help search engines understand your reviews and improve the visibility of star ratings in Google search results.
- GDPR-compliant display: Show customer reviews in a privacy-friendly way that supports GDPR and data protection requirements.
- Multi-platform review support: Connect and display reviews from 9+ platforms, including Google, Facebook, Airbnb, Amazon, AliExpress, Booking.com, Tripadvisor, WooCommerce, Yelp and FluentCart.
- Custom review collection: Add testimonials and reviews collected outside Google, such as offline feedback, emails, or direct customer submissions.
- Import and export options: Easily transfer reviews when migrating your website or managing multiple WordPress installations.
If you want to preview it before installing, the WP Social Ninja demo showcases Google reviews in different template styles, so you can see how they would appear on a website.
Best Practices for a Google review button that actually gets clicks
A Google review button performs best when its placement, design, and wording match real customer behavior. The practices below focus on the small changes that improve visibility and increase clicks.
Put the button where satisfaction peaks: Thank-you pages, order-confirmation pages, post-service emails. Not on the homepage above the fold; that’s too early in the journey.
Make it look clickable: Contrasting color, enough padding to tap on mobile (44px minimum), and a subtle hover state. A grey ghost button blends in and gets ignored.
Test the button text: “Leave a review” is fine. “Share your experience” is warmer. “Help others find us” is the highest converter we’ve seen on WordPress sites. A/B test if you have the traffic.Pair the button with the reviews you already have: When visitors see real five-star customer reviews above the button, they are more likely to trust your business and leave a review themselves. See our guide on displaying Google reviews to learn which layouts and placements work best.
Your next step: Add the button this week
Adding a Google review button is one of the cheapest, fastest reputation moves a small business can make. You already have happy customers. The button just removes the last bit of friction between them and a five-star review.
Pick your method:
- Manual HTML, if you want it live in five minutes and don’t need ongoing sync
- WP Social Ninja, if you’re on WordPress and want the button, the display, the QR code, and the schema in one plugin
- Places API, if you’re building something custom and need full control
When visitors see real five-star customer reviews above the button, they are more likely to trust your business and leave a review themselves. Pairing this with the right approach for how to ask for Google reviews can improve both clicks and review conversions.
FAQ
What’s The Difference Between A Manual And A Plugin-Based Review Button?
A manual review button requires you to create HTML code and maintain the links yourself, while a plugin-based solution like WP Social Ninja automatically manages the connection to your Google Business Profile, provides customization options, displays reviews, and includes additional features like testimonials, adding social feeds, chat widgets, and more. Manual buttons are free but require more maintenance, while plugins offer convenience and advanced functionality.
Can I Embed a QR Code for Review?
Yes! QR codes are excellent for bridging offline and online interactions. WP Social Ninja includes QR code generation that creates scannable codes linking directly to your Google review page. You can use these QR codes on business cards, receipts, or any physical marketing material to make it easy for customers to leave reviews.
Where Is The Write a Review Button on Google?
On your Google Business Profile, the “Write a review” button appears when customers view your business listing on Google Maps or Google Search. It’s typically located near your business name and rating. When customers click this button, they can rate your business and leave a written review.
How Do I Add A Google Review Badge?
A Google review badge typically displays your current rating and review count on your website. When you use WP Social Ninja and connect your Google Business Profile, you can add a review badge by selecting the ‘Badge’ template in the ‘Layout type’ option.
Why Don’t I See a Review Button on My Google Profile?
If your Google Business Profile doesn’t show a review button, it might be because your business category doesn’t allow reviews (like some government organizations), your profile isn’t fully verified, or there are temporary technical issues. Ensure your Google Business Profile is claimed, verified, and complete. If you need more help, contact Google My Business support for assistance.

Subscribe To Get
Weekly Email Newsletter
Connect, Customize, and Display Social Feeds, Reviews, and Chat widgets









Leave a Reply