
How to Add Badge Template to Your WordPress Website (Easy)


Building trust online doesn’t happen automatically. People look for real proof before they decide to buy, book, or contact you. A badge template helps you show that proof in a clear and professional way.
It’s a small review display you can add to your WordPress website to highlight your star rating, total number of reviews, and platform logos (for example: Google, Facebook, Yelp), all in one compact design.
Instead of overwhelming visitors with lengthy review sections, a badge template presents the most important information at a glance, keeping your layout clean and focused.
Review badges work as instant reassurance. They show that real customers have shared positive experiences with your business. This simple visual cue can influence decisions faster than long explanations.
In this guide, you’ll learn what a badge template is, why it matters, and how to easily add a WordPress trust badge to your site to build credibility and improve conversions.
TL;DR
- A badge template is a compact review display that shows your star rating, total reviews, and platform logo in one small block, ideal for building trust without cluttering your page.
- Review badges work as instant social proof, reducing visitor hesitation and increasing conversions before they even read your content.
- Badge layout is best for quick trust signals near CTAs, sidebars, or headers; grid/slider layout is better for testimonial pages where visitors want full reviews.
- To add a badge template in WordPress, use WP Social Ninja: install the plugin, connect your review platform, create a new feed, select the Badge template, customize the design, and embed it via shortcode.
- Best placements for your review badge: homepage hero section, product pages (near the price), checkout page.
What is a Badge Template?
A badge template is a small review badge you add to your website to quickly show visitors how people rate your business. Instead of filling the page with multiple reviews, it shows the important proof, your star rating, total reviews, and platform logo in a neat little button or floating corner box.
Common badge template elements:
- Overall star rating (example: 4.8 out of 5)
- Total number of reviews (example: Based on 287 reviews)
- Platform icons (Google, Facebook, Yelp logos)
Badge templates are also called review badges, start rating badges, trust badges, or floating review badges, depending on their placement and design.
Why do you need a badge template?
A review badge is often the first thing that reassures visitors they’re in the right place. Let’s see why you need a badge template.
Builds instant credibility: People notice your star rating the moment they visit your site, so they already feel more comfortable before reading anything else.
Keeps your page clean: Instead of filling the page with long review sections, a small badge sits neatly in a corner but still lets visitors open the reviews anytime.
Gives proof without being annoying: The badge quietly sits on the page, letting visitors see your reviews only when they want to. No popups, no interruptions.
Increases conversion rates: When shoppers see real feedback from others, their hesitation drops, and they’re more ready to buy or contact you.
Stays with them everywhere: From homepage to checkout, the badge keeps reminding visitors they’re choosing something others already trust.
Badge Layout vs. Grid Layout: Which One Should You Use?
Not sure whether to use a badge or a full review grid? Here’s how to decide. The right layout depends on your goal, and in most cases, the smartest choice is to use both together.
Badge Layout
A badge is compact and simple. It shows your star rating, review count, and platform logo in a small space. It works best near call-to-action buttons, in sidebars, headers, or as a floating element. Because it’s always visible without taking up much room, it constantly increases trust.
Grid or Slider Layout
A grid or slider layout displays multiple full reviews with customer names, photos, and detailed feedback. It’s ideal for testimonial pages, product landing pages, or service pages where visitors want more in-depth social proof before making a decision.
Best Approach
Use a badge for instant trust signals throughout your site, and a grid or slider where visitors need deeper social proof. For most WordPress sites, place the badge near CTAs and the grid or slider on your testimonial widgets or landing page. Using both together gives maximum coverage without cluttering any single page.
Check out WP Social Ninja’s full set of social reviews features. See how you can display reviews from Google, Facebook, Yelp, and more to build trust and boost your site.
How to add a badge template to your WordPress website?
For this tutorial, we’ll use WP Social Ninja, a WordPress plugin that connects to 10+ review platforms like Google, Facebook, and Yelp, and lets you display reviews in multiple layouts, including badge, grid, and slider.

Let’s see how to do that:
Step 1: Connect Your Review Platforms
Select the platforms you want to pull reviews from and connect your accounts. For this example, we’re using Airbnb, Google, and AliExpress.
Step 2: Select the Badge Template
From your WP Social Ninja editor settings panel, select Template -> Badge.
Once you select Badge, it has a detailed filter section too. So you can adjust the reviews and design the badge template the way you want.
Select a Badge; you have two options: Badge 1 and Badge 2.
Step 3: Configure Badge Template Settings
Now you can proceed to the next section, the in-depth Badge settings, where you can adjust the display of your floating badge template.
Badge Position
The badge template lets you change your badge position. Select from Float Left Bottom to Float Right Bottom. Also, you can place it on Float Top Left or Float Top Right.
We’ve selected Float Top Right, you can select any!
Display Platform Icon
The badge widget comes with a detailed filter option. You can even control the platform icons.
As you can see, the badge is showing Airbnb, Google, and AliExpress icons. It’s because the platform icon button is enabled.
Custom Title
After you’ve enabled the platform icon, you can give a Custom Title to your review badge widget.
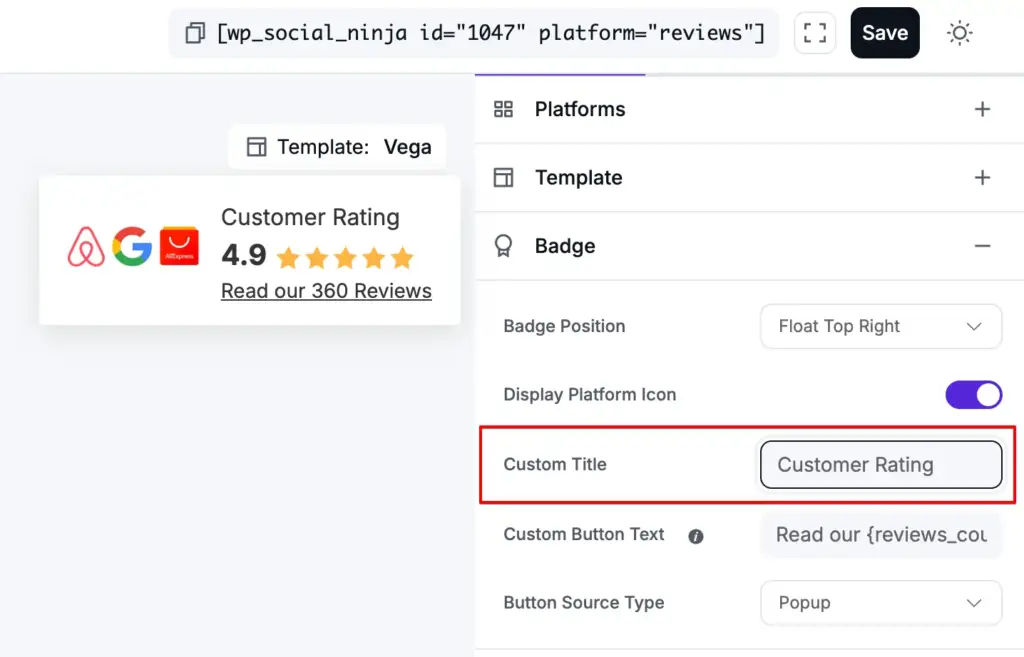
Give an appropriate title that suits your brand and highlights the reviews properly.
Custom Button Text
In this area, {reviews_count} shortcode is set to show a dynamic value in a text. You can add your own words around it, like “Read our {reviews_count} reviews”, to make the badge more clickable and eye-catching.
Button Source Type
Next, you can set the reviews button source type, which will let you select the way how you want to show your reviews through the button.
You’ll find options like Popup, to display your reviews in a popup box, Page to redirect your visitors to your specific review page. Or, you can set your specific page URL if you choose Custom URL, or you can just showcase your reviews by using Fluent Form Shortcode ID.
Step 4: Style Your Badge
After setting up the basics, you can adjust the design to match your brand and make the badge look polished on your site. Change the background color, font style, spacing, and hover effects to make it feel more aligned with your website’s overall look.
Step 5: Save and Preview
Lastly, once you are done, don’t forget to click on the Save button to preserve all your settings. Copy the shortcode and paste it on your WordPress website.
That’s how you can adjust your badge template. And not just that, you can also Filter, add in-depth Settings, fix Header, Pagination, and the Schema Snippet perfectly.
Win your customers’ hearts with exceptional features
Discover how WP Social Ninja can assist you in designing outstanding customer experiences.

Bonus tips: Where to Place Review Badges on Your Website
Placing your WordPress badges in the right spots helps them make the biggest impact.
Here’s where they get the most attention and boost conversions:
Homepage Hero Section
Place a rating badge close to your headline or main call-to-action so visitors notice it right away. The top-right area usually works best because eyes naturally scan there first.
Product Pages
On product pages, people look for reassurance before buying. Add the badge near the product title or just under the price so it supports the purchase decision.
Checkout Pages
Right before payment is where doubts appear. Show a small badge near the order summary or payment button to remind visitors that others trusted you too.
Service Pages
For services, trust builds while reading details. A badge fits well beside key information like pricing, guarantees, or booking buttons.
Contact Pages
When someone is about to reach out, reviews provide final confidence. Place the badge above the form or next to the contact button so they see it before taking action.
Turn long reviews and posts into clear, easy-to-read summaries with AI Summarizer. Save time, highlight what matters most, and keep your visitors engaged.
Final words
Now you know how to add a badge template to your WordPress site. It shows your best reviews in a small, space-saving way while giving visitors instant trust. Your badge template is now live on your WordPress site, helping you highlight social proof without cluttering your pages.
Want to do even more? Explore WP Social Ninja to display reviews from multiple platforms and make your website more credible and engaging.
Don’t forget to check out these resources:
- Why is Schema Markup Important for WordPress Websites?
- How to Add Notification Popup to Your Website with WP Social Ninja
If you found this blog impactful, follow us on X(Twitter) and Facebook and connect with us on YouTube and the Facebook Community.
FAQ
What is a badge template in WordPress?
A badge template is a small review display you add to your WordPress site to show your rating and total reviews. It usually appears as a floating or fixed badge that visitors can click to see more details. It helps show trust without taking up much space.
Are review badges good for SEO?
Yes, indirectly. Review badges can improve click-through rates and keep visitors on your site longer, which helps SEO. If set up with proper schema, they may also show star ratings in search results.
Where should I place review badges on my site?
Place them where trust matters most: homepage, product pages, checkout pages, or contact forms. The goal is to show reviews right before visitors make a decision. Keep them visible but not distracting.
Do badges increase conversions?
They can. When visitors see real reviews, they feel more confident about buying or contacting you. That extra trust often reduces hesitation.
What’s the difference between a badge and a star rating widget?
A badge is usually a compact, clickable review summary that may include platform logos and total reviews. A star rating widget mainly shows just the star score. Badges provide more context, while star widgets focus only on ratings.

Subscribe To Get
Weekly Email Newsletter
Connect, Customize, and Display Social Feeds, Reviews, and Chat widgets


Trending Posts
-

-

-
 Mashfik Upal Aumy


Leave a Reply