


How to Set Instagram Feed Layout & Styling in WordPress


Once your Instagram account is connected to WP Social Ninja, the layout is where you decide how the feed actually looks on your site. The grid, the templates, the header, and what visitors can do with each post. This guide walks through every setting in the feed editor, top to bottom, so you can build a feed that matches your brand without touching code.
We will cover the full General tab, note which options need Pro, and point you to the right place for deeper styling. Set aside about ten minutes.
Before you start
You need two things in place first. Connect your Instagram account. If you have not done this yet, follow our guide on how to add Instagram feeds to your WordPress site. You can connect a Business Basic account, a Business Advanced account, or add a token manually. The full connection steps are in the Instagram configuration docs.
Open a feed template. From your WordPress dashboard, go to WP Social Ninja, then Templates, then the Social Feeds tab, and click Add New Template (or open an existing Instagram template to edit it).
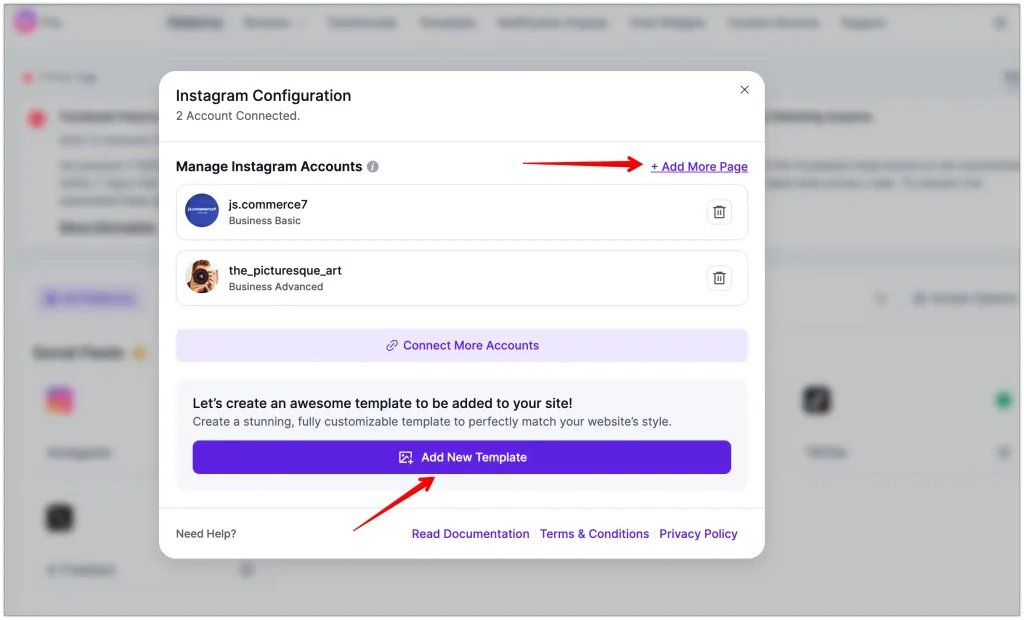
Inside the editor, you will see three tabs at the top right: General, Connection, and Style. The General tab controls what the feed shows and how it is laid out.
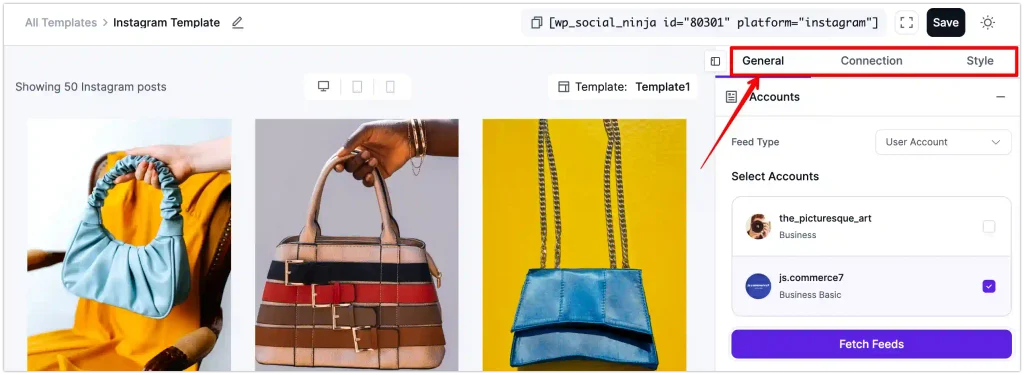
The Style tab controls colors and fonts. The Connection tab lets you add another account without leaving the editor. This guide focuses on the General tab and Style, which is where the layout lives.
A live preview sits next to the panel and updates as you change settings, and every change is saved when you click Save Template.
Configure the Instagram feed layout and styling step by step
With your account connected and the template editor open, you are ready to build the feed. The steps below follow the General tab from top to bottom.
Work through them in order and watch the live preview update as you go. Each step is self-contained, so you can skip any setting you do not need and come back to it later.
Step 1: Choose the feed source
Open the Accounts section. This is where you tell the feed what to pull.
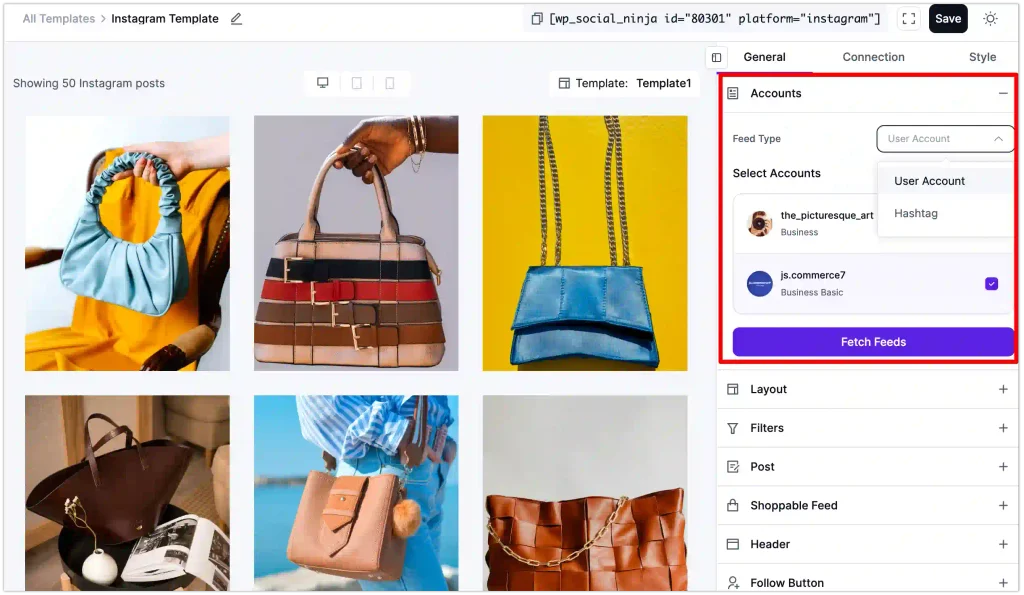
Set the Feed Type. You have two options:
- User Account: Pulls posts from a connected profile. This is the standard choice for most sites.
- Hashtag: Pulls posts tagged with a hashtag. This one requires an Instagram Business account.
Pick your account under Select Accounts, then click Fetch Feeds. Your posts load into the preview right away. You can connect and fetch from more than one account if you want to combine profiles.
Step 2: Pick a layout type
The Layout Type sets the overall shape of the feed. WP Social Ninja gives you four:
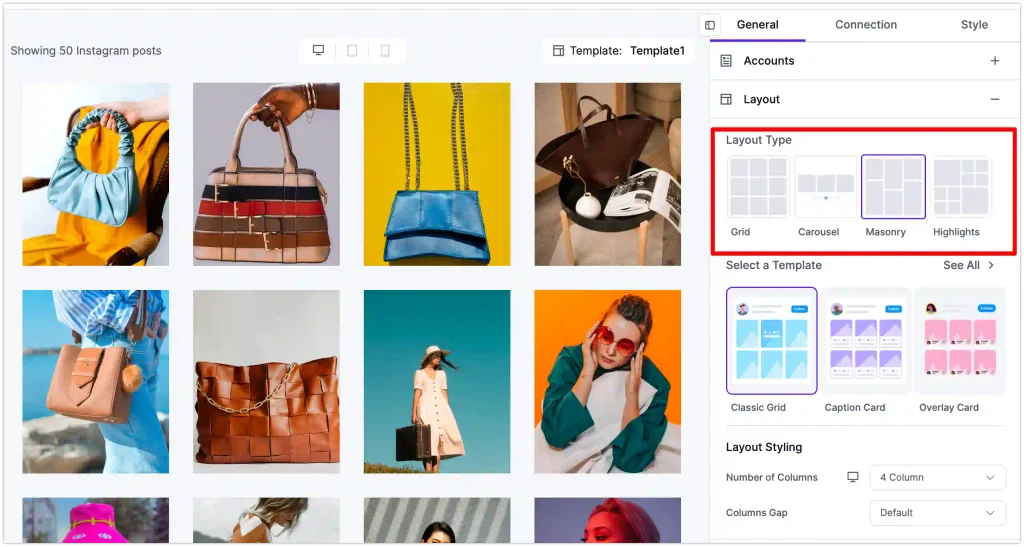
- Grid: Clean, even rows and columns. Available on the free version.
- Carousel: A sliding row of posts with arrows or dots. (Pro)
- Masonry: A staggered, Pinterest-style layout that keeps each image at its natural height. (Pro)
- Highlights: A mixed layout that features some posts larger than others. (Pro)
If you choose Carousel, an extra set of slider controls appears: autoplay on or off, autoplay speed, slides to show, slides to scroll, and navigation style (arrows, dots, or both). Set these to match how you want the slider to move.
Step 3: Select a template
The template controls how each post is presented inside the layout. Open Select a Template to see the options, or click See All to view the full set.
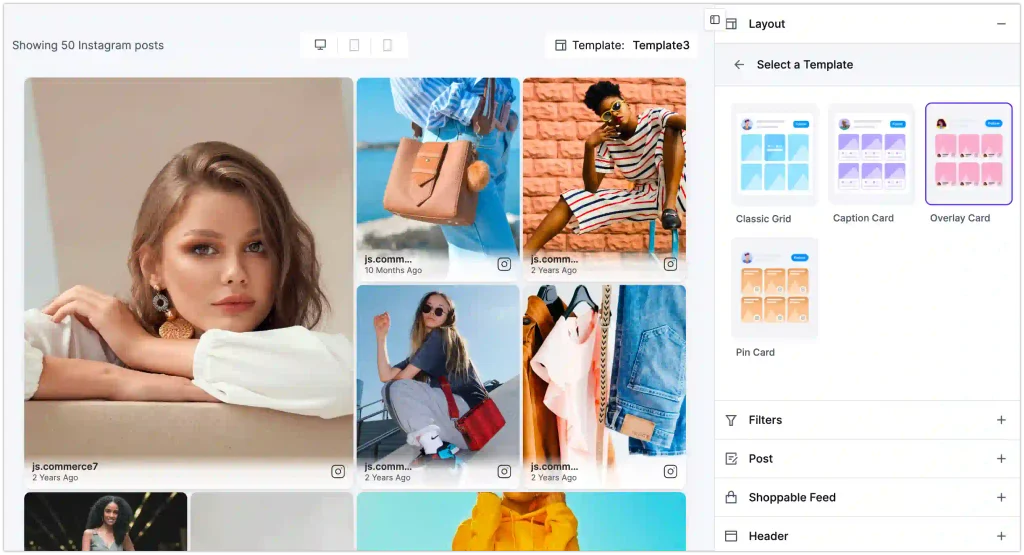
- Classic Grid: Clean images with the caption and stats below. This is the free template.
- Caption Card: Shows the caption and engagement counts under each post in a card. (Pro)
- Overlay Card: Places details over the image on hover for a compact look. (Pro)
- Pin Card: A taller card style that suits portrait content. (Pro)
The free version includes one template (Classic Grid). Pro unlocks the rest.
Step 4: Set columns and spacing
Under Layout Styling, control the grid density.
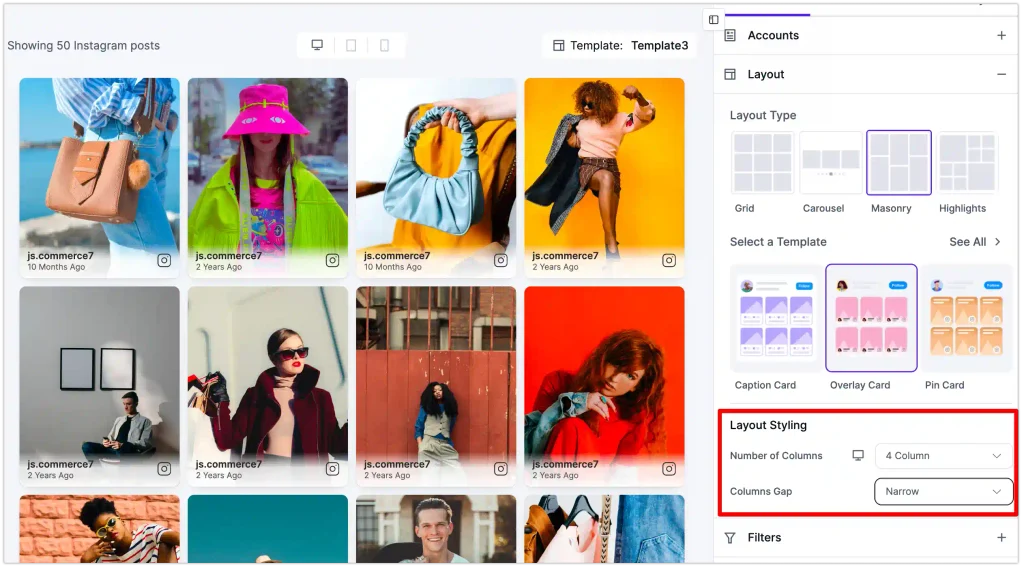
These controls sit in the Layout Styling panel shown in the layout screenshot above.
- Number of Columns: Choose how many posts sit side by side. You can set this separately for desktop, tablet, and mobile using the device icon, so the feed stays readable on phones.
- Columns Gap: Set the space between posts. Options run from No Gap through Narrow, Small, Wide, and Wider, with Default in the middle.
Match the column count to where the feed will live. A narrow sidebar wants two columns; a full-width section handles four to six.
Step 5: Filter which posts show
Open the Filters section to control the number and order of posts.
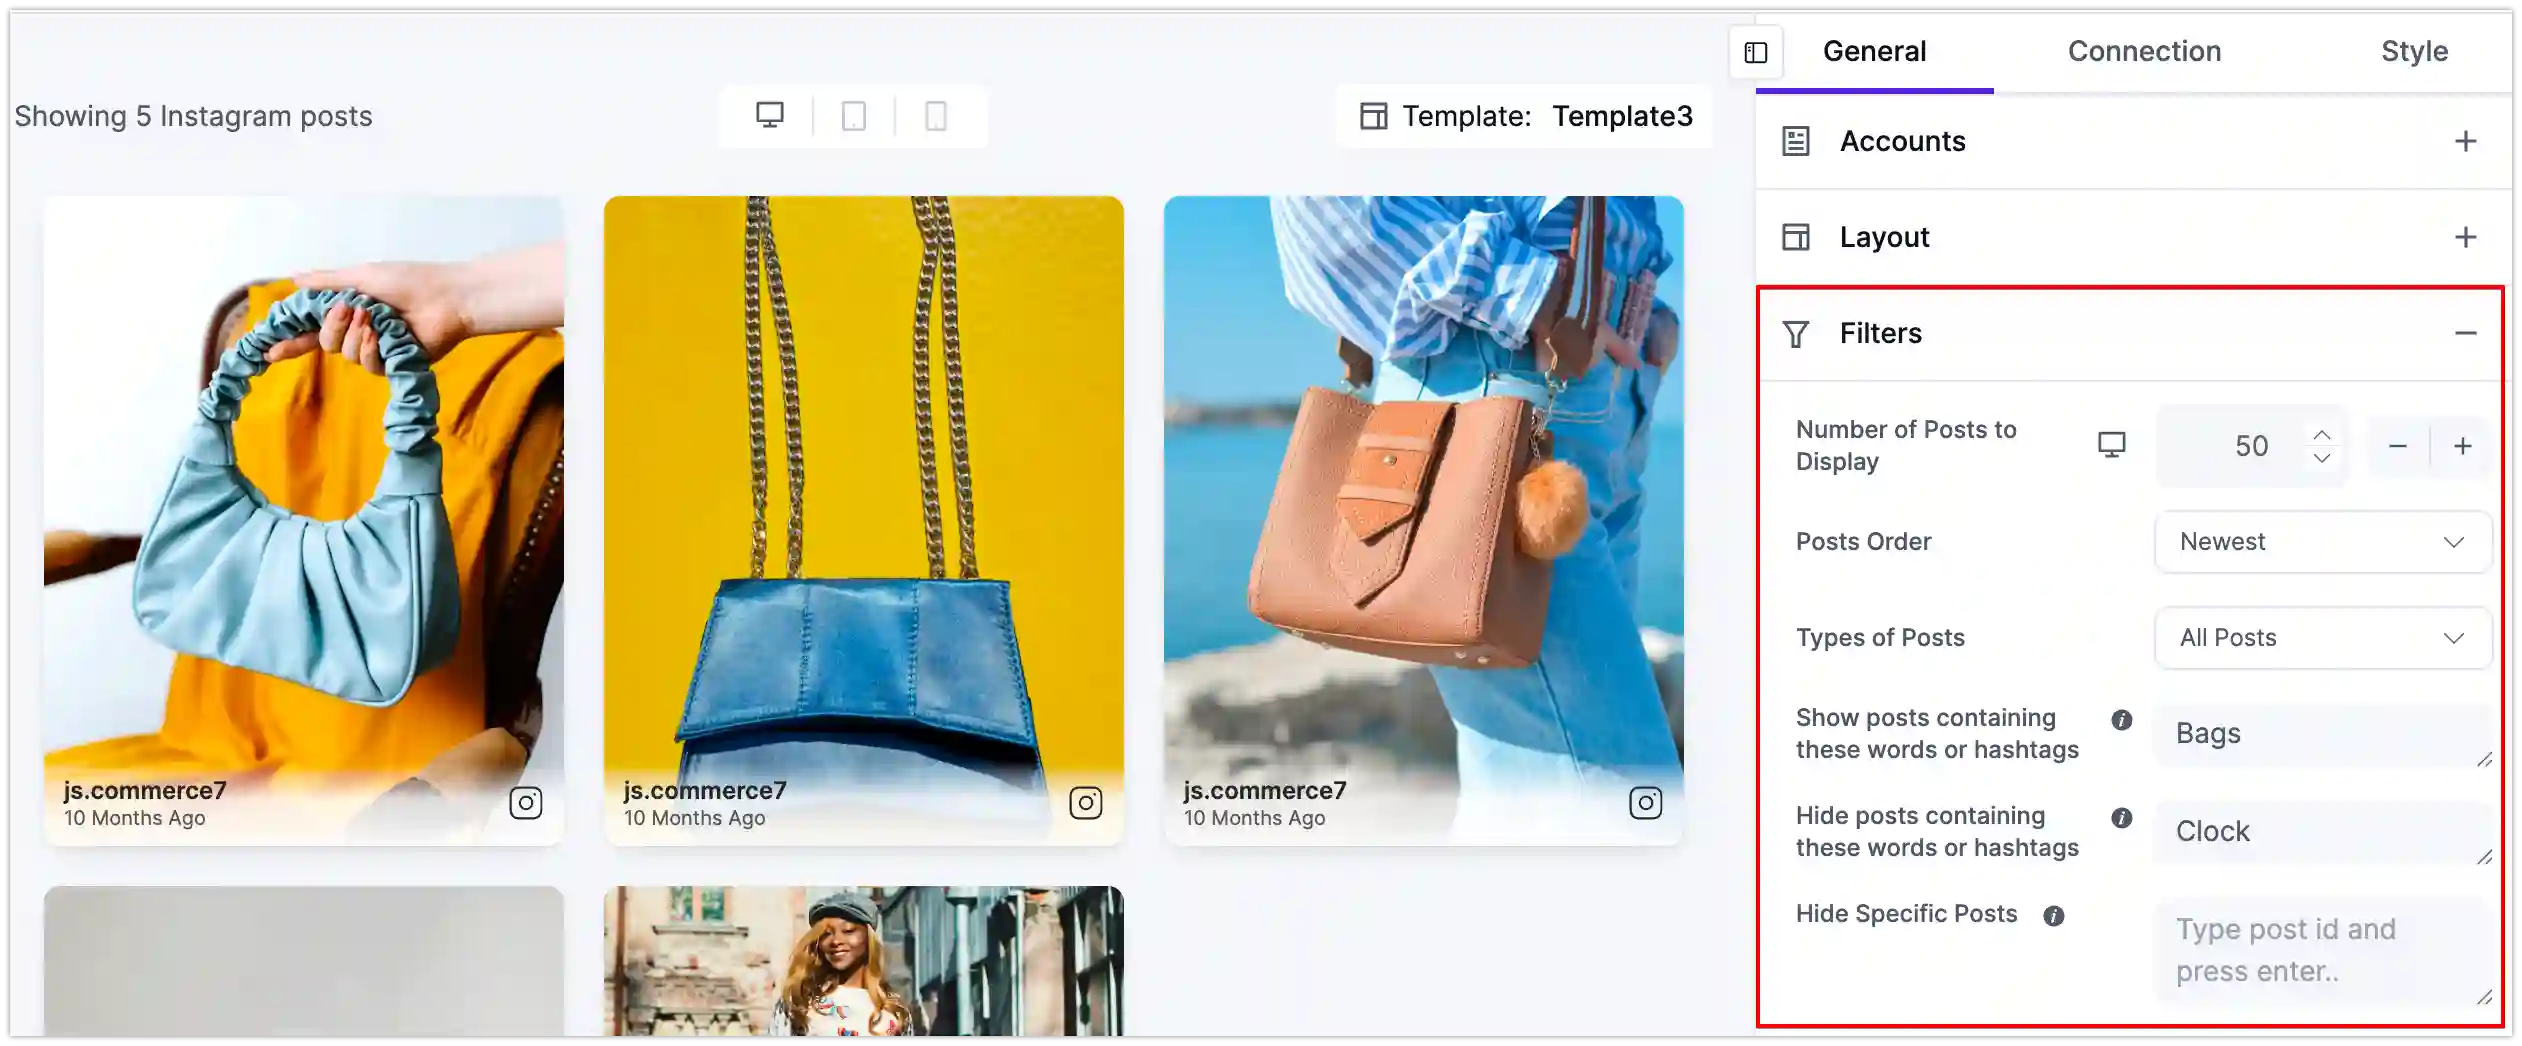
- Number of Posts to Display: Use the plus and minus buttons to set how many posts appear.
- Posts Order: Sort by Newest or Oldest on any plan. Most Popular, Least Popular, and Random ordering are Pro.
- Types of Posts: Show All Posts, Images Only, or Videos Only.
Two more filters help you curate the feed by keyword. Show posts containing specific words or hashtags to display only on-topic content, or hide posts containing certain words or hashtags to keep unwanted posts out.
You can also hide specific posts by ID. These keyword and ID filters are Pro features, and you can enter more than one term in each field.
Step 6: Control how each post looks and behaves
The Post section handles the image display and what happens when someone clicks.
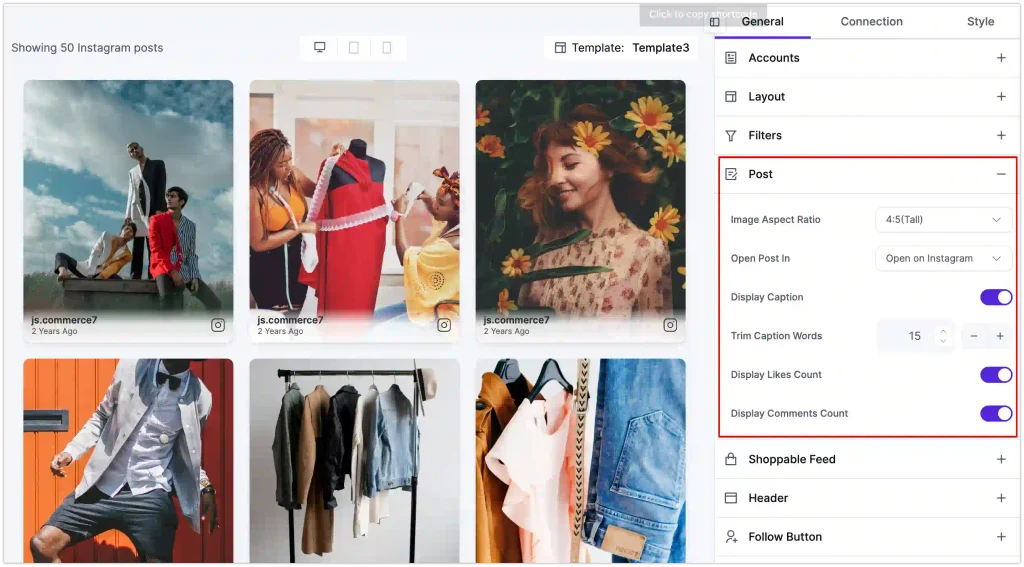
- Image Aspect Ratio: Choose 1:1 (Classic), 3:4 (Portrait), or 4:5 (Tall). Tall ratios give reels and portrait shots more room.
- Open Post In: Decide what a click does, such as opening the post in a popup on your site or sending the visitor to the original post on Instagram.
- Display Caption: Turn post captions on or off.
- Trim Caption Words: Cap the caption length so long captions do not break your grid.
- Display Likes Count & Display Comments Count: Toggle the engagement numbers on each post.
Step 7: Enable a shoppable feed (optional)
If you sell products, the Shoppable Feed turns Instagram posts into a path to purchase. Open the Shoppable Feed section to set it up.
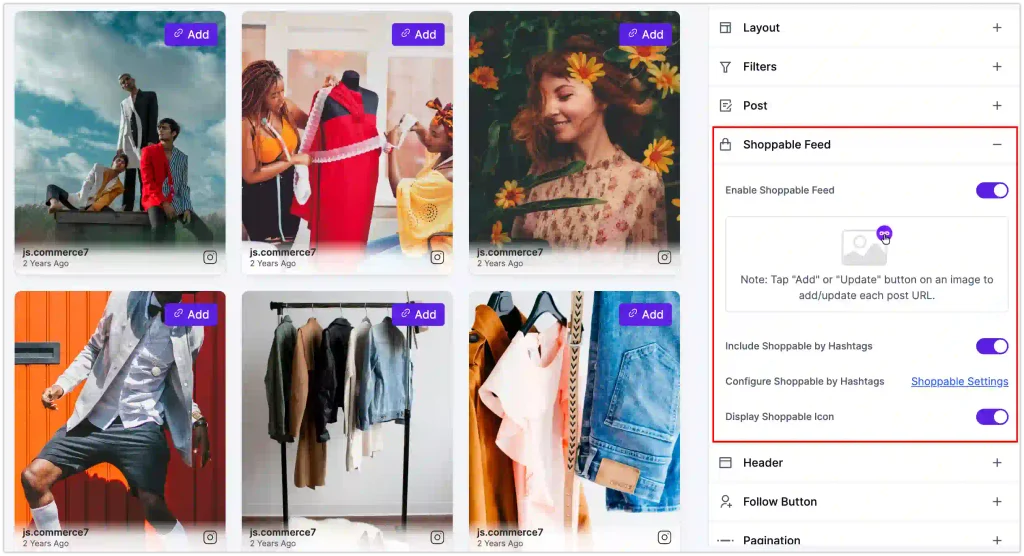
- Enable Shoppable Feed: Switch it on, then click Add or Update on any post image to attach a product URL to that post.
- Include Shoppable by Hashtags: Link products in bulk using hashtags instead of tagging posts one by one.
- Configure Shoppable by Hashtags: Open Shoppable Settings to map hashtags to product links.
- Display Shoppable Icon: Show a small cart or link icon on shoppable posts so visitors know they can click through.
The shoppable feed is a Pro feature and is available for Instagram. See the shoppable Instagram feed page for how stores use it, and the shoppable feed docs for the full setup.
Step 8: Customize the header
The Header is the profile block at the top of the feed. Open the Header section to build it.
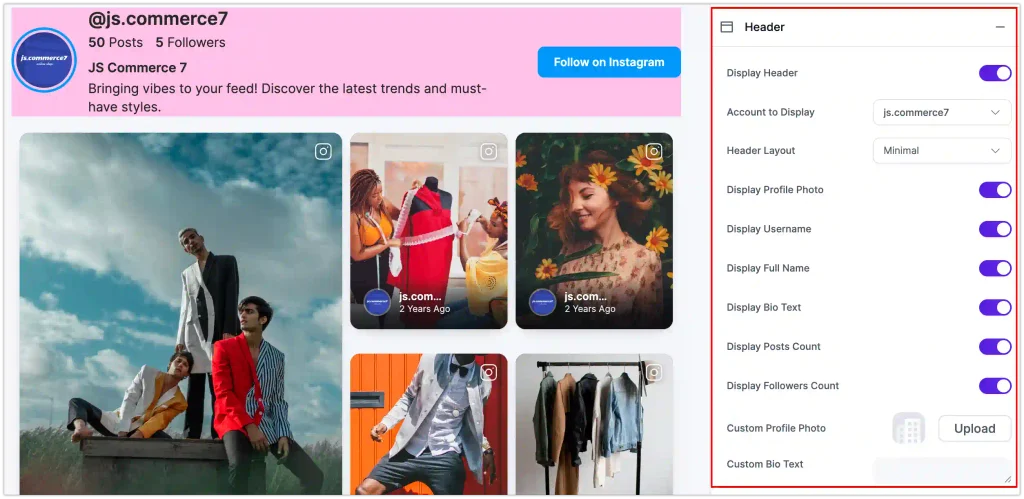
- Display Header: Turn the whole header on or off.
- Account to Display: Pick which connected account the header represents.
- Header Layout: Choose Classic for the full profile block or Minimal for a cleaner, stripped-back header.
- Profile toggles: Show or hide the Profile Photo, Username, Full Name, Bio Text, Posts Count, and Followers Count.
- Custom Profile Photo and Custom Bio Text: Upload your own image and write your own bio if you would rather not pull them from Instagram.
Header customization is a Pro feature. It is worth setting up, because a header with a follower count and a follow button turns a passive feed into a growth tool.
Step 9: Add a follow button
The Follow Button turns viewers into followers.
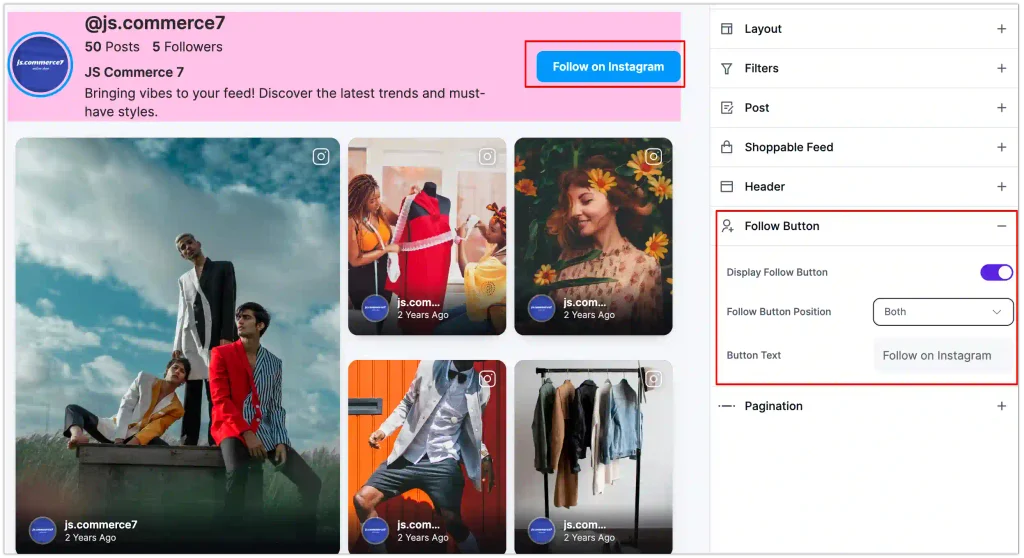
- Display Follow Button: Switch it on.
- Follow Button Position: Place it in the header.
- Button Text: Set the label, for example, “Follow on Instagram.”
The follow button is a Pro feature. Keep the label action-led so the click feels obvious.
Step 10: Set pagination
Pagination controls what happens when a feed has more posts than it first shows.
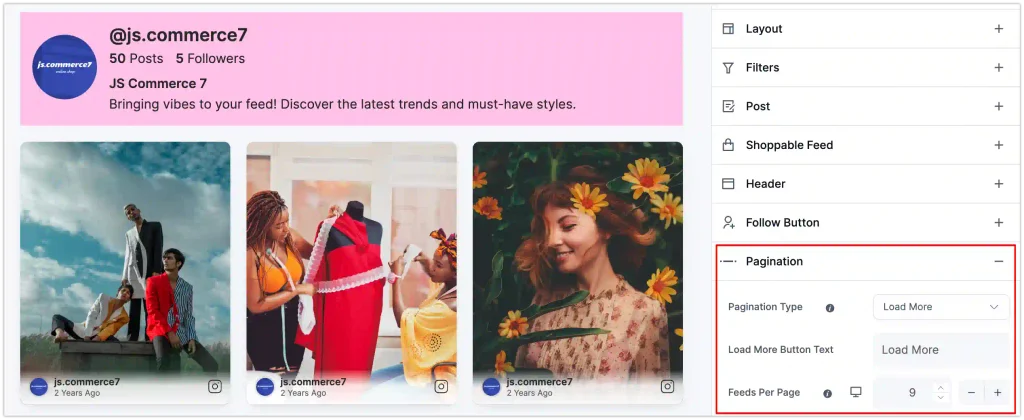
- None: The feed shows your set number of posts and stops.
- Load More: Adds a button so visitors can pull in more posts without loading them all up front, which keeps the page fast.
The Load More option is a Pro feature.
Step 11: Style the feed
The General tab decides what shows. The Style tab decides how it looks. Switch to Style to control colors, fonts, spacing, and borders down to each element. Every change shows in the live preview. Styling is a Pro feature.
The Style tab is split into sections. Here is what each one controls.
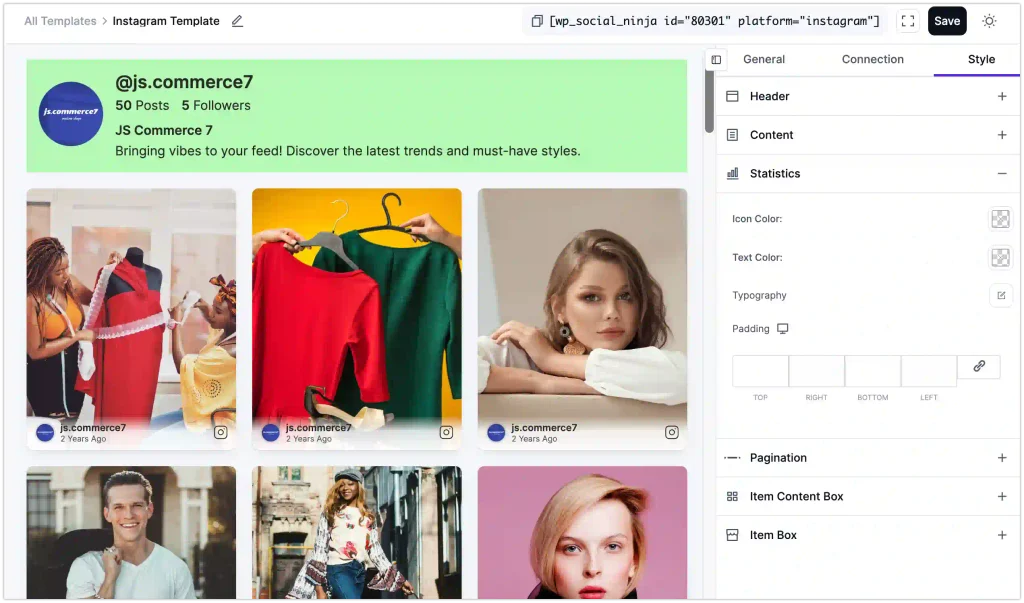
Header: Styles the profile block at the top of the feed.
- User Name: Set the text color, full typography (font family, size, weight, line height, letter spacing), and bottom spacing.
- Statistics: Set the number color, label text color, typography, and the spacing between the Posts, Followers, and Following items.
- Full Name: Set the text color and typography.
- Description: Set the color and typography for your bio text.
- Follow Button and Box: Style the header’s follow button and the header container, including background color, padding, and border type.
Content: Styles the caption text under each post.
- Hashtag Color: Set a separate color for clickable hashtags, so they stand out.
- Text Color and Typography: Style the main caption text.
- Padding: Set the top, right, bottom, and left spacing around the caption. Use the link icon to change all four together or unlink to set them individually.
Statistics: Styles the likes and comments counts on each post (not the header stats) and more
Footer Follow Button: Styles a follow button shown below the feed, separate from the header button
Item Content Box: Styles the container that holds each post’s caption and stats
- Background Color: Set the fill behind the caption area.
- Padding: Set the inner spacing on all four sides.
- Border Type: Choose Solid, Dotted, Dashed, or None.
Item Box: Styles the outer card that holds each full post.
- Background Color: Set the card background.
- Border Type: Pick the border style, then set its width and color.
- Border Radius: Round the card corners on all four sides.
- Box Shadow: Add depth with a preset shadow, or leave it None for a flat look.
For the full reference on every Style option, see the template styling guide.
Step 12: Save and embed the feed
When the feed looks right, click Save Template. WP Social Ninja gives each template a shortcode like . Paste it into any page, post, or widget area, or use the WP Social Ninja block or your page builder’s widget. The feed then updates on its own as you post to Instagram.

JS Commerce 7
Bringing vibes to your feed! Discover the latest trends and must-have styles.


Free vs Pro at a glance
For the layout specifically, here is where the line sits:
| Setting | Free | Pro |
| Layout type | Grid | Grid, Carousel, Masonry, Highlights |
| Templates | 1 (Classic Grid) | 3+ |
| Post order | Newest, Oldest | Adds Most Popular, Least Popular, Random |
| Keyword / hashtag filters, hide specific posts | No | Yes |
| Header customization | No | Yes |
| Follow button | No | Yes |
| Load More pagination | No | Yes |
| Shoppable feed | No | Yes |
| Style tab (colors, fonts, borders) | No | Yes |
| Columns, column gap, posts to display, caption and stats toggles | Yes | Yes |
Win your customers’ hearts with exceptional features
Discover how WP Social Ninja can assist you in designing outstanding customer experiences.
The full Free vs Pro comparison lists every feed feature side by side.
FAQ
How do I change the Instagram feed layout in WP Social Ninja?
Open your Instagram template under WP Social Ninja, then Templates, then Social Feeds. In the General tab, use the Layout Type section to switch between Grid, Carousel, Masonry, and Highlights, pick a template, then set your columns and gap. The preview updates live. Click Save Template when you are done.
Can I show an Instagram feed for free?
Yes. The free version displays a Grid layout with the Classic Grid template, lets you set columns, spacing, and post count, and shows captions and engagement counts. Carousel, Masonry, and Highlights layouts, extra templates, header customization, the follow button, Load More pagination, and the shoppable feed are Pro.
How many Instagram posts can I display?
You set this in the Filters section with Number of Posts to Display. Use the plus and minus buttons to raise or lower the count. Pair a higher count with Load More pagination so the page stays fast.
Can I show a feed from a hashtag instead of my account?
Yes. In the Accounts section, set Feed Type to Hashtag. This requires an Instagram Business account. For a standard profile feed, use the User Account feed type.
How do I set different columns for mobile?
In the Layout Styling section, use the device icon next to Number of Columns to set separate column counts for desktop, tablet, and mobile. Fewer columns on mobile keeps images large enough to read.
How do I make my Instagram feed shoppable?
Turn on Enable Shoppable Feed in the Shoppable Feed section, then click Add or Update on a post to attach a product URL, or use Include Shoppable by Hashtags to link products in bulk. Turn on Display Shoppable Icon so visitors know the posts are clickable. This is a Pro feature for Instagram.
Where do I change the colors and fonts?
Switch from the General tab to the Style tab in the template editor. It is split into Header, Content, Statistics, Footer Follow Button, Item Content Box, and Item Box sections, each with color pickers and full typography controls, plus border, padding, radius, and box-shadow options for the post cards. Styling is a Pro feature.

Subscribe To Get
Weekly Email Newsletter
Connect, Customize, and Display Social Feeds, Reviews, and Chat widgets








Leave a Reply