

How to Collect and Display FluentCart Product Reviews with WP Social Ninja


FluentCart is one of the most trending eCommerce plugins in the WordPress ecosystem right now. Its clean setup, smooth checkout, and easy product management have won the hearts of many business owners.
However, FluentCart has one major drawback. It has no native feature to collect or display product reviews. And as a business owner, that gap can really hurt you. After all, reviews can increase your conversion rate by up to 380%.
The good news is, you can fix this without a developer. WP Social Ninja now connects directly with FluentCart and gives you a built-in way to collect and display product reviews on your store.
In this guide, you will learn the exact process step by step. By the end, your FluentCart products will have a high-quality review form and a beautiful template to display every review that comes in.
So, let’s get started.
Key takeaways
- A review template controls how reviews look on product pages. You can customize it now or later, and changes apply to every product automatically.
- FluentCart is one of the fastest eCommerce plugins for WordPress, but it has no native feature to collect or display product reviews.
- WP Social Ninja closes this gap with a direct FluentCart integration built right into the plugin.
- To add reviews in FluentCart, you can use WP Social Ninja to create a native product review form, connect your FluentCart products, and display reviews using a customizable template.
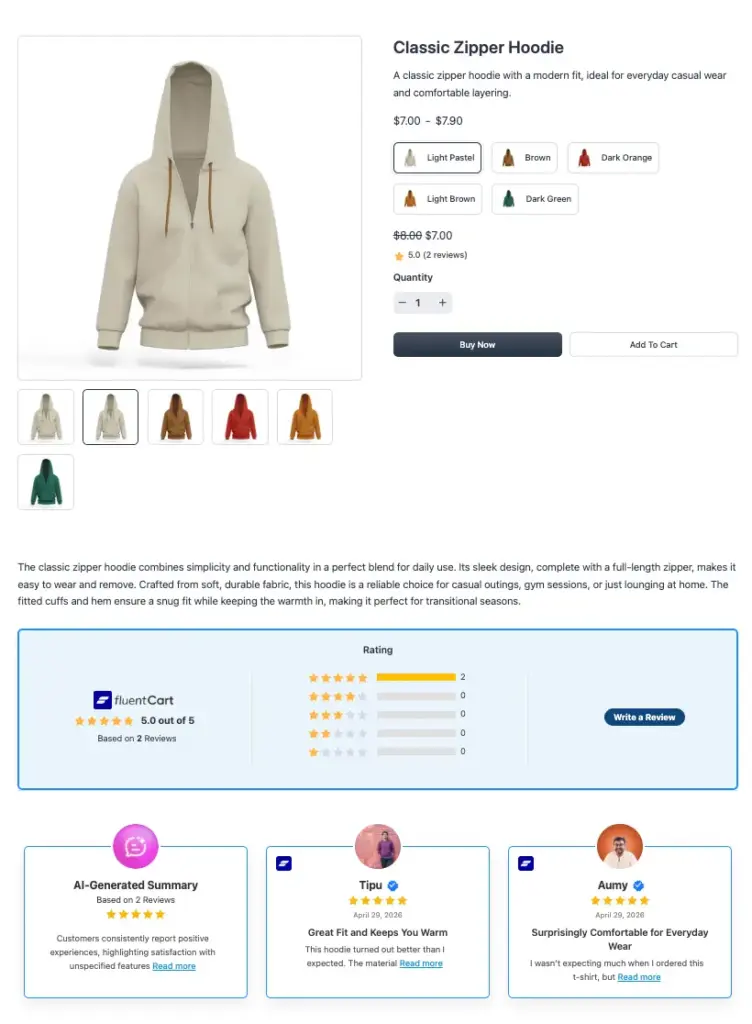
- Once set up, every product page will show a “Write a Review” button and display customer feedback automatically.
- Connecting your products is a one-click action. WP Social Ninja pulls every FluentCart product into your dashboard and keeps it in sync.
How to add a product review system to FluentCart with WP Social Ninja
Setting up a product review system on FluentCart with WP Social Ninja is genuinely simple. Every step is no-code, from building the form to showing reviews on your product pages. In a few minutes, you will have an advanced review system that builds trust for your store.

Key features of WP Social Ninja that work with FluentCart:
- Native review form, no extra plugin required
- Direct FluentCart product connection
- “Write a Review” button on every product page
- Pre-built review templates with full design control
- AI review summarizer to highlight key points fast
- Auto-sync of new reviews as they come in
- Advanced filter with auto-publish rules
- Spam protection with Cloudflare Turnstile
- Star rating customization and required fields control
- Product image uploads and reviewer verification badge
- Schema snippet for better SEO visibility
- Reviews stored inside your WordPress database
- GDPR compliance with local image storage
You can also generate QR codes and place them in your product packages so buyers can leave reviews more easily. Besides FluentCart, WP Social Ninja can collect and aggregate business reviews from 9+ platforms along with other social proof features.
Despite such advanced functionality, it is very lightweight and comes with highly affordable pricing plans. Now let’s walk through the full setup.
Step 1: Install and activate WP Social Ninja
If you are familiar with installing WordPress plugins, WP Social Ninja is no different.

You can do that in two ways:
- From your Dashboard
- From WordPress Repository
Here’s how to install it from your Dashboard:
- Navigate to the WordPress Admin panel. From the WordPress Dashboard, go to Plugins > Add New
- Next, in the search input field, type WP Social Ninja and wait for a moment for it to come up
- Now, click on the Install Now button
- Then Activate
If you decide to install from the WordPress Repository:
- Search WP Social Ninja in the WordPress Repository, and it will appear at the top. Once you click it, hit the Download button
- Now go to the Dashboard and go to Plugins > Add New > Upload Plugin > Choose the zip file
- After that, click the Install Now button and then Activate
Step 2: Create a native review form for FluentCart
Once WP Social Ninja is active, you need a review form that customers will use to submit their feedback. This form lives inside WP Social Ninja, so there is no need for any other form builder.
Follow these steps to build your review form:
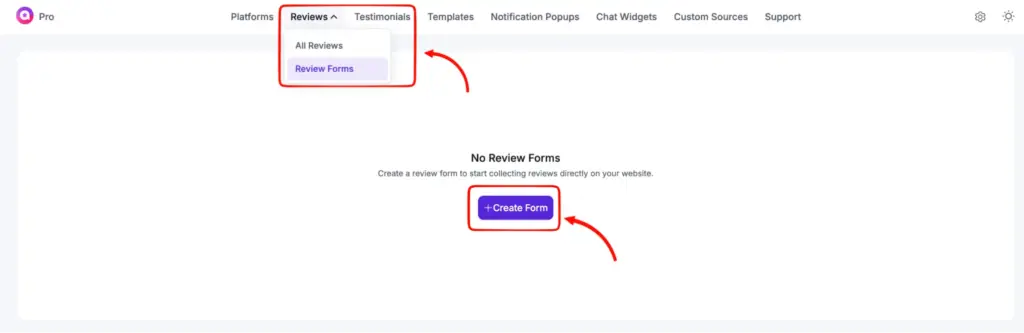
- Go to the Reviews tab on the WP Social Ninja dashboard, select Review Forms, and click Create Form.
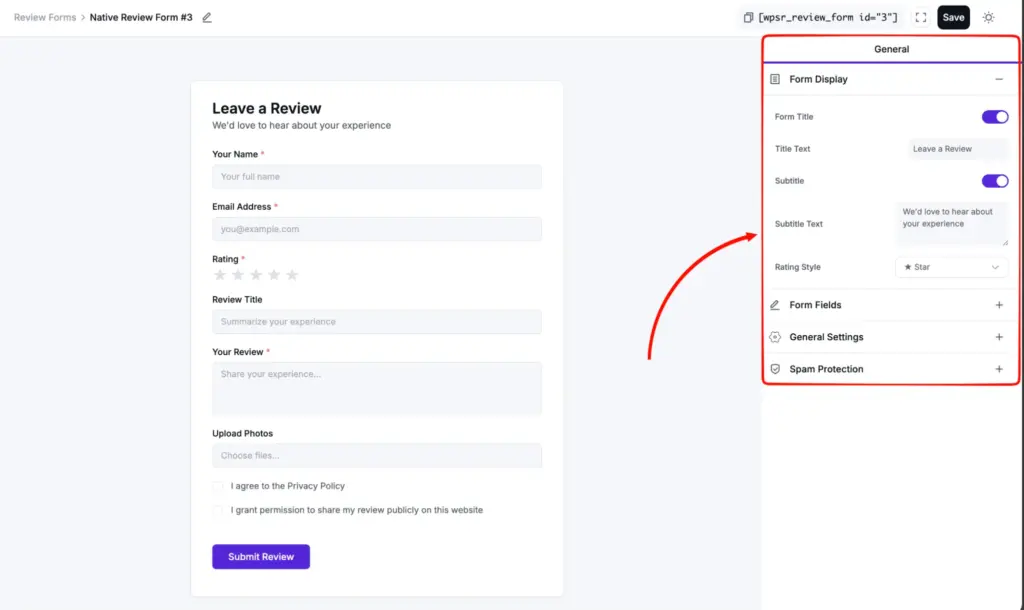
- The review form editor will open. On the right side under the General section, you can customize fields, set required ones, change placeholder text, and adjust the rating style to match your store.
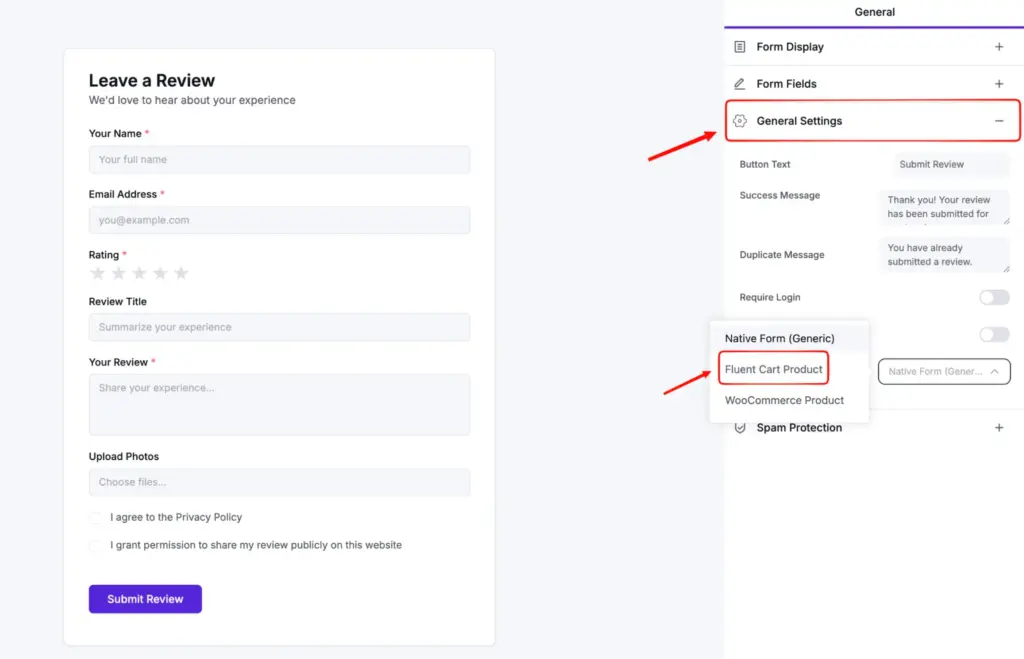
- Now point this form at FluentCart. In General Settings, click the Review Target dropdown and select FluentCart Product.
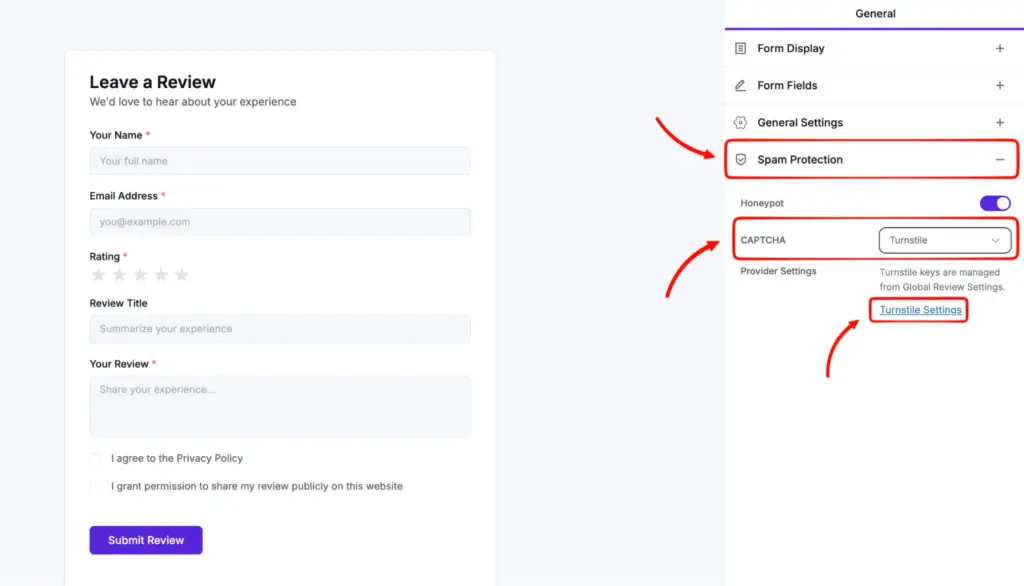
- To stop spam submissions, enable Spam Protection. Select Turnstile under CAPTCHA, then click Turnstile Settings to head to Global Review Settings and enable the protection.
- Save the form once you are done. You will need its ID in a later step.
Pro Tips: Keep the form short. Asking for a name, rating, and review text is enough for most stores. Adding too many required fields lowers submission rates.
Step 3: Connect your FluentCart products to WP Social Ninja
With the form ready, the next step is to bring your FluentCart products into WP Social Ninja, so each one can have its own review section.
- Go to the WP Social Ninja Dashboard and select FluentCart from the Business Reviews section.
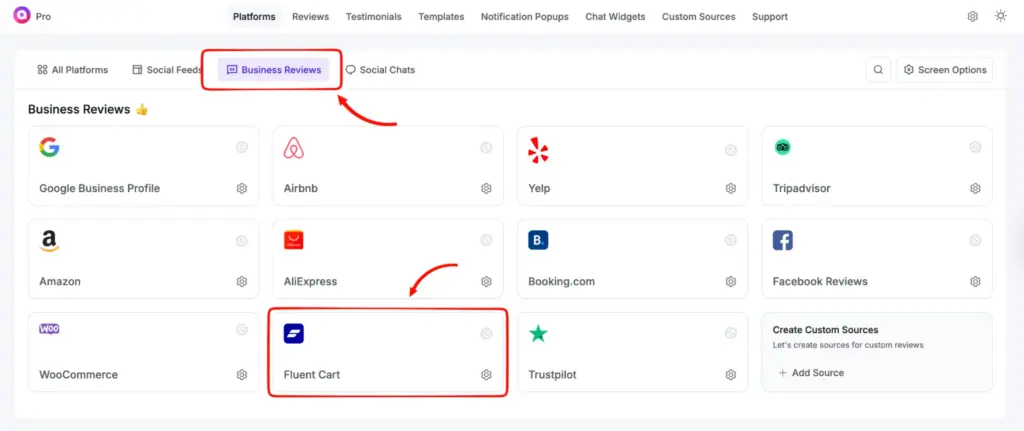
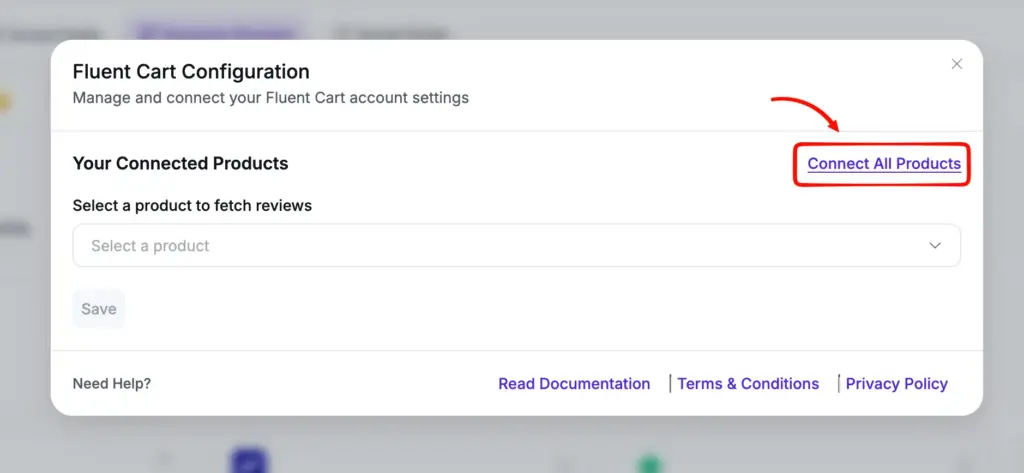
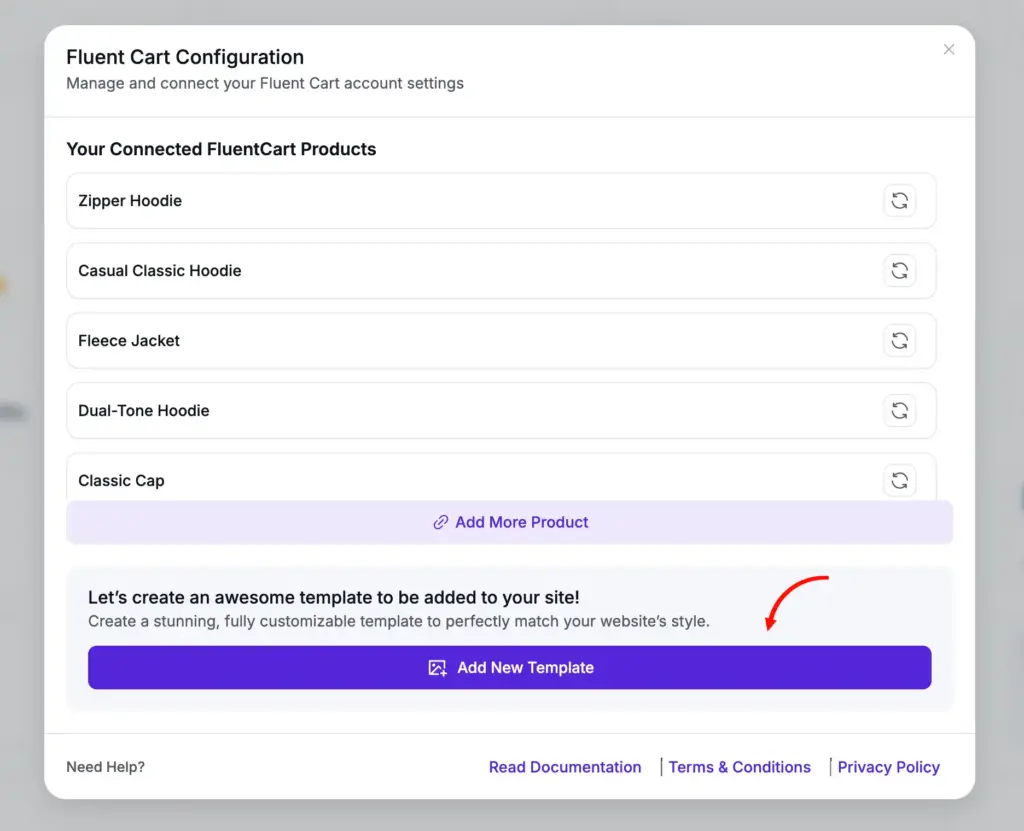
- Click Connect All Products. WP Social Ninja will pull every product from your FluentCart store and make it available for review collection. You can also connect individual products.
Step 4: Create a review template and link the form
The template controls how reviews look on your product pages. WP Social Ninja gives you several pre-built templates and full styling control over each one.
Click Add New Template to open the template editor.
Inside the editor, do the following:
- Go to the Header section
- Toggle Add “Write a Review” URL? to on
- Choose Native Review Form as the Button Source Type
- Select the form ID of the form you built in Step 2
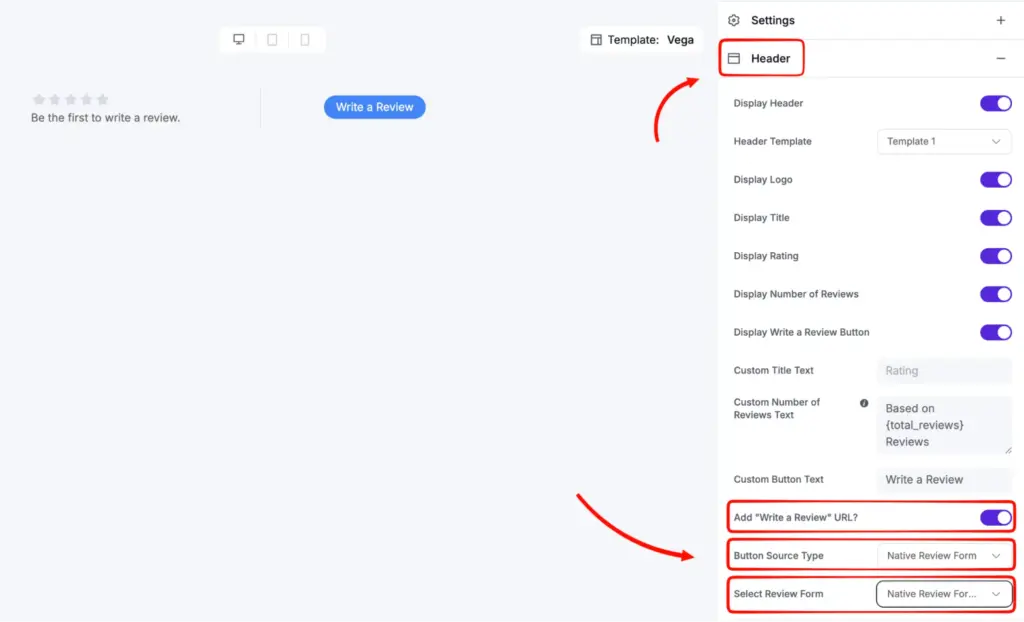
This is what links the form to the button. When a customer clicks the “Write a Review” button on a product page, this is the form they will see.
You can customize the template right now or later when reviews start coming in. Whatever you change here will reflect on every product page automatically.
If you want to see how these customizations look in real use, you can check out the demo templates on their site. It will help you understand how advanced WP Social Ninja can be when it comes to styling.
Step 5: Set WP Social Ninja as your main review hub
The final step tells FluentCart to use this template for every product on your store.
Go to Settings > Review Platforms > FluentCart Settings. Enable the Make WP Social Ninja Your Main Review Hub toggle and select the template you just edited. Click Save Settings.
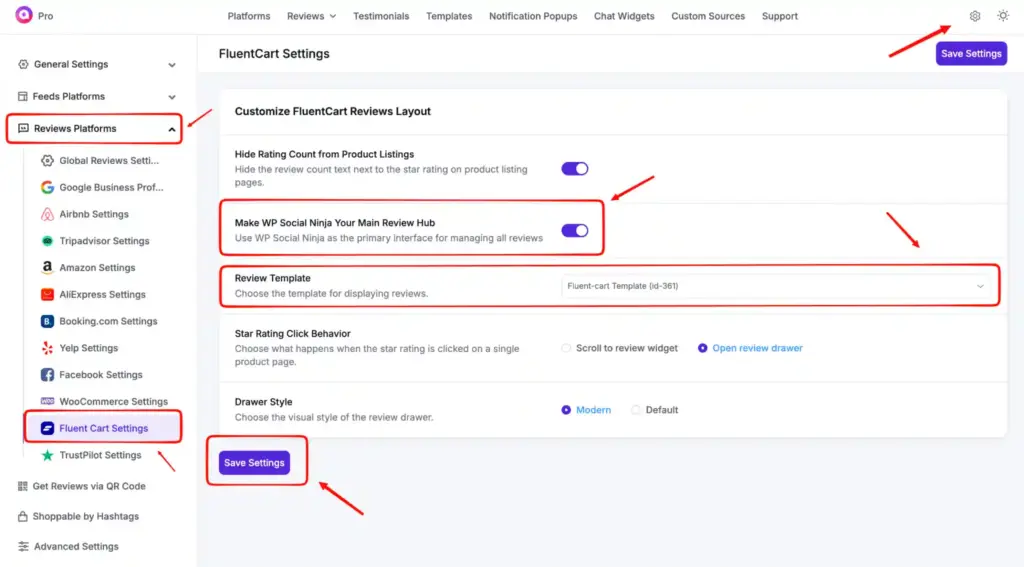
That is it. Visit any product on your FluentCart store, and you will see a “Write a Review” button live on the page. As customers start leaving reviews, they will appear on the product page styled exactly how you set up the template.
If you still have any confusion, feel free to explore our detailed Documentation.
Bonus Tips: After your first few reviews come in, send a follow-up email to recent buyers with a direct link to the review form. Customers who already had a good experience will leave a review when asked. They rarely do it on their own.
Start collecting reviews on your FluentCart store
You started this guide with a FluentCart store that had no way to collect or show reviews. Now you have a clear, no-code path to fix that with WP Social Ninja.
The setup is a one-time job. Build the form, connect your products, design the template, and switch on the main review hub. Every product on your store gets a “Write a Review” button, and every new review shows up on the right page automatically.
Reviews are what turn a curious visitor into a confident buyer. The sooner you start collecting them, the sooner your store starts working harder for you, even when you are not online. All the best.

Subscribe To Get
Weekly Email Newsletter
Connect, Customize, and Display Social Feeds, Reviews, and Chat widgets


Trending Posts
-
 Mashfik Upal Aumy
 -

-
 Mashfik Upal Aumy


Leave a Reply