

How to Filter Reviews on WordPress with Auto-Publish Rules


Every business owner knows how hard it is to earn reviews. Customers rarely go out of their way to write feedback. You are probably eager to show those reviews on your site and bring in more customers.
That works fine until a real five-star review sits next to a spam comment. Or a low-star note that says nothing useful lands on your homepage. All that good feedback you worked for gets buried.
Here is what most site owners might not know yet. You can decide which reviews show up, and automate it too, so every new review shows the best, most authentic version of your brand.
WP Social Ninja is a popular review plugin for WordPress that does exactly that. It pulls business reviews from your connected platforms and publishes only those that meet your rules.
Today, I will show you how to filter reviews on WordPress with auto-publish rules, step by step.
TL;DR:
- The reviews you worked hard to earn often lose their appeal when spam, fakes, and empty one-liners show up right next to your best feedback.
- Auto-publish rules fix this by checking every new review before it goes live, instead of just hiding reviews inside one feed, the way display filtering does.
- WP Social Ninja runs auto-publish on three conditions: a minimum star rating, blocked or spam words, and a minimum review length.
- Reviews that fail a rule are not deleted; they wait in a moderation queue sorted into Approved, Pending Approval, and Spam for your final call.
- One setup covers every connected source, so Google, Yelp, Facebook, WooCommerce, FluentCart, and custom sources all meet the same standard.
- Auto Publish with Filters is a Pro feature, and setup takes only a few minutes inside Global Review Settings.
Display filtering vs. auto-publish: what’s the difference?
Display filtering picks that show up in one template you build. Auto-publish rules decide if a review goes live on your site at all. One just hides reviews in a single feed. The other checks every new review before visitors see it.
Auto-publish with filters runs on three conditions for WP Social Ninja users: minimum rating, blocked or spam words, and minimum review length.
That is the part that display filtering cannot do. Hiding a review in a feed leaves no record and no queue. This is a smart way for review management on WordPress. Nothing gets deleted, you can see why each review is waiting, and you can approve a held one with a single click.
Bonus Tips: No matter how good your business is, getting customer reviews is always hard. Learn how to ask for reviews professionally so that you earn more reviews without sounding salesy.
How to set up auto-publish rules in WP Social Ninja
Setting up auto-publish rules might sound complicated, but WP Social Ninja has made the process quite easy for users. You set up auto-publish rules inside Global Review Settings. Install the plugin, connect your reviews, pick the filtered publishing mode, set your three conditions, and save. That’s it.
Follow these simple steps to get the whole process done within a few minutes.
Step 1: Install and activate WP Social Ninja
You can do it two ways: from your dashboard or from the WordPress repository.
Here is how to install WP Social Ninja from your dashboard:
- In your WordPress admin panel, go to Plugins → Add New.
- In the search field, type WP Social Ninja and wait a moment for it to come up.
- Click Install Now.
- Then click Activate.
If you would rather install from the repository:
- Search for WP Social Ninja in the WordPress repository and hit Download.
- Back in your dashboard, go to Plugins → Add New → Upload Plugin and choose the zip file.
- Click Install Now, then Activate.
The free version lets you display reviews from Google and Airbnb with basic filtering. However, to connect more review platforms and set the auto-publish rules, you will need the pro version.
Step 2: Connect your review platforms
Before any rule can run, you need to add your customer reviews with WP Social Ninja. Connect at least one source, like Google, Yelp, Facebook, Airbnb, and more review platforms, so that they start syncing in.
Besides, WP Social Ninja also allows you to collect reviews for FluentCart and WooCommerce store products with its native form and display them on your site with a custom template.
Each platform connects a little differently, so follow the step-by-step setup in the detailed review documentation for the source you use.
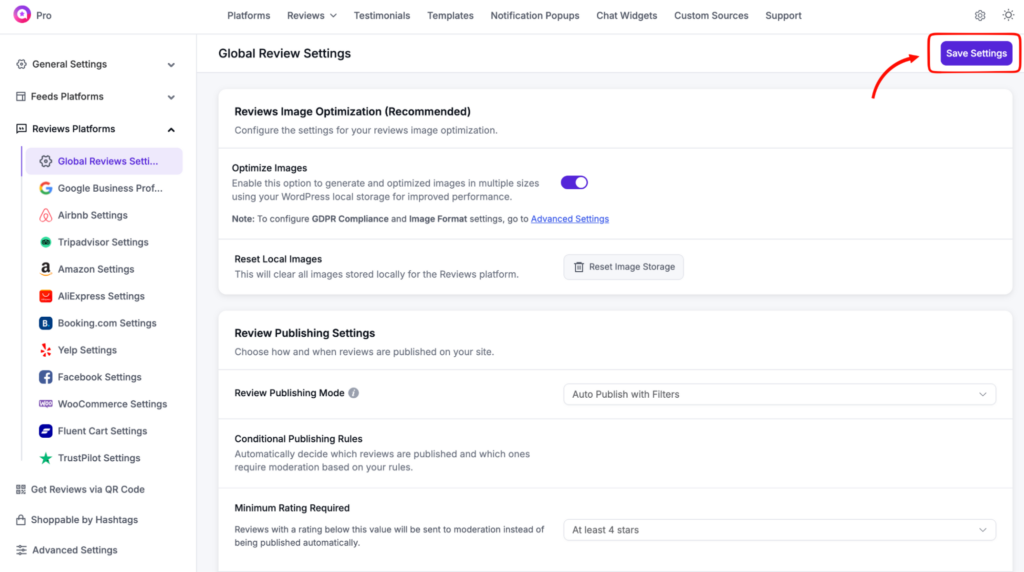
Step 3: Open Global Review Settings
- Log in to your WordPress dashboard.
- Go to WP Social Ninja → Settings.
- In the left sidebar, click Reviews Platforms, then select Global Review Settings.
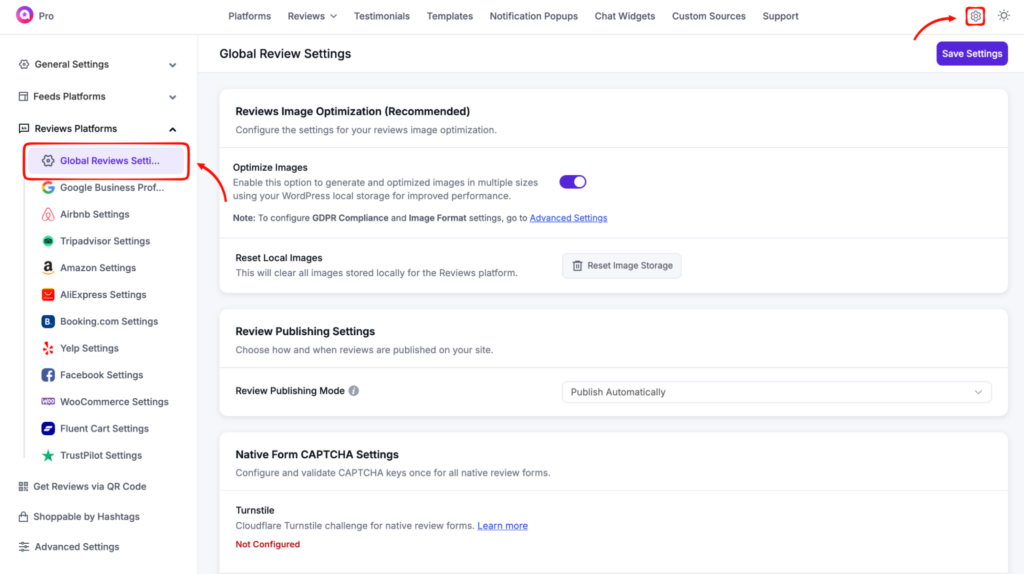
Please note that these settings apply to every connected review platform at once.
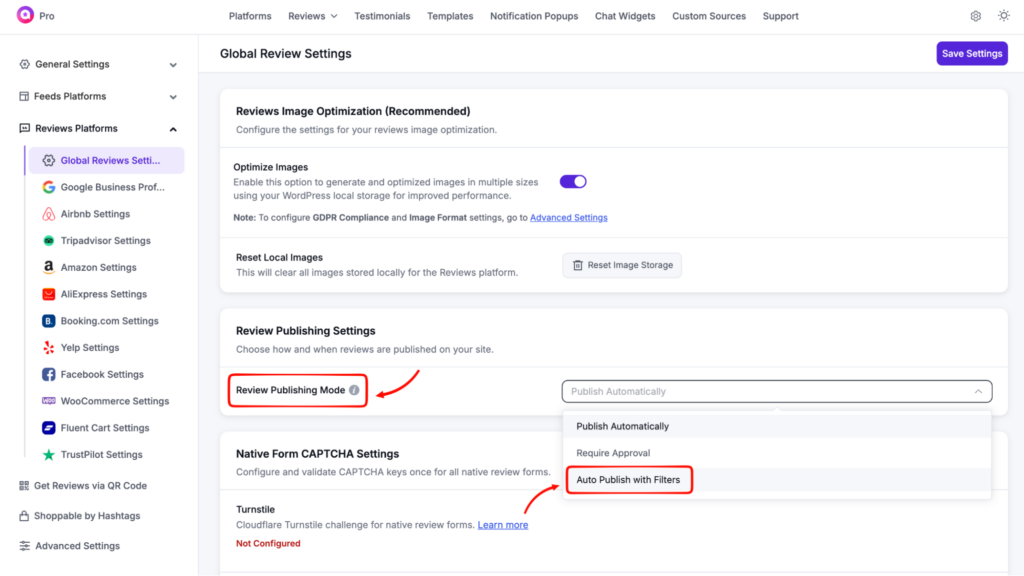
Step 4: Choose your publishing mode
Find Review Publishing Mode. You will see three options:
- Publish Automatically sends every review live the moment it comes in.
- Require Approval holds every review until you approve it first.
- Auto Publish with Filters publishes reviews on their own only if they pass your rules, and sends anything that fails to moderation.
Select Auto Publish with Filters.
Step 5: Set your three conditions
This is where you decide what “good enough to publish” means. Fill in the Conditional Publishing Rules:
- Minimum Rating Required: Pick the lowest star rating allowed to publish on its own. Four is a common choice, so four and five-star reviews go live, and the rest wait.
- Blocked/Spam Words: Type the words you do not want, separated by commas. Any review containing one is sent to moderation.
- Minimum Review Length: Set a character count so very short reviews get held instead of published.
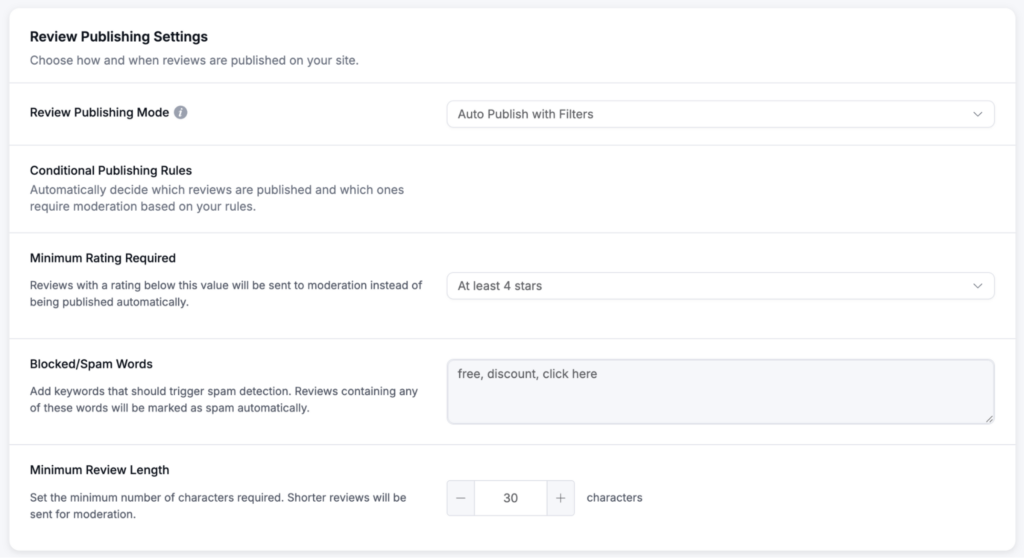
A quick tip on the words you block. Think about the spam you actually get, not every bad word you can think of. Most junk reviews follow a few patterns. They drop in links, off-topic product names, or the same promo phrases again and again. Words like free, discount, or click here are common ones to start with.
Pick five or six to begin with. You can add more later once you see what slips through. The same goes for review length. Twenty to forty characters is usually enough.
Click Save Settings in the top-right corner. Your rules are now live for upcoming reviews.
From here, every new review gets checked against these rules before it can appear.
One setup covers everything. The same rules apply across all your connected platforms, so reviews from Google, Yelp, Facebook, FluentCart, WooCommerce, and all other platforms all meet the same standard.
They also cover feedback you collect through custom sources. You set the conditions once, and they run on every review source you use.
Open your reviews list and check the three states. Approved reviews are live. Pending reviews need a quick yes or no. Spam sits separately.

This means you no longer approve reviews individually before publishing. The strong ones publish themselves. Only the borderline cases ask for your time.
Here’s a preview of Facebook reviews on my own site with WP Social Ninja’s auto-publish mode turned on. Have a look at more demos to see how your reviews could look once they go live.
Let your best reviews publish themselves
Set the rules once, and your reviews start managing themselves. The strong ones publish the moment they arrive. Spam and low-effort ones get held or flagged before anyone sees them. Your WordPress site keeps showing real, trustworthy feedback while you get on with your day.
It also keeps you honest with visitors. You are not hiding fair criticism. You are filtering out spam, fakes, and empty one-word notes, so the reviews people read are the ones worth reading. That is the kind of review wall that actually earns trust, because every review on it is there for a reason.
If your widget still shows everything unfiltered, this is worth the time to turn on Auto Publish with Filters in WP Social Ninja, set your three conditions, and let the good reviews speak for themselves.
Frequently Asked Questions (FAQs)
Will filtering delete or change my reviews on Google or Facebook?
No. It only controls what shows on your WordPress site. Your reviews on Google, Facebook, and other platforms stay exactly as they are, and held reviews are not deleted either.
A spam review already slipped through. Can I take it down now?
Yes. Open your reviews list, find it under Approved, and move it to Pending or Spam. It comes off your site right away, and your rules catch similar ones going forward.
What happens to a real review that gets held by mistake?
It waits in Pending Approval until you look. Nothing is lost. You approve it with one click, and it goes live, so a strict rule never costs you a genuine review.
Do I have to approve every review myself?
No. Reviews that pass your rules publish on their own. Only the ones that fail a condition wait for you, which is much lighter than approving every review by hand.
Can I collect reviews with the native form and still block spam bots?
Yes. WP Social Ninja’s native review form has a built-in Cloudflare Turnstile CAPTCHA you can switch on for spam protection. You enable it in the form’s CAPTCHA settings, so bot submissions get stopped before they ever reach your moderation queue.

Subscribe To Get
Weekly Email Newsletter
Connect, Customize, and Display Social Feeds, Reviews, and Chat widgets


Trending Posts
-

-
-
 Mashfik Upal Aumy


Leave a Reply