How to Add Facebook Feed with WP Social Ninja (Part 1)
Are you looking for the best way to embed a Facebook feed on your website?
If you want your brand to thrive, you need an effective social media marketing strategy. And a successful SMM strategy depends on engagement. To be precise, in the form of Likes, Comments, and Shares. However, a high engagement rate is not easy as to be said!
But the right social media platform would definitely direct you to the right track. And what is better than the social media king, Facebook, with 2.89 billion monthly active users worldwide? Moreover, all your potential audiences are active on social media and looking for your service. So it’s better to create a bridge between your followers and your website.
And that’s why WP Social Ninja has brought to your Facebook feed to fetch the social media feeds to your website. Let’s see how to do that.
How to add Facebook feed to your website
To configure Facebook feed to your website you need to know how to authorize Facebook. WP Social Ninja has an amazing feature to embed Facebook feeds without creating any Facebook app.
Let’s see how WP Social Ninja will engage your website visitors by embedding Facebook feed to your WordPress website.
Win your customers’ hearts with exceptional features
Discover how WP Social Ninja can assist you in designing outstanding customer experiences.
Facebook feed configuration
To connect with Facebook on your website, first, you need to authorize Facebook.
Start the process of authorizing by clicking on Continue with Facebook. You will be redirected to a new page. To start the process of connecting the account, click on Continue as {User_Name}
However, you need to log in to your account if you are not logged in.
After that, you need to choose the page/pages and click on the Next button to go further.
Enable all the options (if any of them are disabled) as they are required for WP Social Ninja to work and click on Done.
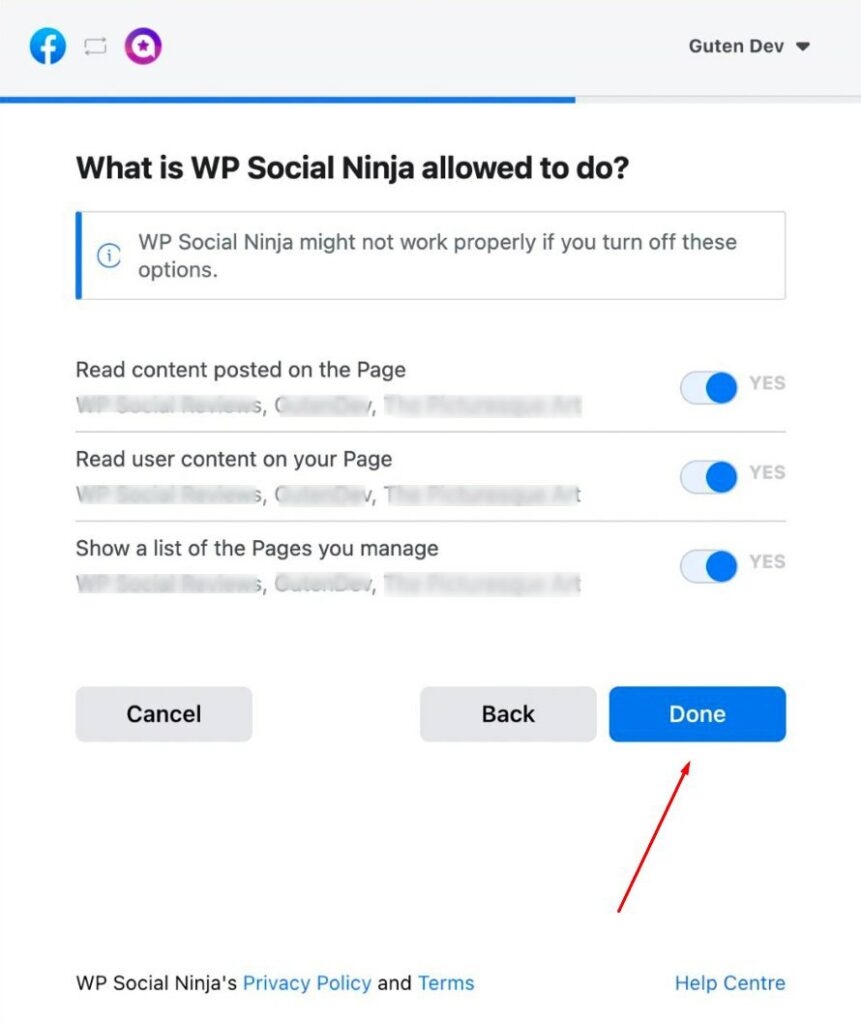
Now you have successfully linked to WP Social Ninja. To complete the Authorization process, click Ok.
You will be redirected to the dashboard. Here you need to again authorize the particular page/pages you want to fetch your feed from.
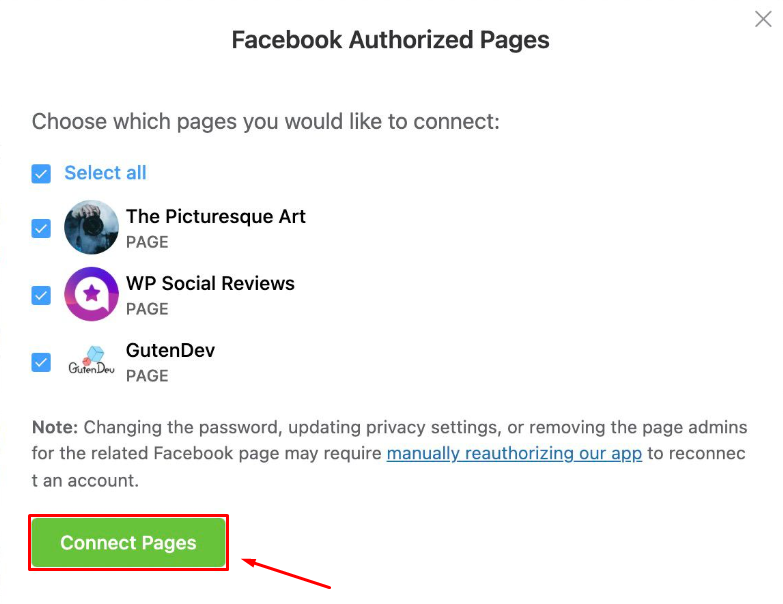
If you want to connect multiple Facebook Pages, you can do that by simply clicking Add More Accounts. If you have already authorized other pages then select your desired page/pages and click on Connect Account. However, if you need to connect another account then just follow the above-mentioned steps and you are all good to go.
If needed, you can click the cross icon on the left side to delete a page. Now you can start creating a Facebook feed Template.
Facebook feed layout
Let’s have a look at how to customize your Facebook feed Layout.
Source
To change the Layout, click on the Source Button, and a Feed Type drop-down menu will appear at the top of the right side of your dashboard.
Feed Type
Currently, we have three Feed Types; Timeline Feed, Videos, and Photos. By changing the Feed Type, for example, if you select Videos, all the videos from your feed will appear on your site automatically.
Similarly, you can choose any feed type from this section and show your social presence on your website.
Select Pages
After selecting the Feed Type, you have to select the pages from the Select Pages option from where you want to collect your Facebook content.
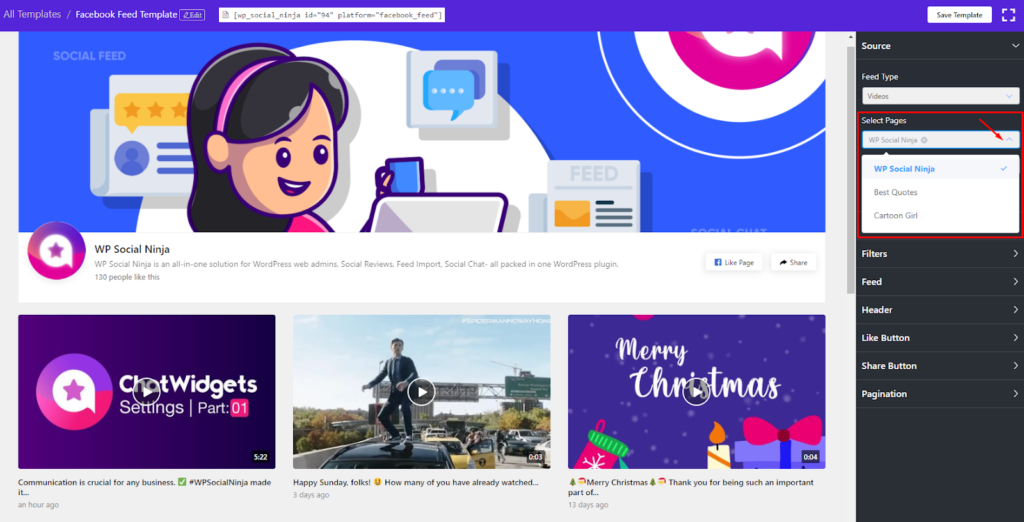
Here, we have selected the WP Social Ninja Facebook Page.
Total Feed
This input field will allow you to set how many posts to retrieve from Facebook. Here you have the option to show a maximum of 100 posts from the Facebook page.
Once you select the page and set the number for Total Feed, click on the Fetch Feeds button.
Now Facebook feed is ready to display on your website.
Note that you can fetch multiple pages simultaneously on your website.
Template
Facebook feed has several pretty Template features for you. Let’s check out.
Layout Type
The Template has Layout Types to change your Facebook feed style on the right side. If you click on the drop-down menu, you can find a few options. Now we have Timeline, Grid, Masonry, and Carousel.
Select any Layout Type that suits your brand.
Carousel Setting
Suppose, If you select Carousel Layout Type, a new Setting will appear.
Right Now, we have five options for Carousel Settings; Autoplay, Autoplay Speed, Slides To Show, Slides to Scroll, Navigation Type.
Autoplay
This section can set your Autoplay mode for your Facebook posts.
Turn Off the Button if you don’t want to use Autoplay.
Autoplay Speed
Next, you will find Autoplay Speed; from here, you can adjust your Autoplay Speed limit. To decrease the speed limit, simply down the speed limit by clicking the minus sign.
Slides to Show
Here you can adjust the Number of Slides that will be displayed on your website.
Now we have 10 Slides to display. So, according to your wish, you can increase or decrease the slides.
Slides to Scroll
After Slides to Show, you can set your Slides to Scroll button.
From the settings panel, you can adjust the Slides to Scroll option. Here we picked digit three, so at a time, it scrolls three posts and shows the following posts on your display.
Navigation Type
Our Navigation section has four options; Arrows and Dots, Arrows, Dots, and None.
In this Screenshot, you can find both Arrows and Dots as we have selected this. But, you can select any.
Template Type
Next, you have Template Type; select a Template from the Settings Panel.
If you select Template 1, all the posts will appear this way in front of your display.
Number of Columns
In this section, you can change the Number of Columns.
Here you can set the Columns of your website that you want to display. Right now, we have seven ways to sort the Number of Columns; 1 Column to 10 Column. Select any for your brand.
Columns Gap
Next is Columns Gap; right now, we have five types of Columns Gap available; No Gap, Narrow, Small, Wide, and Wider.
We have selected the Narrow option; you can select any.
Filters
Once you click on the Filters, a drop-down menu will appear. Let’s check out how it works-
Number of Feeds to Display
This feature has various options to filter specific Timeline feeds, videos, and photos according to your requirements.
Here you can adjust by entering the Number of posts to display by clicking the +/- icon.
Post Order
You can choose what order you want to display your posts using the Posts Order option.
Currently, there are five options available; Ascending, Descending, Most Popular, Least Popular, and Random.
Show/Hide Post
Next is Show posts containing these words or hashtags; you can use this setting to show posts containing specific words or hashtags in the caption with separate multiple words or hashtags using commas.
Example: #hashtag1, word1, word2. Moreover, with the Hide posts containing these words or hashtags, you can hide posts in the same way.
Hide Specific Feeds
The Hide Specific Feeds option lets you hide a particular post by its Post ID. You can find the post’s ID by clicking on the Facebook icon on the post and then copy & paste the ID Number from the end of the URL.
Example: https://www.facebook.com/229248910907303/posts/ [247142819117912]/.
Make sure you select the ID Number correctly and insert it on the Hide Specific Feeds field. The ID will look like [ 247142819117912 ]. After you have completed it, click on the enter button.
Once you’re done, don’t forget to click on the Save button, and you’ve successfully done your Facebook feed settings. Let’s see how the front would look like!
Beautiful, right?
Last words
A social media plugin in your business can turn your user into a potential customer. WP Social Ninja will help you to make the most of your social feeds and Facebook feed is our latest update just like a cherry on the top!
So what are you waiting for? Get WP Social Ninja Facebook feed now and take your brands to the next level.
For better understanding check out our detailed user guidelines and follow our social platforms Twitter, Facebook, & YouTube.

Subscribe To Get
Weekly Email Newsletter
Connect, Customize, and Display Social Feeds, Reviews, and Chat widgets

Trending Posts
Comments
-
Hello, I see only one of my facebook pages when I connected the account. How can I configure other pages, so that their feed also can also be integrated into the plugin?
-
Hello, can you please open a support ticket? Here:https://wpmanageninja.com/support-tickets/#/. Our support agents can check it and fix your issue!
-





Leave a Reply