
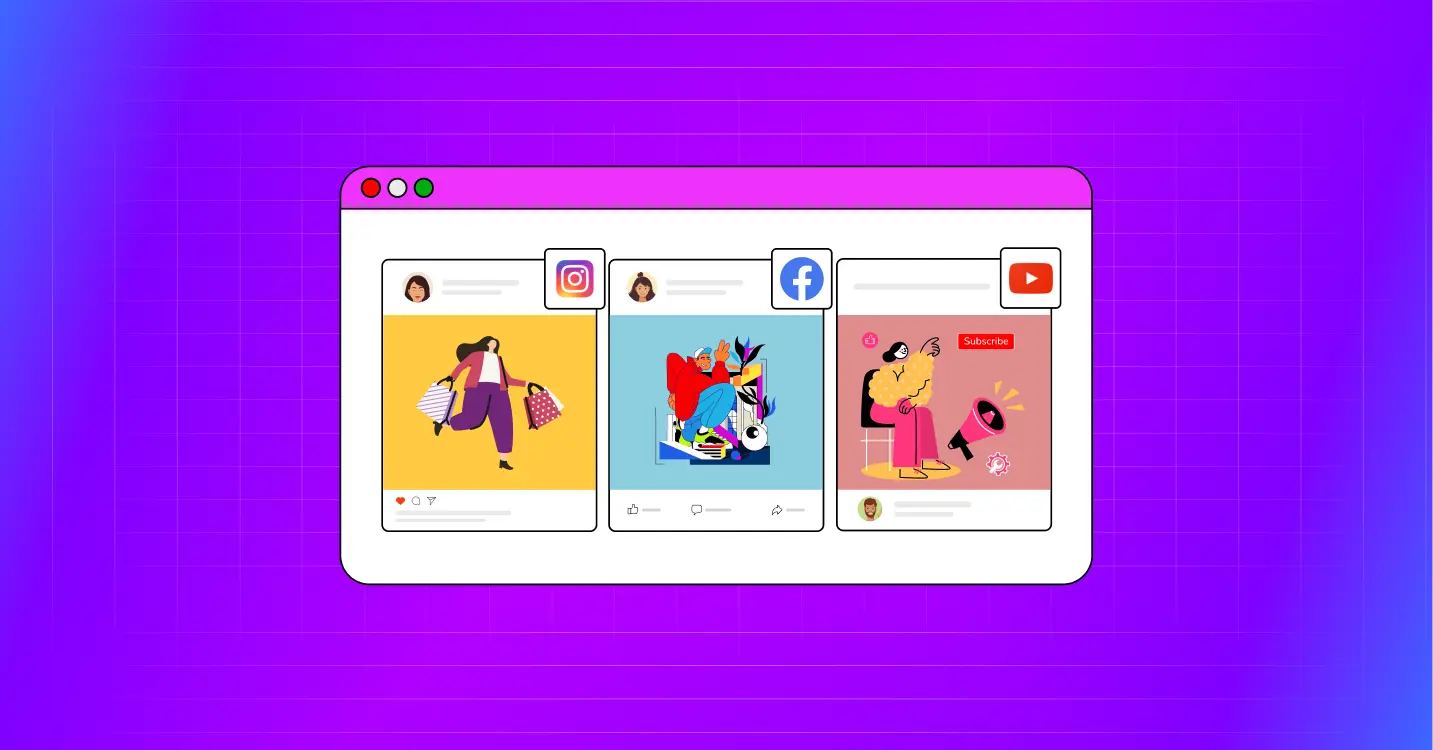
How to Embed Social Media Feeds on WordPress Website (2026)


Smart businesses know how important it is to show their social media presence on their website. It tells new visitors what your brand personality is and how real people perceive it.
But the problem starts when you actually try to embed social media feeds on your website. Maybe you go the manual route first. Copy an embed code, paste it in. It works for a few days. Then it breaks, and you have no idea why.
Or you look for a WordPress plugin. You find one for Instagram. But then you need a separate one for Facebook, TikTok, and the list goes on. Now you are paying for each one separately, bleeding money every month.
In my marketing career, I have seen hundreds of businesses stuck in this exact loop.
Today, I will walk you through how social media feed embedding actually works on WordPress, how to connect multiple platforms without high costs, and how different businesses can benefit with the right tool.
Key takeaway
- Embedding a social media feed means displaying live, automatically updating content from platforms like Instagram, Facebook, YouTube, or TikTok directly on your website.
- There are three ways to embed social feeds: static embeds, widget embeds, and dynamic feeds. Only dynamic feeds update automatically and stay reliable over time.
- Static embeds break often. Widget embeds depend on third party servers. A dedicated WordPress plugin is the easiest and most practical solution.
- Different feed types serve different goals. Choosing the right one for the right page makes a real difference in engagement and conversions.
- WP Social Ninja supports multiple platforms from a single plugin, which saves cost and simplifies management compared to using separate tools.
- Top brands use social feeds to tell a story and sell a lifestyle, not just to display their latest posts.
Different types of social media embed methods for WordPress
There are three main ways to embed social media feeds on a WordPress website: static embeds, widget embeds, and dynamic feeds. Each works differently and delivers very different results.
Here is a quick overview of these three methods:
| Type | How it works | Updates automatically | Design control |
| Static embed | Copy a code from the platform and paste it on your page | No | Very limited |
| Widget embed | A third-party tool hosts your feed and loads it on your page from their server | Tool dependent | Limited |
| Dynamic feed | Your website connects directly to the platform through API and pulls live content | Yes | Full control |
Let’s take a look at this breakdown of how each embed method works:
- Static embed: You copy an embed code snippet directly from your social media post and paste it on your WordPress page. It shows your content at that moment, but never updates. When the platform changes something on their end, it breaks.
- Widget embed: You sign up for a third-party tool, create your feed there, and paste their widget code on your page. The feed loads from their server, not yours. If their server is slow or fails to update new posts, the same happens to your page
- Dynamic feed: Your website talks directly to the social media platform through API. This securely pulls content automatically. WordPress social media plugins are usually built to handle this connection for you, without any coding.
From my experience, a dedicated WordPress plugin is always the smartest choice. You do not need any technical knowledge, and it saves your time, money, and the headache of dealing with broken feeds.
Types of social media feeds to display on your WordPress website
Different social media feeds serve different purposes. The type you choose determines what your visitors see and how engaging your website feels. Understanding the different options will help you pick the right one based on your goals.
Here are the most common social media feed types businesses use:
| Feed type | What is displays |
| Profile or Timeline feed | Latest posts from your social media account |
| Hashtag feed | Posts tagged with a specific hashtag, including user-generated content |
| Video feed | Latest videos from your YouTube or TikTok channel |
| Live stream feed | Active or recent YouTube live streams |
| Playlist feed | Videos from a specific YouTube playlist |
| Album feed | Photo albums from your Facebook Page |
| Event feed | Upcoming events from your Facebook Page |
| Shoppable feed | Social media posts linked directly to product pages |
Let’s take a look at different social media feeds on websites in detail:
- Profile or Timeline feed: Displays posts directly from your social media account, like your Instagram profile or Facebook page.
- Hashtag feed: Pulls and displays content with a specific hashtag, mixing your own posts with user-generated content.
- Video feed: Shows your latest videos from Instagram, YouTube, or TikTok directly on your website. Instead of displaying individual videos, your entire channel updates automatically.
- Live stream feed: Displays your active or recent YouTube live streams on your website.
- Playlist feed: Shows videos from a specific YouTube playlist instead of your entire channel.
- Album feed: Displays photo albums from your Facebook Page on your website. It is a great fit to showcase moments in a more organized visual format.
- Event feed: Pulls upcoming events from your Facebook Page and displays them on your website automatically.
- Shoppable feed: Turns your social media posts into a clickable shop on your website. Each post links directly to a product page.
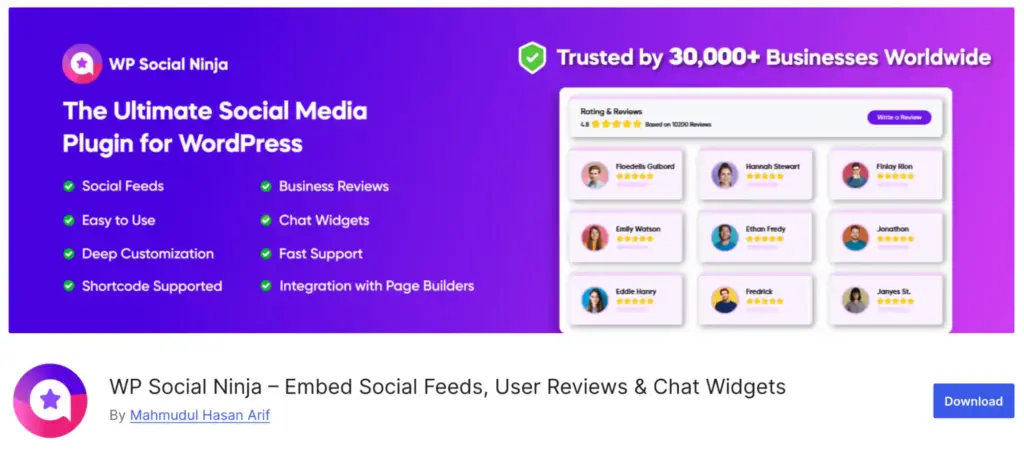
The best plugin to embed social media feeds on WordPress
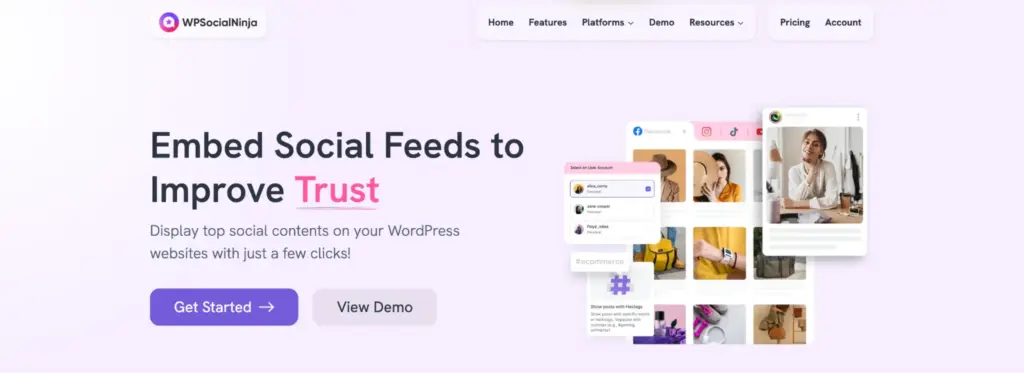
There are many social media feed plugins available in the WordPress directory. But if you want my professional opinion, I will recommend WP Social Ninja.
It is easy to set up, lightweight, uses secure API connections, and supports multiple platforms from a single dashboard, along with top-notch advanced feed features.
Over the years, I have personally tested and used all three of the most popular options in this space: WP Social Ninja, Smash Balloon, and Spotlight. Each has its strengths, but after years of working with them across different projects, WP Social Ninja is the one I keep coming back to.
Here is a quick comparison of these three plugins:
| Feature | WP Social Ninja | Smash Balloon | SpotlightWP |
| Social feed platforms | 4+ | 4+ (separate plugins each) | 1 (Instagram only) |
| Free version | Yes | Yes | Yes |
| Instagram feed | Yes | Yes (separate plugin) | Yes |
| Facebook feed | Yes | Yes (separate plugin) | No |
| TikTok feed | Yes | Yes (separate plugin) | No |
| YouTube feed | Yes | Yes (separate plugin) | No |
| Twitter/X feed | Yes | Yes (separate plugin) | No |
| Hashtag feeds | Yes | Yes | Yes (Instagram only) |
| YouTube live stream | Yes | Yes | No |
| Facebook album and event feed | Yes | Yes (requires additional extension) | No |
| Shoppable Instagram feed | Yes | Yes | Yes |
| Feed downtime alerts | Yes | Yes | No |
| Pre-built templates | Yes | Yes | Yes |
| Image optimization | Yes (advanced) | Yes (basic) | Yes (basic) |
| Local image storage | Yes | Yes | Yes |
| GDPR compliant | Yes | Yes | Yes |
| Feed filters | Advanced | Basic | Basic |
| Feed style moderation | Advanced | Basic | Basic |
| Pricing | Starts from $44/year (after discount) | $598 (for the bundle package to access all plugins) | Starts from $59/year (Instagram only) |
From the comparison table, you can see that WP Social Ninja covers all four major social feed platforms from a single plugin.
If you want a deeper breakdown between tools, check this detailed comparison of WP Social Ninja vs other social feed plugins to see how features, pricing, and performance differ in real use.
Smash Balloon requires a separate plugin and a separate purchase for each platform. Spotlight is focused entirely on Instagram and does not support Facebook, YouTube, or TikTok at all.
For businesses that need feeds from more than one platform, WP Social Ninja is the more practical choice with affordable pricing.
Here are the key social media feed features of WP Social Ninja that you’ll like:
- Multi-platform support from one plugin: Connect Instagram, Facebook, YouTube, TikTok, and Twitter/X without installing separate plugins or managing separate subscriptions.
- Multiple feed types: Profile feeds, hashtag feeds, playlist feeds, live stream feeds, album feeds, event feeds, and shoppable feeds are all supported, depending on the platform.
- Multiple layout options: Grid layout is available in the free version. Carousel and Masonry layouts are available in Pro, giving you more control over how your feeds look on the page.
- Shoppable Instagram feed: Tag products directly in your Instagram posts and link them to product pages on your website. A powerful feature for eCommerce businesses.
- Hashtag and keyword filtering: Show only the content that meets your quality standard. Hide posts by keyword, filter by hashtag, or manually include and exclude specific posts.
- Auto-sync: Your feeds update automatically whenever you publish new content on a connected platform. No manual refreshing needed.
- Image optimization and GDPR compliance: WP Social Ninja can automatically optimizes feed images and store them locally on your server. This reduces external requests, speeds up your page load time, and keeps your site GDPR compliant.
- Auto caching with template-level cache clear: Feed data is cached automatically to keep your pages loading fast. You can also clear the cache at the individual template level, so you refresh only the feed you need without affecting the rest of your site.
- Feed downtime alerts: If a feed connection breaks due to an expired token or an API change, WP Social Ninja sends you an email alert so you can fix it before visitors notice.
- Page builder compatibility: Works with Gutenberg, Elementor, Beaver Builder, and Oxygen. Embed feeds using a shortcode, block, or widget, depending on your setup.
- No coding required: The entire setup, from connecting accounts to customizing layouts, is handled through a visual dashboard inside WordPress.
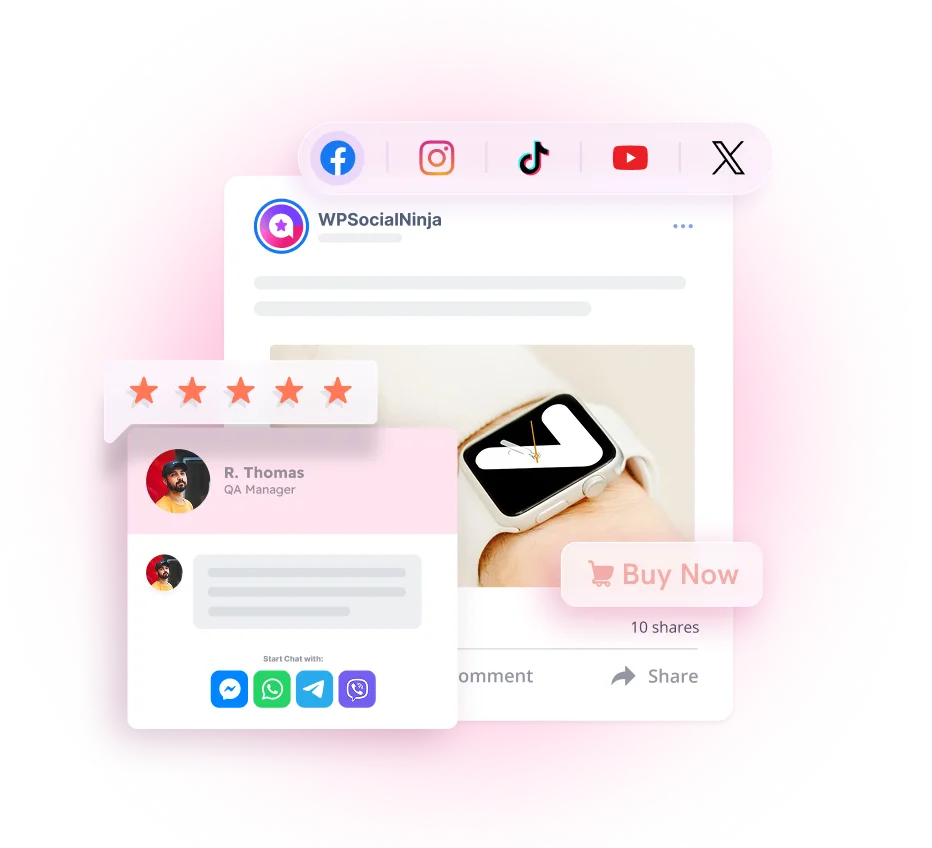
Besides social media feed integrations, it offers more features needed by almost all businesses. You’ll be able to add customer reviews, notification popups, chat widgets, and testimonials. With a total of 30+ platforms from a single subscription.
For businesses that need social feeds, reviews, chat widgets, and more in one place, managing everything from a single dashboard saves both time and money. All your social proof in a single dashboard.
Win your customers’ hearts with exceptional features
Discover how WP Social Ninja can assist you in designing outstanding customer experiences.
How to embed social media feeds with WP Social Ninja
Now that you know what WP Social Ninja offers, let me walk you through how to connect each platform. The process is straightforward for all of them. But first, you’ll need to install WP Social Ninja on your website.
You can do that in two ways:
- From your Dashboard
- From WordPress Repository
Here’s how to install it from your Dashboard:
- Navigate to the WordPress Admin panel. From the WordPress Dashboard, go to Plugins > Add New
- Next, in the search input field, type WP Social Ninja and wait for a moment for it to come up
- Now, click on the Install Now button
- Then Activate
If you decide to install from the WordPress Repository:
- Search WP Social Ninja in the WordPress Repository, and it will appear at the top. Once you click it, hit the Download button
- Now go to the Dashboard and go to Plugins > Add New > Upload Plugin > Choose the zip file
- After that, click the Install Now button and then Activate
I will now show you how to connect Instagram, Facebook, YouTube, and TikTok feeds with WP Social Ninja. Follow the steps below, and your feed will be connected within five minutes.
How to embed an Instagram feed on WordPress website
WP Social Ninja lets you connect your Instagram account in three ways: Business Basic, Business Advanced, or manually using an access token. Choose the method that matches your account type.
Before you start, make sure your Instagram account is a Business or Creator account. Personal accounts cannot be connected through the API. If you currently have a personal account, you can convert it to a Business or Creator account.
Follow these steps to get started:
- From your WordPress dashboard, go to WP Social Ninja and click on Platforms in the navbar.
- Find Instagram and click the Settings icon to open the configuration pop-up.
- A pop-up will appear asking you to select your Account Type. You will see three options: Business Basic, Business Advanced, and Account Manually.
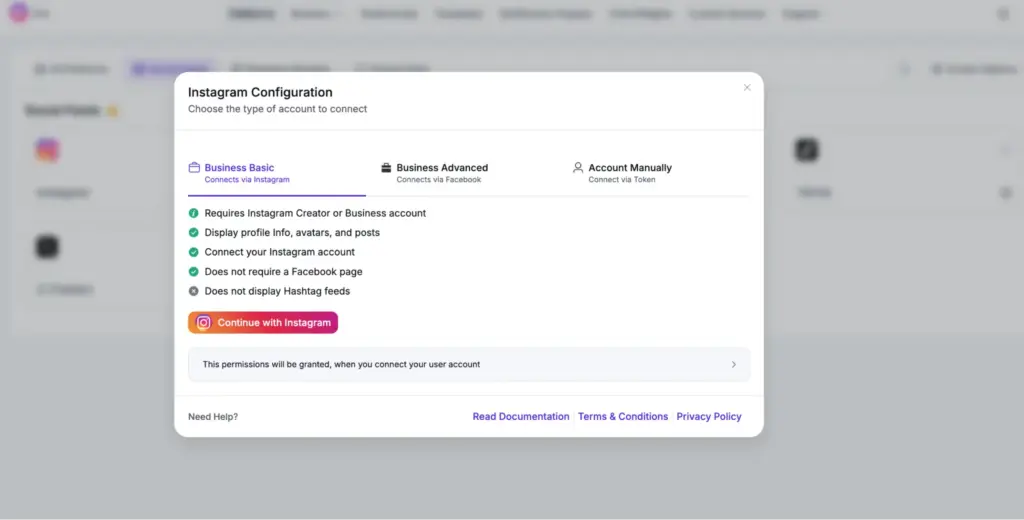
How to connect a Business Basic account
- Select Business Basic from the Account Type dropdown and click the Continue with Instagram button.
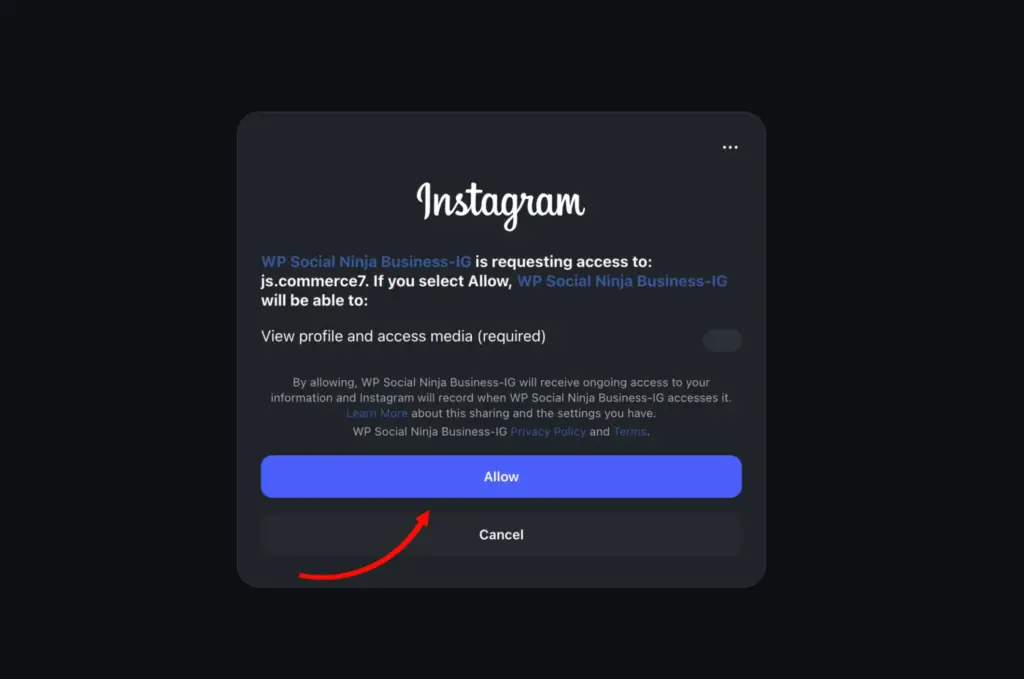
- You will be redirected to Instagram. Log in to your Business or Creator account.
- An Access and Permissions screen will appear. Click Allow to grant WP Social Ninja the necessary permissions.
- Your Instagram account is now connected. Click Add New Template to create and customize your feed.
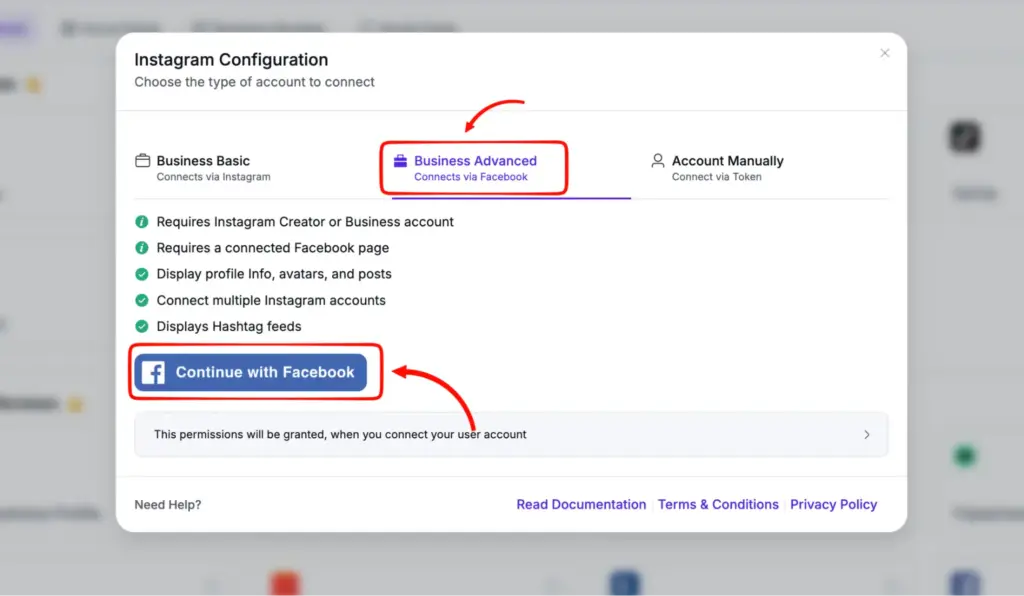
How to connect a Business Advanced account
- Select Business Advanced from the Account Type dropdown and click the Connect with Facebook button.
- You will be redirected to Facebook. Log in to the Facebook account linked to your Instagram Business account.
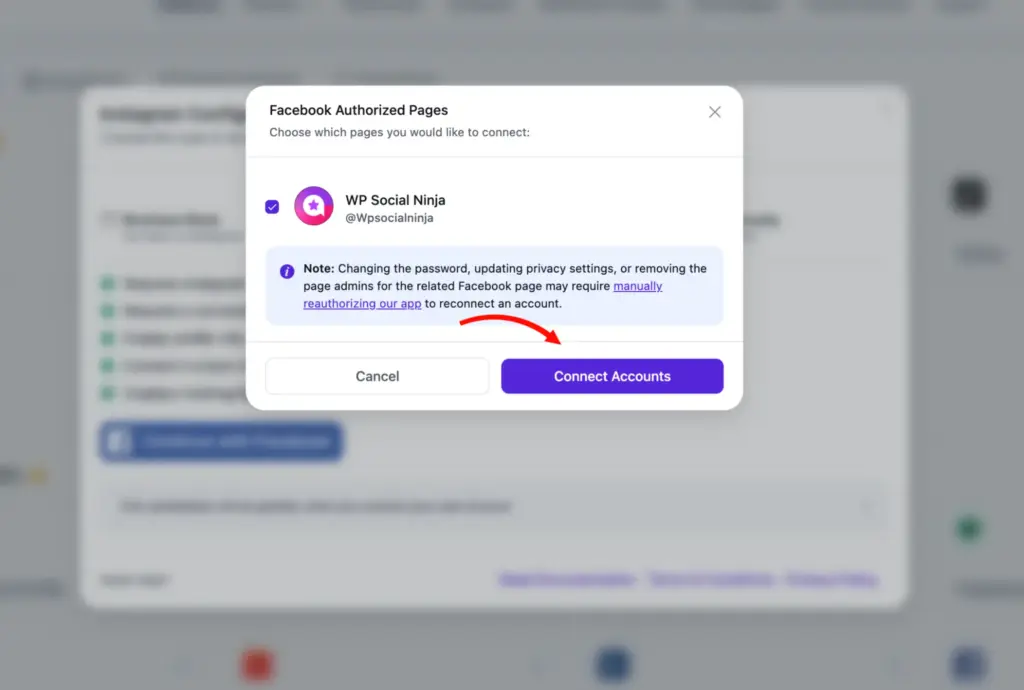
- An Access and Permissions screen will appear. Click Continue to grant the necessary permissions. Then, select your Business Account linked to Facebook and click Connect Accounts.
- Your Instagram Business Advanced account is now connected. Click Add New Template to create and customize your feed.
How to connect an Instagram account manually
- Select Account Manually from the Account Type dropdown.
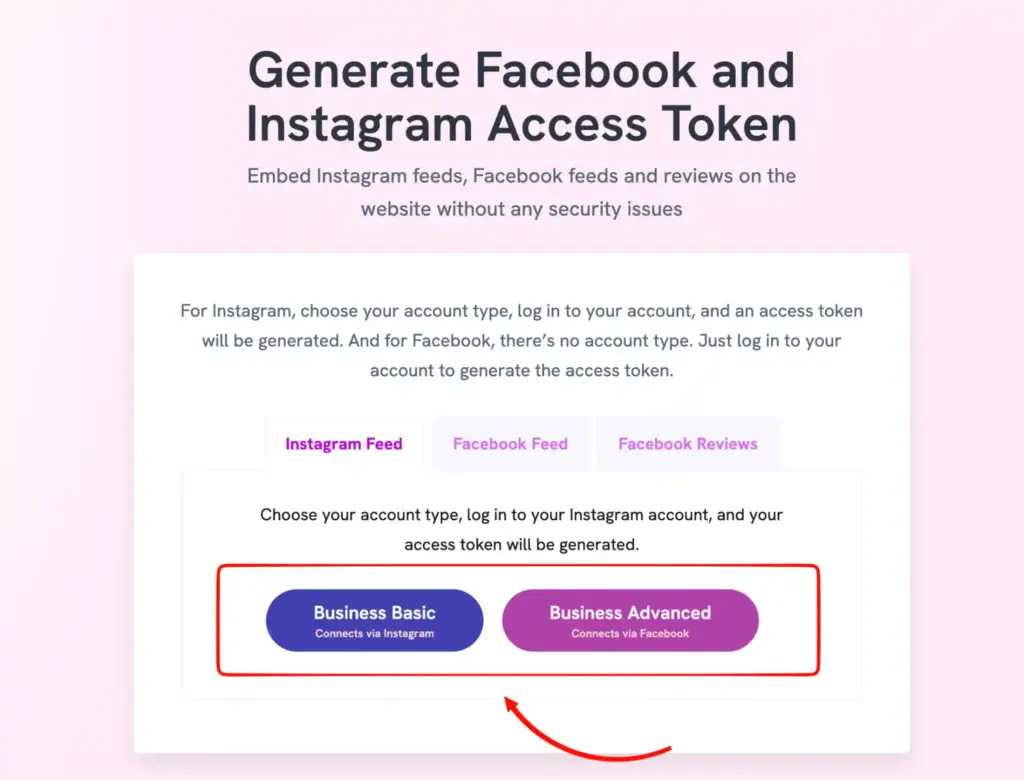
- Click the Access Token Generator link to open the generator page.
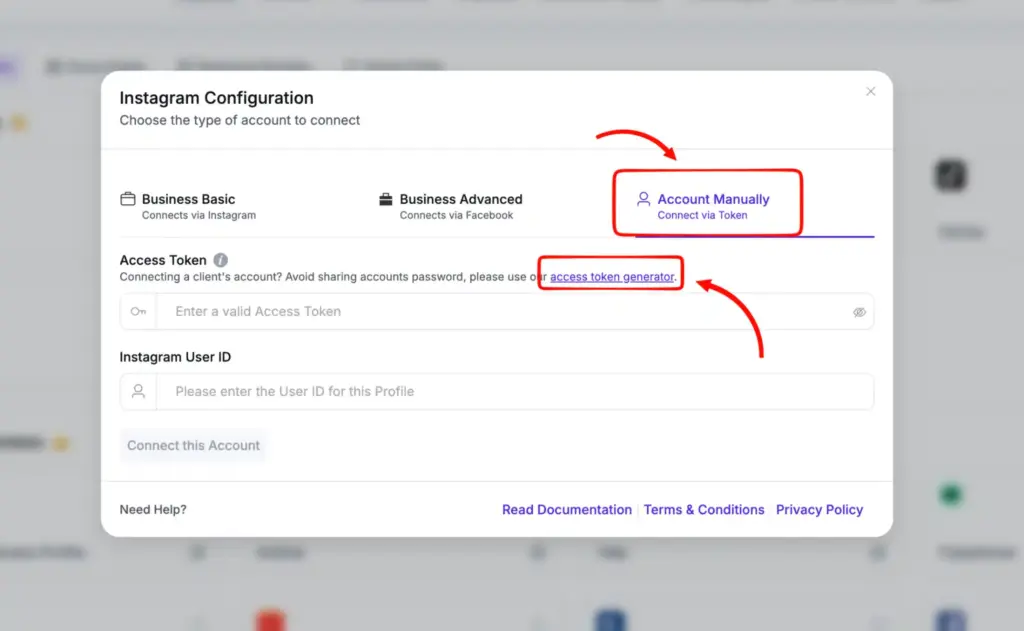
- Select Instagram Feed and choose your Account Type, either Business Basic or Business Advanced.
- Grant the necessary permissions by clicking Allow.

- Your Access Token and User ID will be generated. Copy both.
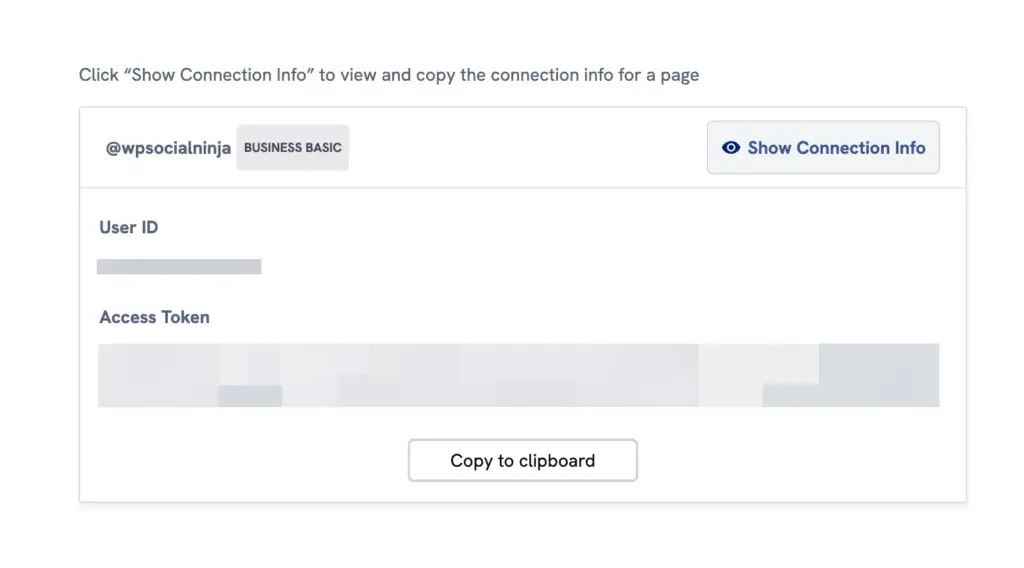
- Return to WP Social Ninja, paste the Access Token and User ID into their respective fields, and click Connect This Account.
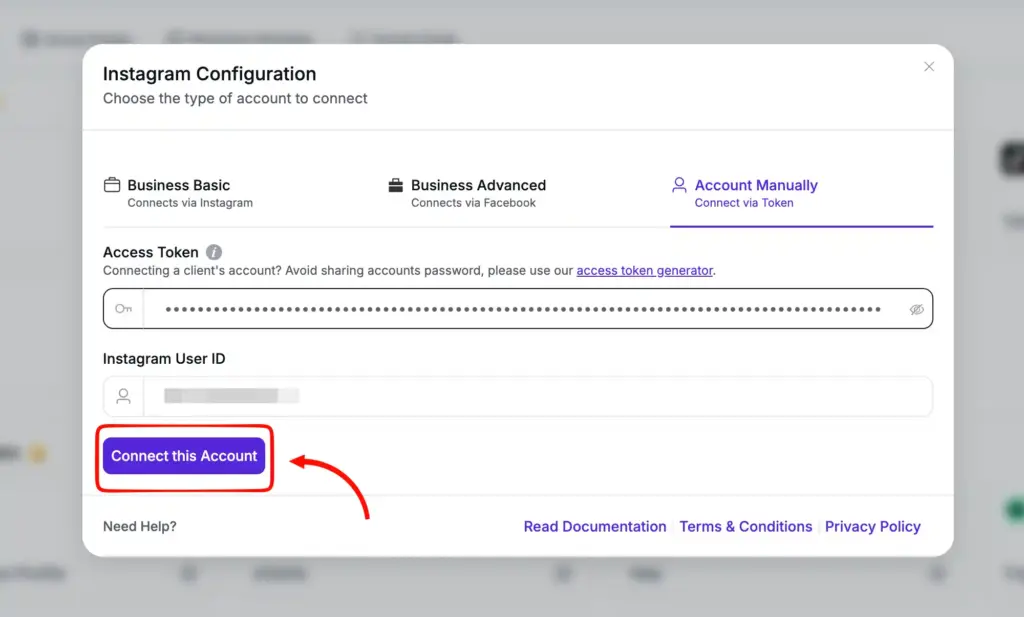
- Your account is now connected. Click Add New Template to create and customize your feed.
Once your Instagram account is connected, you’ll need to create a feed template, adjust the layout, and place it on your page using a shortcode or block. This is the step where your feed actually appears on your website.
If you want the full process, including how to display and style the feed properly, follow our guide on how to embed an Instagram post on a WordPress website.
How to embed a Facebook feed on WordPress website
WP Social Ninja connects directly to your Facebook Page through a simple authorization process. Just log in, grant permissions, select your page, and your feed is ready to go.
Follow these steps to connect your Facebook Page:
- From your WordPress dashboard, go to WP Social Ninja and click on Platforms in the navbar.
- Find Facebook and click the Settings icon to open the configuration popup.
- Click Continue with Facebook and log in to your Facebook account.
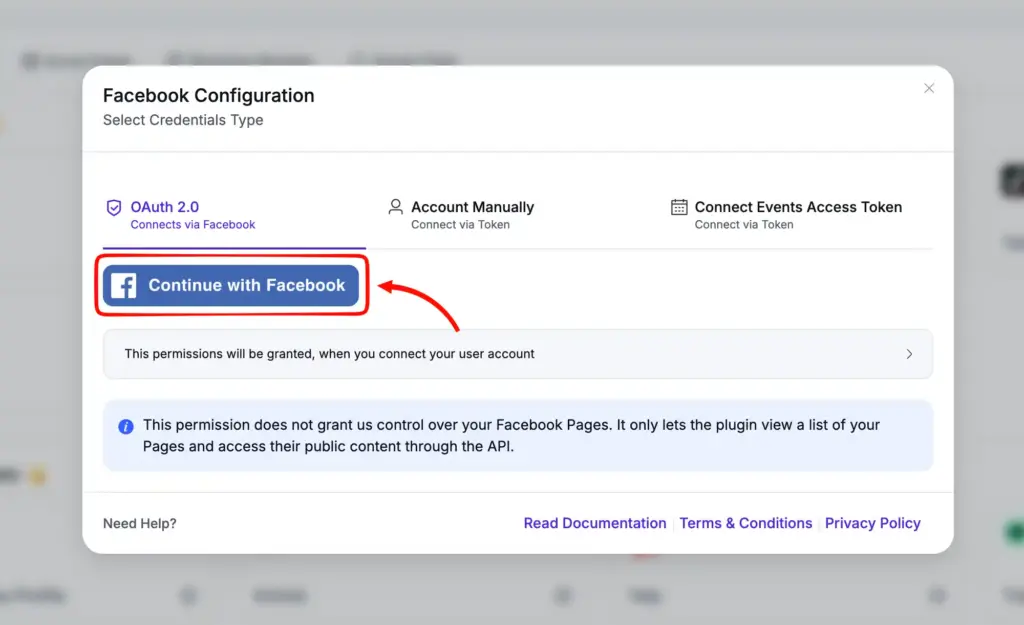
- Click Continue to grant WP Social Ninja the necessary permissions to access your Facebook Page.
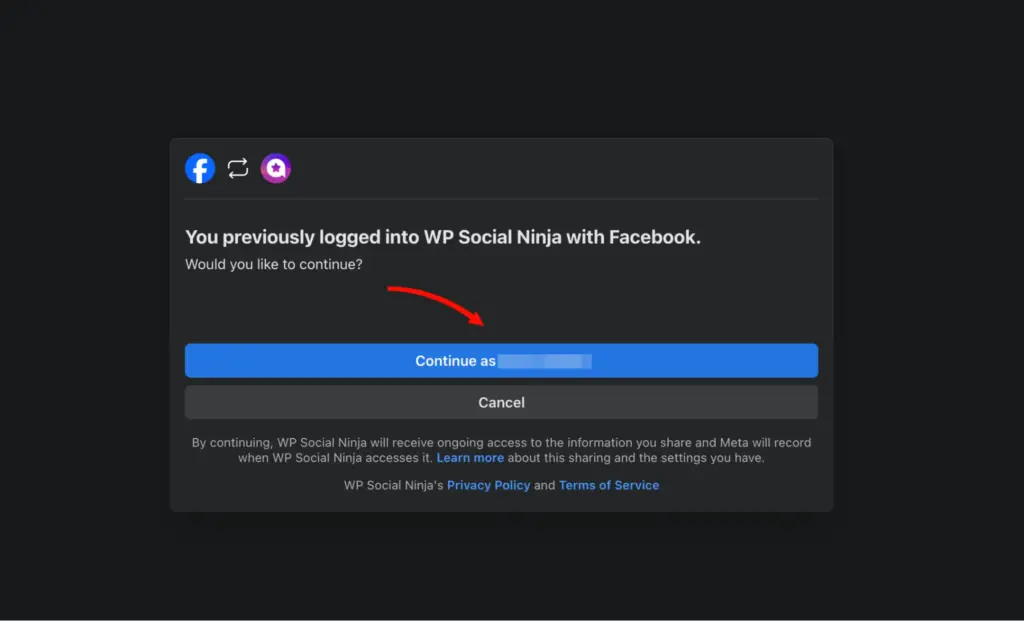
- You will be redirected back to WP Social Ninja. A popup will appear asking you to select one or more Facebook Pages to display on your website.
- Select your Page and click the Connect Pages button.
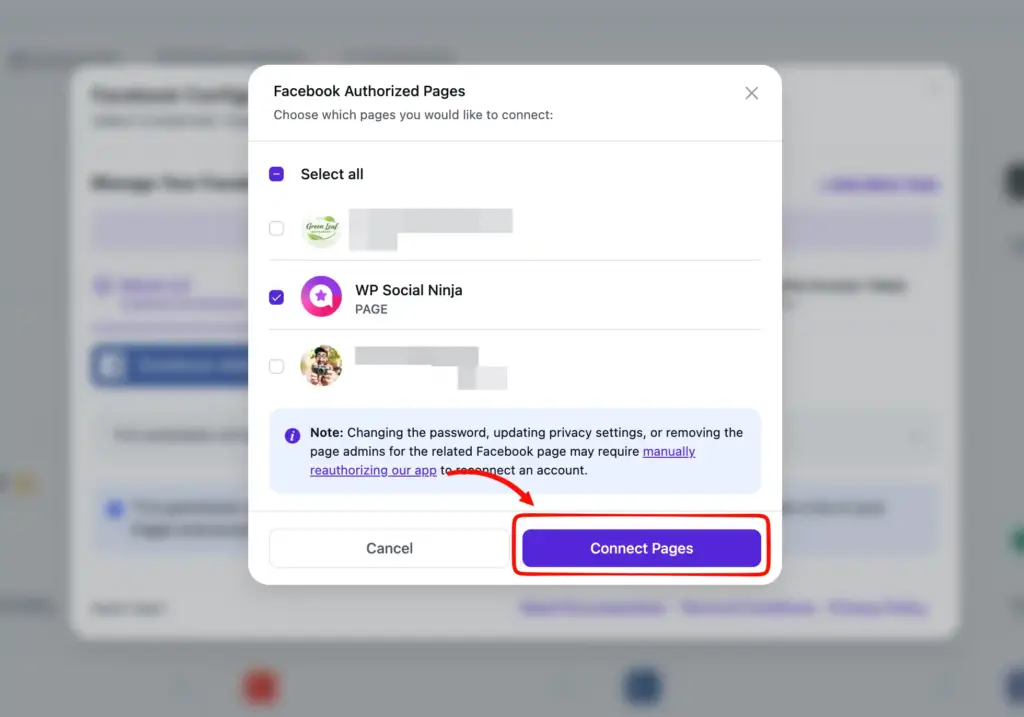
- Your Facebook Page is now connected. Click Add New Template to create your feed and choose a layout.
To understand more about the integration process, you can check our article on how to add a Facebook feed on WordPress.
How to embed a TikTok feed on a WordPress website
WP Social Ninja connects to your TikTok account through a simple access code authorization. Just log in, grant permissions, and paste the code to get your feed live.
Follow these steps to connect your TikTok account:
- From your WordPress dashboard, go to WP Social Ninja and click on Platforms in the navbar.
- Find TikTok and click Connect to open the configuration popup.
- Click the Continue with TikTok button.
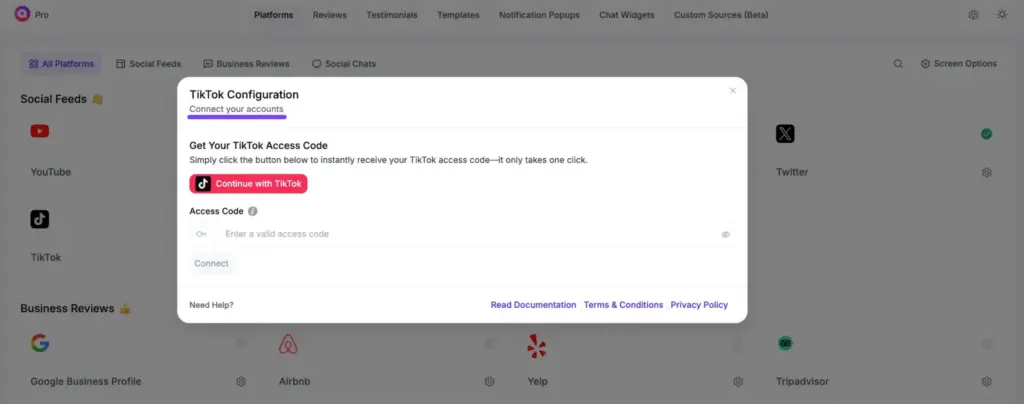
- You will be redirected to the TikTok login page. Log in to your TikTok account.

- Select the permissions for WP Social Ninja and click Continue.
- TikTok will generate an Access Code. Copy it and paste it into the Access Code field in WP Social Ninja.
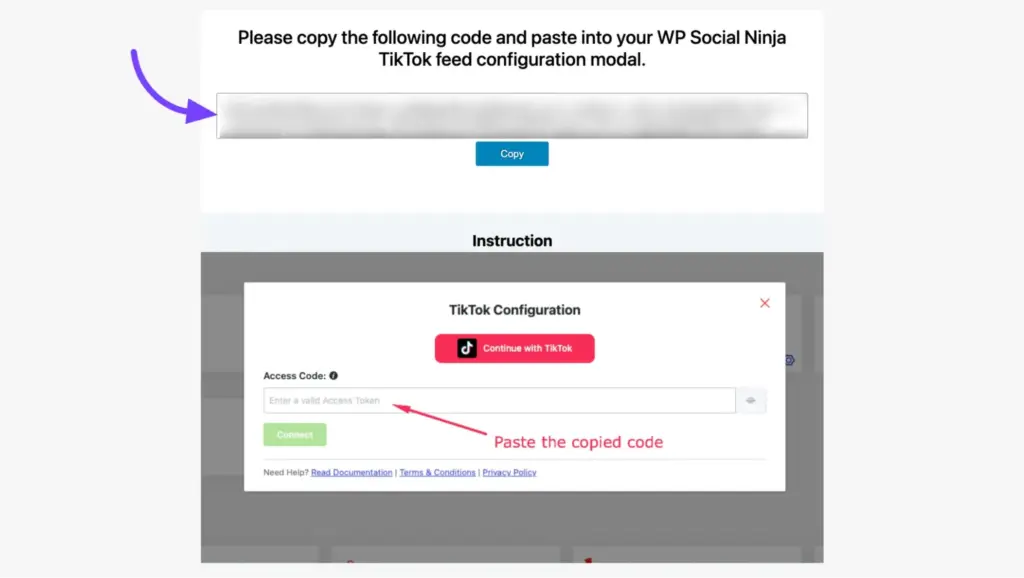
- Your TikTok account is now connected. Click Add New Template to create and customize your TikTok feed.
Please note that TikTok requires you to reconnect your account every 7 days due to their data privacy policy. If you do not reconnect within that period, WP Social Ninja will send an error notification, and your TikTok feed data will be automatically deleted.
How to embed a YouTube feed with WP Social Ninja
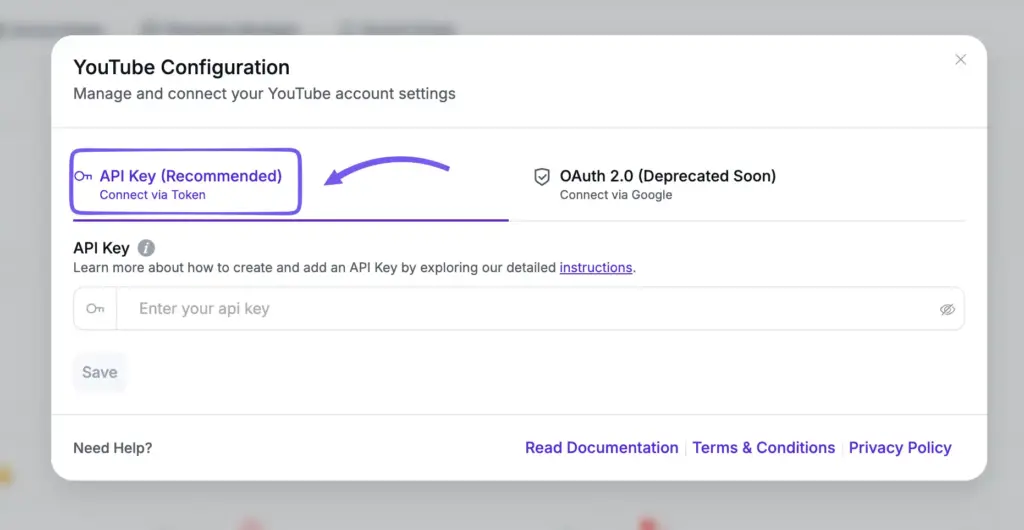
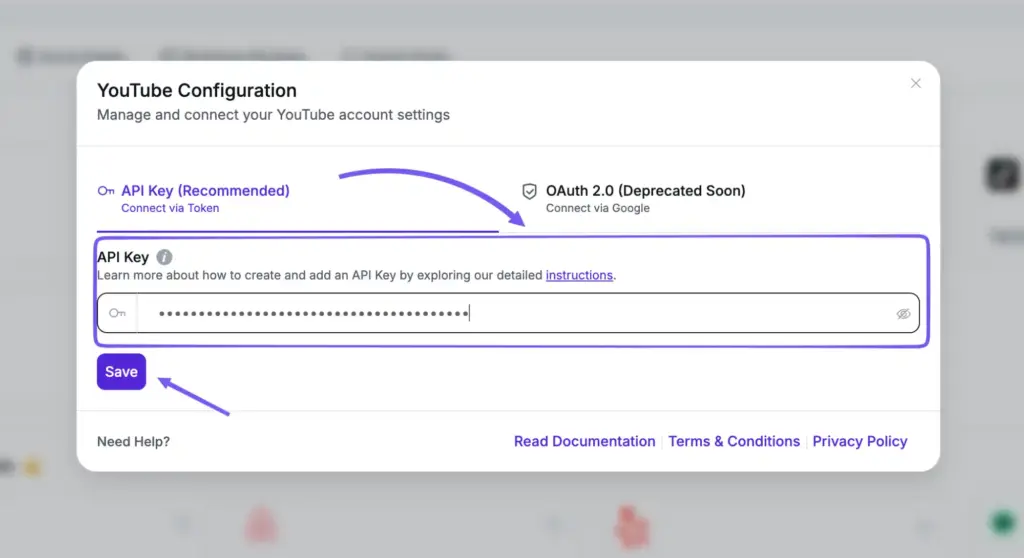
WP Social Ninja offers two methods to connect your YouTube channel. The API Key method is recommended for long-term stability.
Here’s how you can do it easily:
- From your WordPress dashboard, go to WP Social Ninja and click on Platforms in the navbar.
- Click the Social Feeds tab, find YouTube, and click the Connect button.
- In the pop-up, select the API Key (Recommended) option.
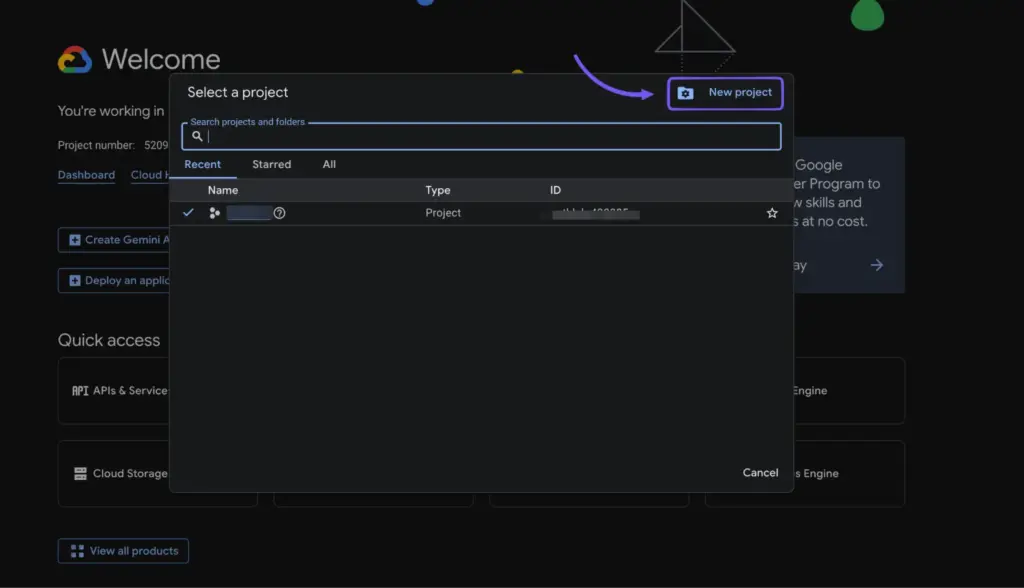
- Go to the Google Cloud Console and log in with your Google account. Click Select a Project, then New Project.
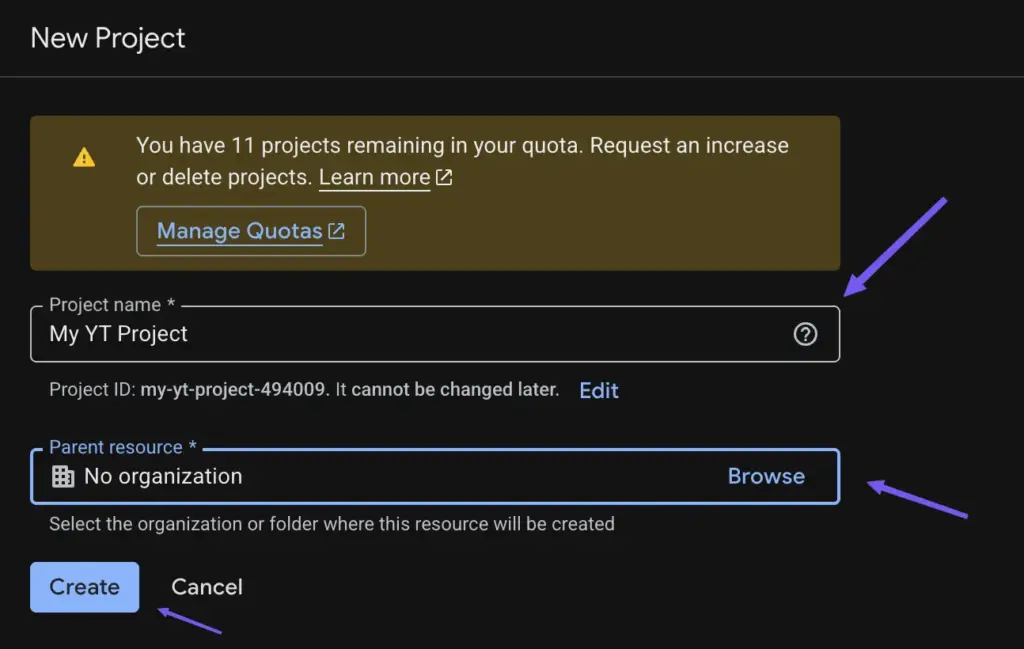
- Enter a project name and click Create.
- Navigate to APIs and Services, then Credentials. Click Create Credentials, select API Key, and click Create. Copy the key generated.

- Go back to APIs and Services and click API Library. Search for YouTube Data API v3 and enable it. Without this step, the API key will not work.
- Return to WP Social Ninja, paste your API Key into the YouTube API Key field, and click Save. Your YouTube channel is now connected.
Best practices for embedding social media feeds
Getting the feed live is just the first step. Here is what I have learned from my experience about making feeds actually work for the business goals behind them.
Do not put every feed on every page
| Common mistakes | Better approach |
| Multiple feeds on the homepage | Choose one feed carefully for better impact |
| Same feed repeated across pages | Match the feed to the page purpose |
| Auto-playing videos on product pages | Use a static thumbnail with click-to-play |
| Feeds without context | Add a headline or label above the feed |
Match the feed to the page goal
- Homepage: Instagram or TikTok feed showing brand personality and recent activity
- Product pages: UGC feed showing real customers using the product
- About page: behind-the-scenes content or team activity
- Resources page: YouTube feed keeping video library updated automatically
- Contact page: Facebook feed showing responsiveness and community engagement
Bonus Tips: Without a clear goal, your social media marketing attempt will only face troubles. So, learn how to set clear social media marketing goals for better brand exposure.
Curate what you display
You do not have to show everything. Use filters to show only your best content. With WP Social Ninja, you can:
- Filter posts by keyword
- Include or exclude specific posts
- Hide content that does not meet your quality standard
- Control the exact number of posts visible at any time
Keep your connections active
WP Social Ninja sends email alerts if a feed connection breaks. When you get one of those alerts, just go to your connected accounts inside WP Social Ninja and hit reconnect. It takes about 30 seconds and keeps everything running smoothly.
Always test on mobile
More than half of your visitors are on a phone. A feed that looks great on desktop but breaks on mobile is worse than no feed at all. After setting up any feed, open your site on a phone and check that:
- The layout is responsive
- Images load at the right size
- Text is readable without zooming
- The feed does not overflow its container
How to troubleshoot common social feed issues
Even with a good plugin, things can sometimes go wrong. Here are the issues I have seen most often, along with how to fix them quickly.
| Problem | Most likely cause | Fix |
| Feed not updating | Expired access token | Reconnect the account in WP Social Ninja |
| Feed not showing at all | Revoked permissions or wrong shortcode | Check account connection and shortcode placement |
| Slow loading feed | Too many posts or uncached images | Reduce post count, enable image optimization |
| Broken layout on mobile | Layout not responsive | Switch to Grid layout |
| API error message | Platform API change | Check WP Social Ninja changelog and update the plugin |
| Old content is showing after the update | Page cache not cleared | Clear your template cache from the WP Social Ninja dashboard |
| Feed showing the wrong account | Wrong account connected | Disconnect and reconnect the correct account |
Pro Tips: If you find it difficult to fix Facebook feed issues, you can check our detailed guide on Facebook API error fixing for a stable connection.
How different businesses can use social feeds for better profit
In my years of working with different types of businesses, I noticed that not every social feed works the same way for everyone. It depends on the type of your business and audience.
Let me break that down.
- eCommerce stores: For product pages, an Instagram or TikTok UGC feed showing real customers using the product works best. On the homepage, an Instagram profile feed builds brand trust and shows activity. On the cart or checkout page, a Facebook feed reassures buyers right before they complete their order.
- Local businesses: Restaurants, salons, clinics, and service providers do really well with Instagram or Facebook feeds on their homepage and about page. It shows new visitors that the business is active and gives them confidence.
- Agencies and freelancers: An active social feed on a portfolio or services page tells potential clients you are engaged and current. A YouTube feed showing case studies or client work is especially powerful here.
- Beauty industry: Salons, makeup artists, and skincare brands thrive on visual content. An Instagram or TikTok feed showing transformations, tutorials, and real client results builds trust and drives bookings faster than any sales copy ever will.
- Fitness industry: Gyms, personal trainers, and fitness coaches can use Instagram or TikTok feeds to show workout clips, member transformations, and daily motivation content. It keeps the website feeling energetic and gives potential members a taste of what they are signing up for.
- Education: Schools, online course creators, and training providers can use YouTube feeds to showcase lessons, demos, and student success stories. It adds credibility and gives prospective students a feel for the teaching style before they enroll.
- Sports: Sports clubs, teams, and individual athletes can use Instagram and Facebook feeds to keep fans updated on match results, training highlights, and behind-the-scenes moments. It turns a static website into a live hub for fans.
- Software and tech companies: A YouTube channel feed on a features or resources page keeps your site fresh without you having to update it manually. Facebook feeds also work well for product news, events, and announcements.
- Personal brands and bloggers: Connecting Instagram or TikTok to your personal website brings your content to visitors who do not follow you on those platforms yet. It also keeps your site feeling alive without publishing new blog posts every week.
- Non-profits and community organizations: Facebook Page feeds and event feeds keep supporters informed and engaged directly from the website. They do not need to visit Facebook separately to stay updated.

Get exclusive social media marketing tips and tutorials in your inbox!
Case study: how top brands use social media feeds
The biggest brands in the world are not just using social media feeds to show their latest posts. They use them to tell a story, sell a lifestyle, and create a dream that visitors want to be part of. Here are five real examples that will show you exactly how they do it.
1. GoPro
GoPro embeds a live Instagram feed on their homepage filled entirely with user-generated content. Real customers filming surfing, skydiving, hiking, and adventure sports from every corner of the world.
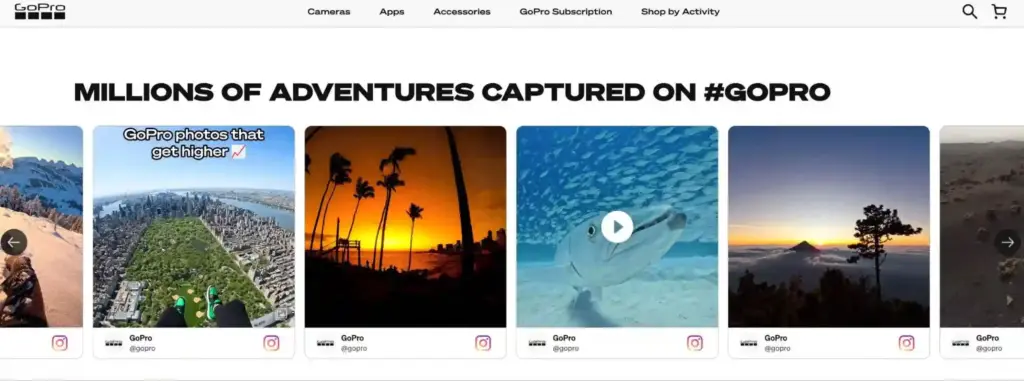
They do not need to say their camera is good. Their customers say it for them, right on the homepage. A visitor lands, sees thousands of real people doing incredible things with a GoPro, and the purchase decision almost makes itself.
2. CUBE Bikes
CUBE is a German bike brand that uses an Instagram feed on their homepage to show real riders on real terrain. Mountains, trails, roads, and city streets. All captured by actual customers who love the product.

What makes it smart is that CUBE is not just selling a bike. They are selling a lifestyle and a feeling. A visitor does not just see a product on a page. They see what it feels like to ride one. That emotional connection is very hard to create with product descriptions alone.
3. University of Manchester
The University of Manchester links directly to its Instagram and TikTok under a section called “Discover Manchester,” encouraging prospective students to explore student life through real social content rather than official marketing material.
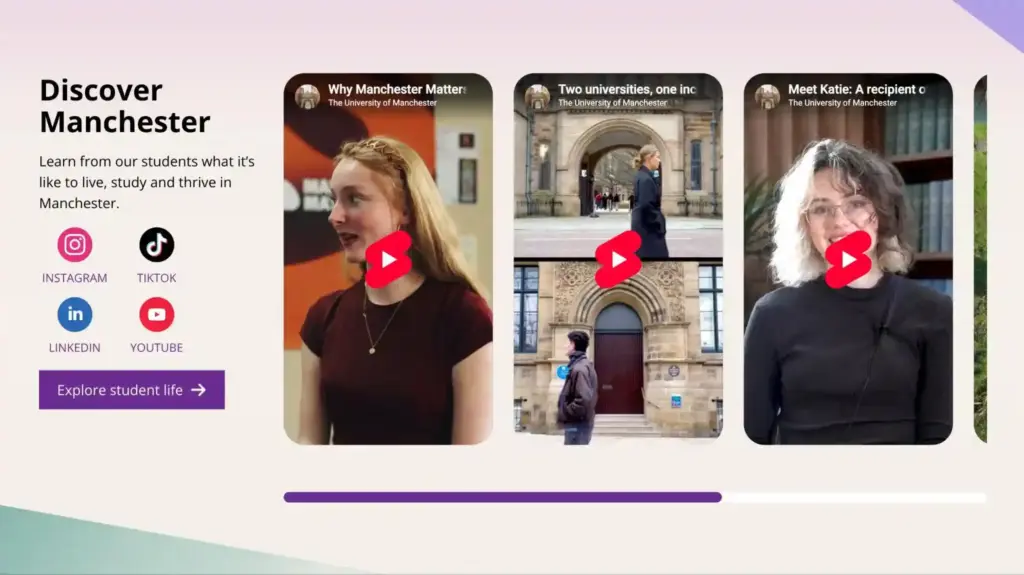
Younger students want to see real experiences before applying. They trust a TikTok from a current student far more than a polished brochure. By pointing visitors to their social feeds, Manchester essentially lets its own students do the recruitment for them.
4. VfL Wolfsburg
VfL Wolfsburg has a dedicated “Social News” section on its homepage that pulls in live social activity. Match updates, behind-the-scenes moments, player content, and fan reactions all flow in real time.
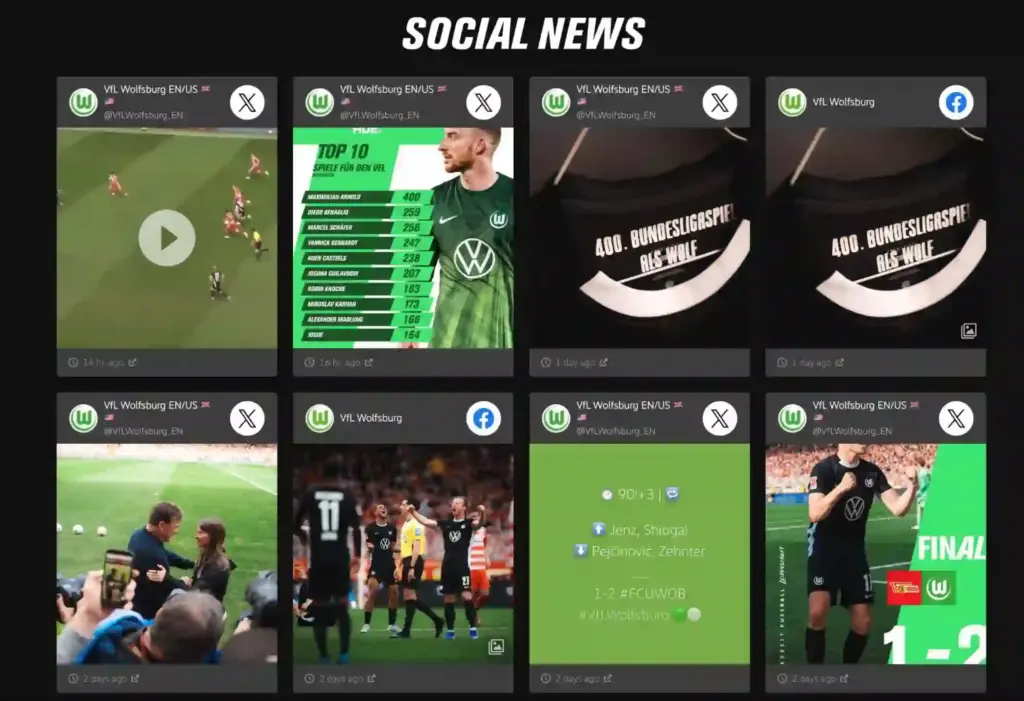
For a football club, keeping fans engaged between matches is everything. The social feed turns their website into a living hub rather than a static information page. Fans find fresh content every time they visit, which keeps them coming back long after the final whistle.
5. Romantik Hotels
Romantik Hotels runs a section called “Romantik Social” on their homepage that showcases guest Instagram posts tagged with their branded hashtag. Real guests sharing real experiences from real stays across their boutique properties in Europe.

No stock photography or corporate staging. Just authentic moments from people who actually stayed there. For a premium hotel brand, that kind of trust signal is far more convincing than any advertisement they could run.
Use social media feeds like a pro
Embedding social media feeds on your website is one of the simplest things you can do to make your website feel alive. It shows visitors that your brand is active, real people love what you do, and there is a community behind your business. That kind of trust is very hard to build with words alone.
The brands doing it best are not just displaying posts. They are telling stories, showing real experiences, and turning their social presence into a conversion tool. You can do the same thing, whether you run a restaurant, a fitness studio, an online store, or a personal brand.
WP Social Ninja makes the whole process simple. One plugin, multiple platforms, no coding, and no ongoing maintenance headaches. Connect your accounts once and let it do the rest. Your feeds will update automatically, load fast, and look good on every device. If you have not added social feeds to your website yet, today is a good time to start.
Frequently Asked Questions (FAQs)
Will embedding social feeds slow down my website?
No. WP Social Ninja is built with performance in mind. It stores images locally and optimizes them automatically, which reduces external requests and keeps your page loading fast.
Can you embed social media feeds on WordPress without a plugin?
Yes, but only through embed codes copied directly from the platform. These do not update automatically and often break when platforms change their API policies or embed rules. For a reliable, long-term solution, a dedicated plugin is a much better option.
Will social media feeds help my SEO?
Yes. Fresh content is a strong SEO signal. Every time your feed updates with new posts, Google sees your page as active and regularly updated, which can positively impact your rankings over time.
Can I connect multiple social media accounts to one website?
Yes. WP Social Ninja allows you to connect multiple accounts per platform. You can create separate feeds for each account and embed them on different pages.
Does embedding social feeds hurt my website’s privacy compliance?
No. WP Social Ninja is GDPR compliant. It stores images locally and avoids third-party requests, so visitor data is not shared with external servers without consent.
Is WP Social Ninja a heavy plugin?
No. It is specifically designed to be lightweight. The plugin is built for speed and performance, so adding it to your website will not bloat your site or conflict with your existing setup.
Will my social feed ever break?
WP Social Ninja uses official API connections for maximum stability. If a feed does break due to an expired token or a platform change, the plugin will immediately send you an email alert so you can fix it before your visitors notice.
Can I display a social feed without showing my follower count or profile information?
Yes. You have full control over what appears in the feed. You can hide the header, follower count, profile picture, and other elements directly from the feed settings.
Do I need to keep posting on social media for my feed to stay useful?
Yes. If your social media account becomes inactive, your feed will show old content. Stale posts can make your brand look inactive to new visitors, so regular posting keeps the feed working in your favor.

Subscribe To Get
Weekly Email Newsletter
Connect, Customize, and Display Social Feeds, Reviews, and Chat widgets


Trending Posts
-
-
 Mashfik Upal Aumy
 -


Leave a Reply