
How to Create an Event on Facebook in 2026 (Step-by-Step Guide)


You want to create a Facebook event. Simple enough. But then you open Facebook, and suddenly nothing is where you expected it to be.
The button you remember from last time has moved. The menu looks different. You click around for five minutes and still haven’t started.
It happens to a lot of people, not just beginners. Facebook updates its interface regularly, and what worked six months ago might look completely different today.
This guide fixes that. It will show you how to create a Facebook event in 2026, step by step, with updated instructions for both personal profiles and Facebook Pages. Whether you’re planning a local workshop, a business launch, a webinar, or a community meetup, you’ll have your event live before you finish reading this.
Creating a Facebook event takes less than 5 minutes if you follow the right steps.
Key Takeways
- Creating a Facebook event is simple: go to Events → Create, choose virtual or in-person, fill in the details, and publish
- You can create events from your profile, Page, or even a Facebook group, depending on your goal
- Make sure your event is set up properly with clear name, correct time zone, good description, and a cover image
- After publishing, don’t stop there; promote it by sharing, inviting people, and posting updates
- Avoid common mistakes like wrong timing, no image, or not promoting at all
Let’s start then!
Why Facebook events still work really well
Before the steps, here’s why it’s worth doing this properly.
According to Backlinko, Facebook has over 3 billion monthly active users. When you create an event, it doesn’t just sit there. It shows up in the Events tab, in recommendations, and in the feeds of people who follow your Page or are friends with you. People can mark themselves as “Going” or “Interested,” which then shows their friends, and that’s free reach you didn’t have to pay for.
There are a few specific things Facebook events do that a simple post can’t:
- Automatic reminders. Facebook sends notifications to interested attendees before the event starts. You don’t have to remind people yourself.
- Built-in RSVP system. You can see who’s coming, who’s interested, and roughly how many people to expect.
- Searchable. Public events are discoverable by people who don’t already follow you. That’s new audience reach at zero cost.
- Shareable. People can share your event to their own timeline or to groups, which multiplies your reach without any extra effort.
If you’re a small business, an event organizer, a marketer, or someone who just wants to bring people together, Facebook Events is one of the simplest free tools you have.
Types of Facebook events you can create
It helps to know your options before you start. Facebook lets you create these main types of events:
Online events
For anything that happens over the internet. This could be a Facebook Live session, a webinar, a virtual class, or an online launch. Facebook lets you choose how you want to host it, like using Live, a video room, or an external link.
Offline events
For physical gatherings. A store opening, a workshop, a networking event, a birthday party. You add a physical location, and Facebook can show it on a map for attendees.
Facebook group events
If you run a Facebook group, you can create events directly inside it. These are only visible to group members, which makes them ideal for private communities, member-only sessions, or niche meetups. It’s a simple way to keep your group engaged and organized without needing a public event.
Recurring events
If you host something regularly, a weekly meetup, a monthly class, or a recurring sale, you can set up a recurring event so you’re not creating it from scratch every time. This keeps your event presence consistent without extra work.
Knowing which type you need will make the setup faster. Also, if you’re creating events to grow your business, you’ll also need a steady audience. Here’s a simple guide on how to get more followers on Facebook so your events actually reach people
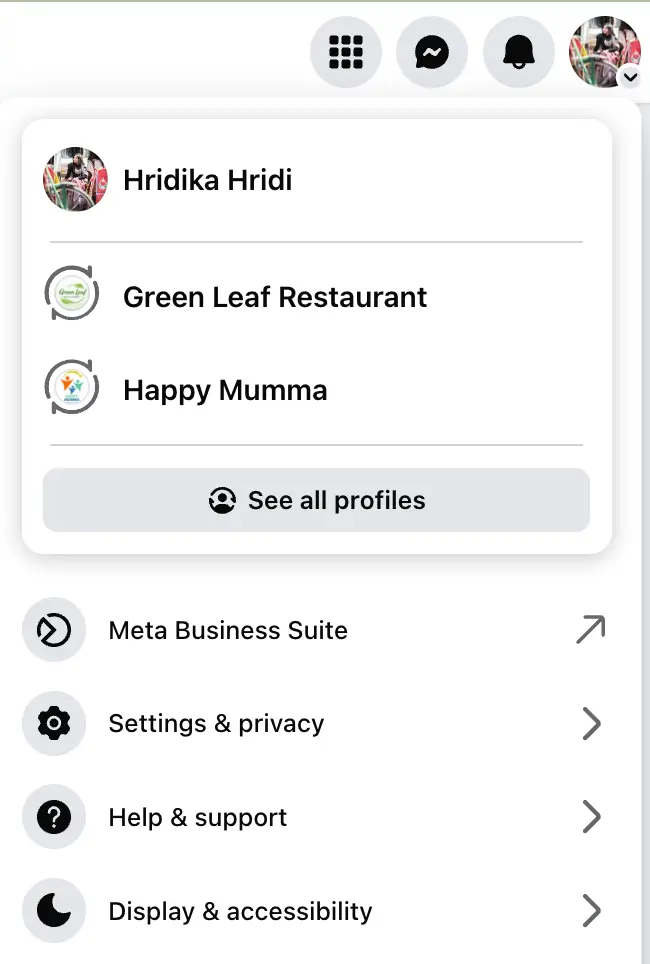
How to Create a Facebook Event from a personal profile
This is for people creating an event as themselves, not through a business Page.
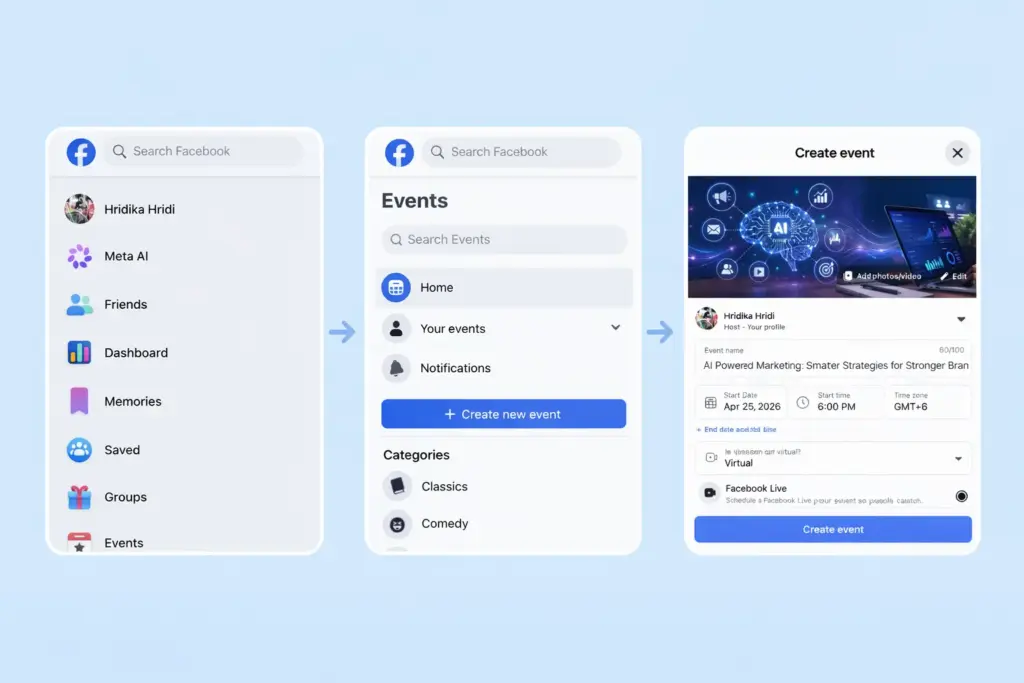
Step 1: Go to the Events section
On desktop, look at the left-hand menu on your Facebook feed. You’ll see a section called Events. Click it. If you don’t see it right away, click See more to expand the menu. It’s usually in there.
On mobile, tap the menu icon (three horizontal lines, usually in the bottom right or top right corner), then scroll down until you find Events.
Step 2: Click “Create new event”
Once you’re in the Events section, look for the Create new event button. On desktop it appears in the left sidebar. On mobile it’s usually a button near the top of the screen.
Step 3: Choose virtual or in-person
You will find two option in the dropdown, choose one the way you want to create you event.
- Choose In person if people are coming to a physical location
- Choose Virtual if it’s happening digitally
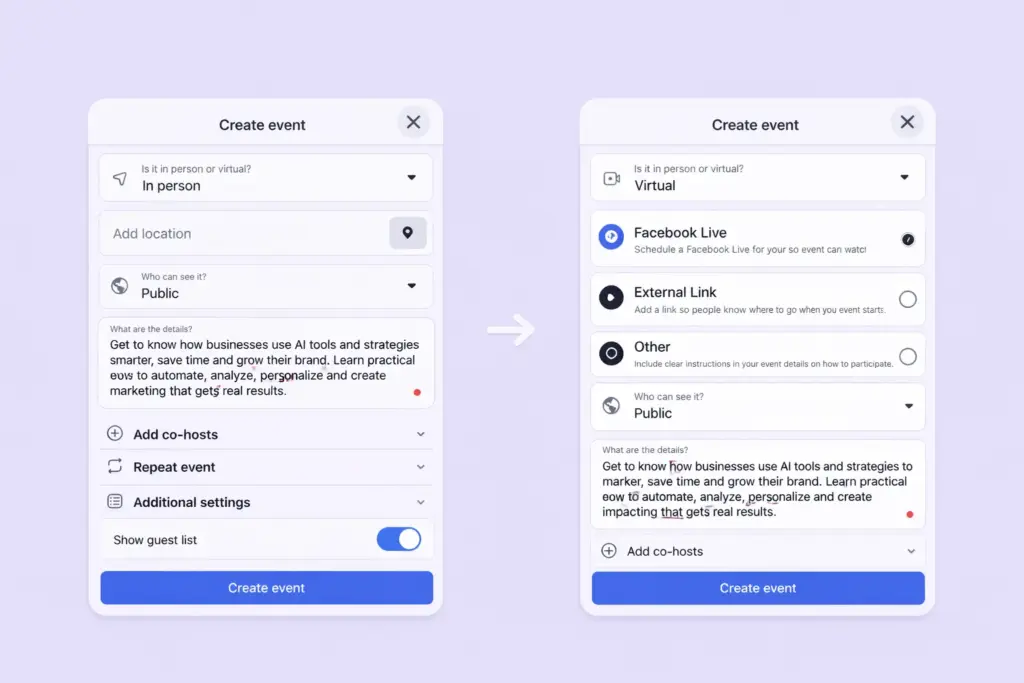
This choice affects what information you’ll need to fill in next.
Step 4: Fill in the event details
This is the main form. Here’s what you’ll need:
- Event name: Keep it clear and specific. “Spring Pottery Workshop” is better than “Fun Event This Weekend.”
- Date and time: Double-check your time zone here. This is one of the most common mistakes people make.
- Location: For in-person events, enter the venue address so attendees can find it easily. For online events, add the link where the event will take place (like Zoom or Google Meet). In some cases, you can also connect it to a Facebook Live session.
- Description: Write something that tells people what to expect, why they should come, and what they need to know. Keep it clear and friendly.
- Cover photo: Add one. Events without a cover image look unfinished and get less attention.
Cover image size tip: Facebook recommends 1920 x 1005 pixels for event cover photos. That’s roughly a 16:9 landscape image. If you use Canva or similar tools, they have a Facebook Event Cover template that gets the dimensions right automatically.
Step 5: Set privacy
Choose who can see the event:
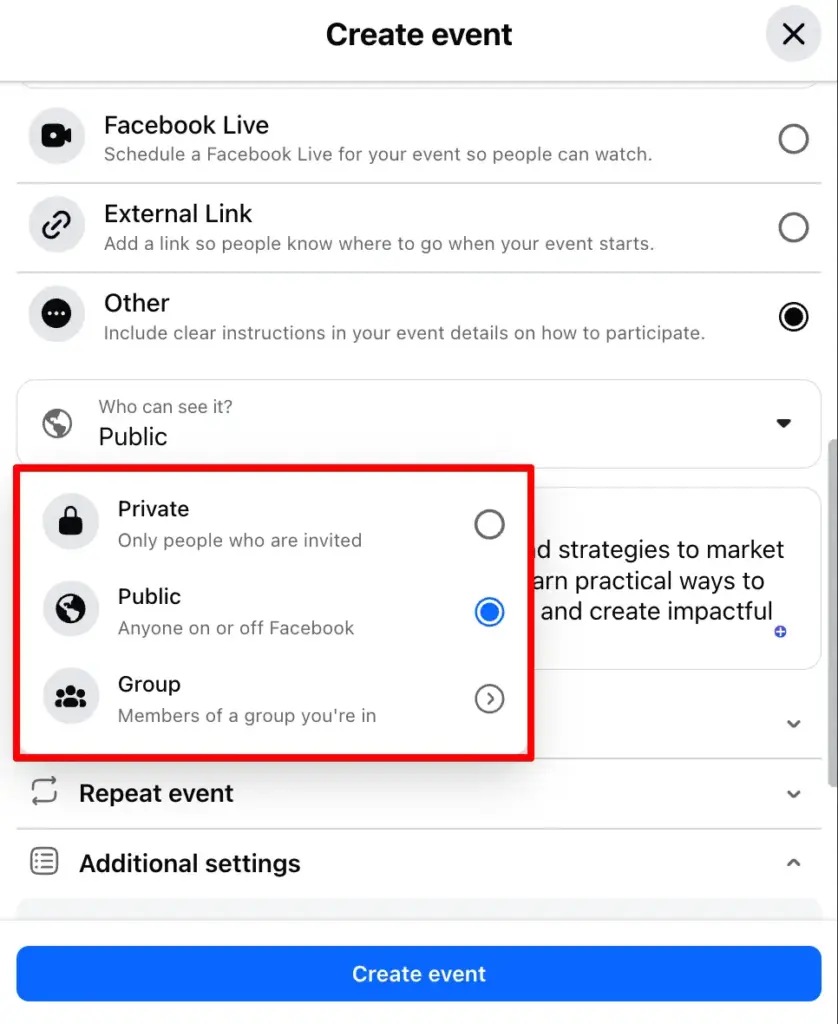
Private: Only people you invite can see the event details. Good for closed gatherings, internal meetings, or limited-access events.
Public: Anyone on Facebook can see the event and find it in search. Best for business events, webinars, workshops, or anything you want to reach a wider audience.
Group: The event is visible only to members of a specific Facebook Group. Ideal for community-based sessions, member-only events, or niche audience meetups inside a group.
Important: Once you create a public or group event, you can’t switch it to private afterward. Choose carefully.
Step 6: Add co-hosts (optional)
If someone else is helping organize the event, you can add them as a co-host. They’ll be able to edit the event and respond to guests.
Step 7: Create the event
Click Create event. Your event is now live. If it’s public, it’s already visible to others.
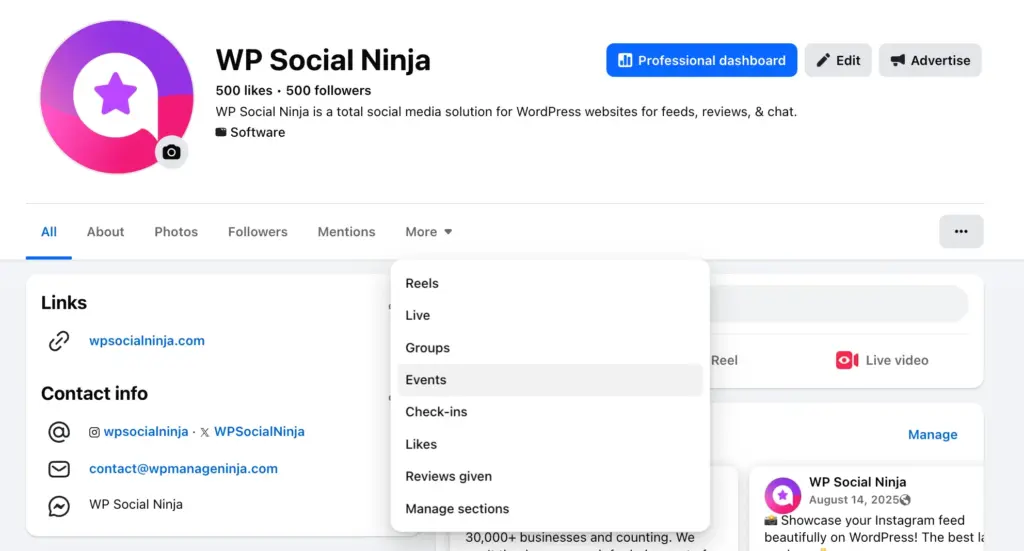
How to create an event on Facebook business page
If you manage a business Page, you’ll want your event to come from the Page, not your personal profile. Here’s how you can do it:
Step 1: Go to your Facebook page
Go to the Page you manage. Make sure you’re in Page mode, not personal profile mode. In the new Facebook layout, you switch by clicking your profile picture in the top right and selecting your Page name.
Step 2: Find the Events section
Go to your Facebook Page, click the More (three dots) menu, then select Events from the dropdown list.
Step 3: Click “Create Event”
Click the button to start a new event.
Step 4: Choose the event type
For Page events, you’ll also be asked whether it’s virtual or in-person. If you choose virtual, you’ll pick from these formats:
- Facebook Live: Best for large audiences, broadcasting to followers
- External link: If your event is hosted on Zoom, Eventbrite, or another platform, paste the link here
- Other: For any other online format
Step 5: Fill in the details
Same as with a personal event name, date, time, location or link, description, and cover photo. The same tips apply.
For Page events, the description matters a bit more. Your Page followers might not know you personally, so give them enough context to decide if this event is for them.
Step 6: Create event
Click Create event. The event will now appear on your Page under the Events tab, and depending on your settings, it may show up in the feeds of people who follow your Page.
How to create a Facebook event on mobile
The steps are nearly the same on mobile, but the layout is a little different.
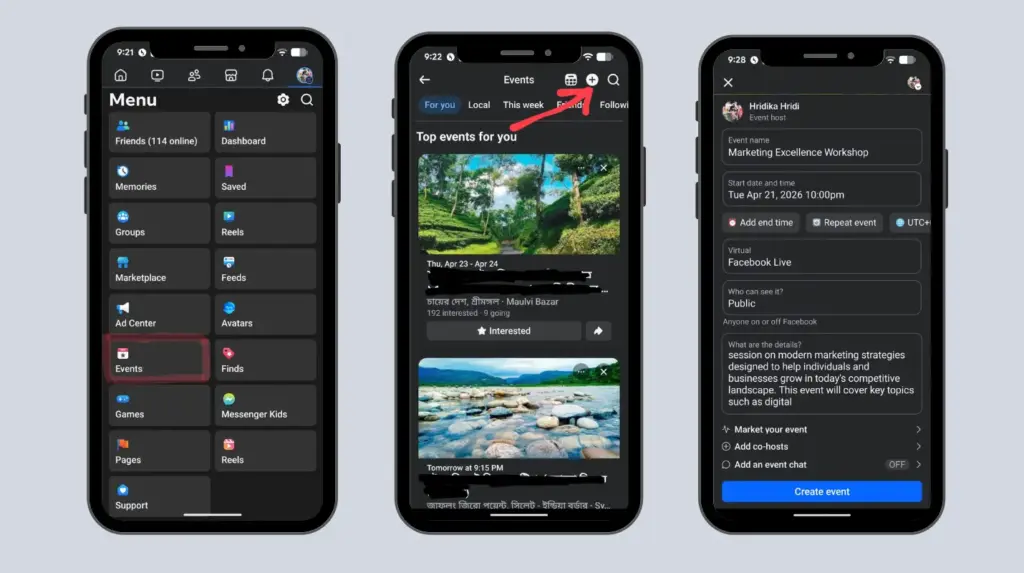
- Open the Facebook app
- Tap the menu icon (three lines), it’s in the bottom right on iOS, top right on Android
- Scroll down and tap Events
- Tap Create or the + button near the top
- Choose In-person or Virtual
- Fill in all the event details, name, date, time, location, description, cover photo
- Set your privacy preference
- Tap Create Event
Mobile tip: Uploading a cover photo from your phone is easy, just tap the cover image area and choose a photo from your camera roll. Try to use a horizontal image for the best results.
Best practices before you hit ‘Create event’
A lot of events get created, but don’t get much attention. These small things make a real difference:
Use a specific, clear event name: Avoid vague names like “Big Announcement” or “Special Event.” People scroll fast. A name like “Free Online Workshop: How to Start Selling on Etsy” tells them exactly what it is and who it’s for.
Always add a cover image: Events without cover photos look empty and get ignored. You don’t need a professional design. Even a clean, simple image with your event name on it works well. Tools like Canva make this very easy.
Write a real description: Your description should answer three questions, What is this? Who is it for? What should people do next? Keep it short and direct. Bullet points work well here.
Add a CTA link: If people need to register, buy a ticket, or join a Zoom link, put that link in your description. Don’t make them hunt for it. Make the action obvious.
Check your time zone: If your audience is in a different city or country, double-check that the time zone is set correctly. Facebook usually auto-detects this based on your location, but it’s worth verifying. Getting the time zone wrong is one of the fastest ways to lose attendees before the event even starts.
Preview before publishing: On desktop, you can preview how your event looks before making it live. Take 30 seconds to do this. Check that the image looks right, the details are accurate, and the description reads clearly.
How to edit or delete a Facebook event after publishing
Made a mistake? Changed the date? No problem. You also have options to fix them.
To edit an event:
- Go to the event page
- Click the three dots menu near the top of the event
- Select Edit event
- Make your changes and save
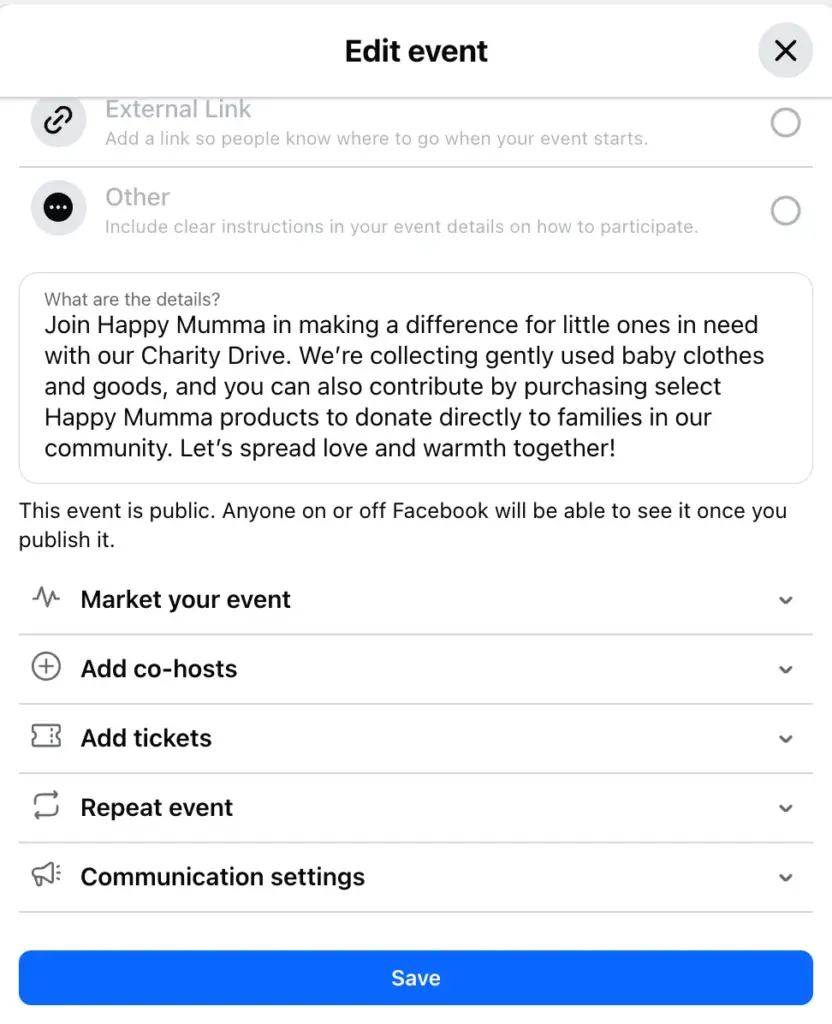
You can change almost everything after publishing; the date, time, description, cover photo, location. The one thing you can’t change is the privacy setting on a public event.
Good practice: If you change the date or time, write a post in the event to let attendees know. Facebook sends a notification automatically, but a personal note from you keeps people informed and builds trust.
To cancel or delete an event:
- Go to the event page
- Click the three dots menu
- Select Cancel event or Delete event
Canceling an event keeps the page visible, but it clearly shows that the event is no longer happening. Deleting removes it completely. If people have already RSVP’d, it’s usually better to cancel instead of deleting so they get a proper notification that the event has been called off.
If you’re managing multiple Pages or cleaning things up, you might also want to remove unused ones; follow our guide on how to delete a Facebook business page step by step.
How to promote your Facebook event
Creating the event is just step one. To get people to actually show up, you need to actively promote it.
Share in relevant Facebook groups: Post your event in groups where your audience already hangs out; local communities, niche groups, or industry spaces.
Quick tip: Check group rules before posting to avoid getting blocked.
Post it more than once: Don’t rely on a single post. Share your event on your timeline or Page a few times before it goes live.
Keep captions short and focused on why people should join.
Send direct invites: Use the Invite button on your event page. Invite friends, followers, or past attendees.
Personal invites often get better responses than general posts.
Promote beyond Facebook: Share your event link everywhere your audience is, like Email newsletters, Instagram stories, or bio or WhatsApp or community groups
The more visibility your event gets, the more likely people are to join.
Run a small paid boost (optional): If attendance matters, put a small budget behind it. Even $10–$20 can expand your reach to the right audience.
For businesses running paid promotions, Meta’s business help center also shares how to boost events and reach the right audience.
Keep the event active: Post updates on the event page, such as Reminders, Behind-the-scenes, and Important details.
Facebook doesn’t show your event to everyone automatically. It depends on how people engage early on plays a big role, which is why understanding how the Facebook algorithm works can make a real difference.
Common mistakes to avoid
These are simple mistakes, but they can cost you attendees, if you’re not careful.
Wrong time zone: If your timing is off, people will miss the event. Always double-check the time zone before publishing.
No cover image: Events without images look unfinished and get ignored. Add a simple, clean cover, it makes a big difference.
Vague description: “Join us for a great time” isn’t enough. Be clear about what’s happening, who it’s for, and what people should expect.
No promotion: Publishing isn’t enough. Share the event, invite people, and post updates; that’s how you get attendance.
Skipping a final check: Take a quick look before sharing. Make sure everything looks right, and all details are accurate.

Get exclusive social media marketing tips and tutorials in your inbox!
Want to show your Facebook events on your website?
If you have a website and want to display your upcoming Facebook events there automatically, you can embed a live Facebook event feed. This keeps your website visitors informed without you having to manually update anything.
There are tools that let you do this cleanly on WordPress, pulling your events directly from Facebook and displaying them in a styled widget on any page. You can learn it from our blog on how to embed a Facebook event feed on your website.
Ready to create your event?
Creating a Facebook event isn’t complicated once you know where to look. The interface changes occasionally, but the core flow stays the same. Choose your event type, fill in the details, set your privacy, and publish.
The part that actually makes a difference is what you do after. A well-promoted event with a clear description and a good cover image will always outperform one that was rushed and forgotten after publishing.
If Facebook updates the layout again, you can always check Meta’s official guide on creating an event for the latest steps
Follow these steps and avoid the common mistakes, and you’ll set up your event properly from the start, giving it a much better chance of getting real attendance.
Related blogs you may find useful to read:
- How to Fix Facebook API Error (Quick and Complete Guide)
- How to Get Facebook Reviews: 14 Strategies to Win More
- How to Embed Facebook Album Feed on Your Website
FAQ
How do I create a Facebook event on mobile?
Open the Facebook app, tap the menu, scroll to Events, then tap Create. Choose in-person or online, fill in the details, and tap Create Event.
Can I edit a Facebook event after publishing?
Yes. Go to the event page, click the three dots menu, and select Edit event. You can change the name, date, time, description, location, and cover image. The one exception is privacy; you can’t change a public event to private after it’s created.
Why can’t I create an event on my Facebook Page?
A few things could cause this. Your Page might not have the Events tab enabled; you can turn it on in Page settings under Tabs. If you’ve just created the Page, some features may take a little time to appear.
In some cases, the issue can also be due to limited Page permissions; make sure you have full access or admin rights to create events.
How do I make a Facebook event public?
When setting up your event, choose “Public” under the privacy settings. Public events can be seen and found by anyone on Facebook, including people who don’t follow you.
How do I invite people to my Facebook event?
On the event page, click the Invite button. For personal events, you can invite Facebook friends. For Page events, you can invite Page followers. You can also share the event link directly with people via message or email.
Does Facebook notify attendees before the event?
Yes. Facebook sends automatic reminder notifications to people who marked themselves as “Going” or “Interested.” They’ll typically get a reminder the day before and again closer to the start time.
Can I see who is attending my Facebook event?
Yes. On your event page, you can see a list of people who marked “Going,” “Interested,” or “Not Going.” This gives you a rough idea of expected attendance.
How to make a private event on Facebook?
To create a private event, start by creating a new event from your profile or Page. When setting it up, choose Private under the privacy option before publishing.
Once it’s private, only people you invite can see the event details, and it won’t appear in search or on your public Page.

Subscribe To Get
Weekly Email Newsletter
Connect, Customize, and Display Social Feeds, Reviews, and Chat widgets


Leave a Reply