

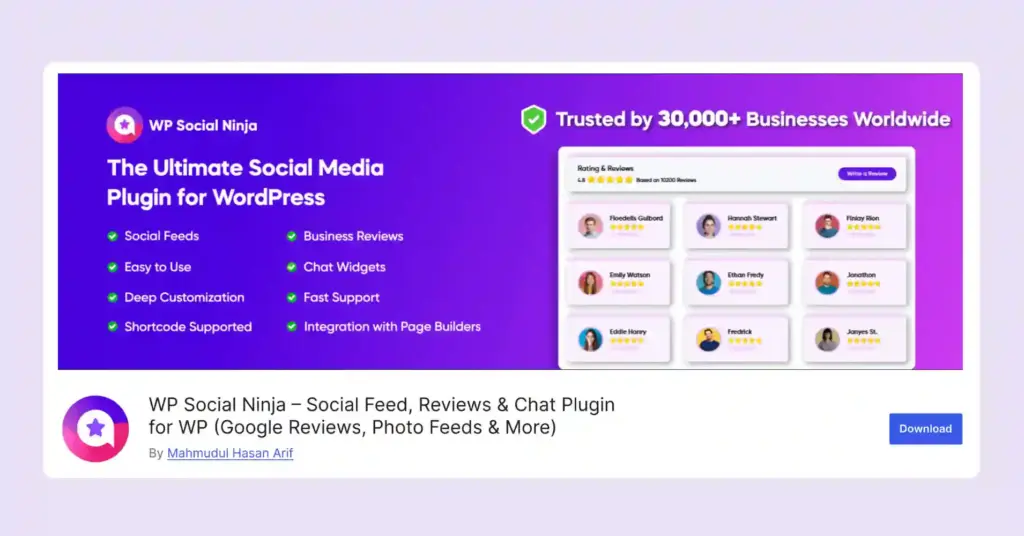
How to Embed YouTube Feed on WordPress Website


Are you looking for a simple solution to embed your YouTube feed on your WordPress website?
YouTube is the largest video-sharing platform and the second most visited website, right after Google. Proper YouTube marketing can help you grow your business worldwide and reach a bigger audience even if they don’t speak your language.
Video content is naturally more engaging than any other format. That makes YouTube ideal for brands to present themselves and generate more value for their target audience.
However, you can’t take advantage of your video content without embedding a YouTube feed on your website. But don’t worry! It is so easy to embed YouTube feeds on websites built with WordPress.
In this article, we’ll show you how to embed YouTube feeds on your WordPress website easily. Let’s start.
Why should you embed YouTube feeds on WordPress websites?
We look for relevant videos on YouTube if we are trying to learn a tutorial to do something or want to watch some clips for our work. That’s how influential YouTube is in modern society, making it the second-largest social platform.
Moreover, YouTube videos appear on Google SERP results, making it a lucrative marketing place. It’s essential to embed the YouTube channel feed so that it appears right in front of the appropriate audience.
Let’s look at some key benefits:
- If you embed YouTube feeds on your site and visitors see your channel, they are likely to be your new subscribers.
- An embedded YouTube playlist can significantly increase the time visitors spend on your website. This will lead to the improvement of your site’s health.
- Relevant videos can enhance watch hours on YouTube, which is highly efficient for the growth of your channel.
- YouTube is a competitive platform. So, it is relatively easier to reach your audience with your site by embedding YouTube feeds and optimizing your webpage.
- Video content provides more information, and if you embed YouTube feeds, it can act as a fresh testimonial of your brand’s quality and establish solid recognition.
In simple terms, with proper YouTube video ideas and embedded feeds on your site, your business can achieve greater success than any other conventional marketing tactics.

Get exclusive social media marketing tips and tutorials in your inbox!
What is the easiest method to embed YouTube feed?
The most amazing thing about WordPress is that everything is so easy and simple. There are plenty of YouTube widgets for websites to embed your channels. However, the number is too high, and it can be bothersome and risky to go through trial and error to choose one.
To make things easy, let’s meet WP Social Ninja, an all-in-one YouTube feed plugin for WordPress websites.
Now, that might seem like a huge claim. But we have solid and logical thoughts behind our verdict. Let’s talk about them now.
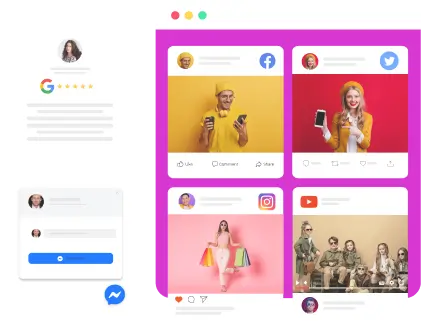
WP Social Ninja is a top-tier social media solution that lets you collaborate with 30+ social platforms, including YouTube. Let’s have a look at some features of the YouTube feed:
- You can embed multiple channels and create various feeds. That includes your YouTube playlist, specific posts, live streams, and more.
- Multiple layouts and templates are available to choose from the most suitable one. Pick one that matches your brand voice.
- Advanced filter options are available to order, sort, or hide posts based on your needs.
- You can personalize the fetched content. For example, you can choose different play moods, like what you would want to happen when a visitor clicks on the video.
- You can use the style options to customize your template down to the last element. That includes typography, background, spacing, and many more elements.
Check out the feature of the YouTube feed for more details, but hold on!
WP Social Ninja has much more to offer than that. This plugin enables integration with over 30+ social platforms. You can connect your Instagram, Facebook, and TikTok feeds, embed reviews from 10+ platforms, including Google Business profile, WooCommerce, Yelp, Airbnb, and many more, add custom testimonials, connect chat widgets from 15+ platforms, show notification popups for reviews, and much more.
You can check out the Feature Page for more details about WP Social Ninja.
How to embed YouTube feeds with WP Social Ninja
One thing to remember before we say anything: everything is easy with WP Social Ninja! Embedding YouTube feeds will take no more than 1 minute.
Is it hard to believe? Then, stay with us and see for yourself!
Install and activate to embed the YouTube feed
The first step is to install WP Social Ninja. If you know how to install a plugin, the process is similar. You can do that in two ways:
- From your Dashboard
- From WordPress Repository
Here’s how to install it from your Dashboard:
- Navigate to the WordPress Admin panel. From the WordPress Dashboard, go to Plugins > Add New
- Next, in the search input field, type WP Social Ninja and wait for a moment for it to come up
- Now, click on the Install Now button
- Then Activate
If you decide to install from the WordPress Repository:
- Search WP Social Ninja in the WordPress Repository, and it will appear at the top. Once you click it, hit the Download button
- Now go to the Dashboard and go to Plugins > Add New > Upload Plugin > Choose the zip file
- After that, click the Install Now button and then Activate
Win your customers’ hearts with exceptional features
Discover how WP Social Ninja can assist you in designing outstanding customer experiences.
YouTube feeds configuration
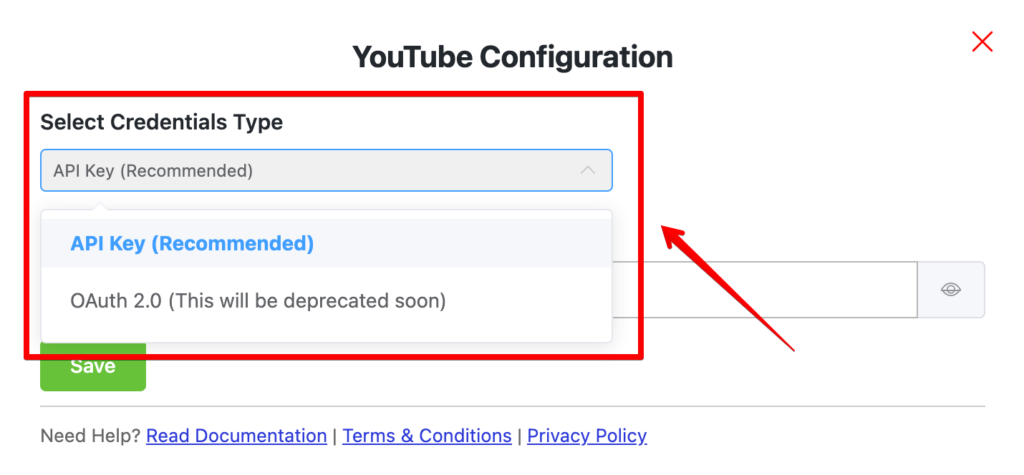
You can connect a YouTube feed with an API Key or OAuth 2.0 credential type. We recommend configuring your YouTube account using the API Key.
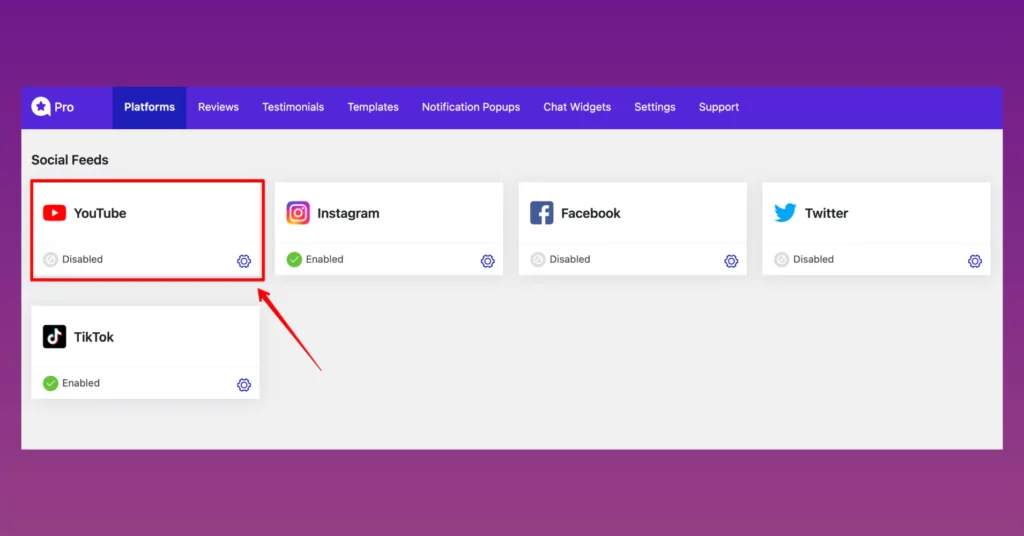
Click on YouTube from the Platforms section of the WP Social Ninja dashboard to start the configuration process.
Then choose API Key from the Select Credential Type.
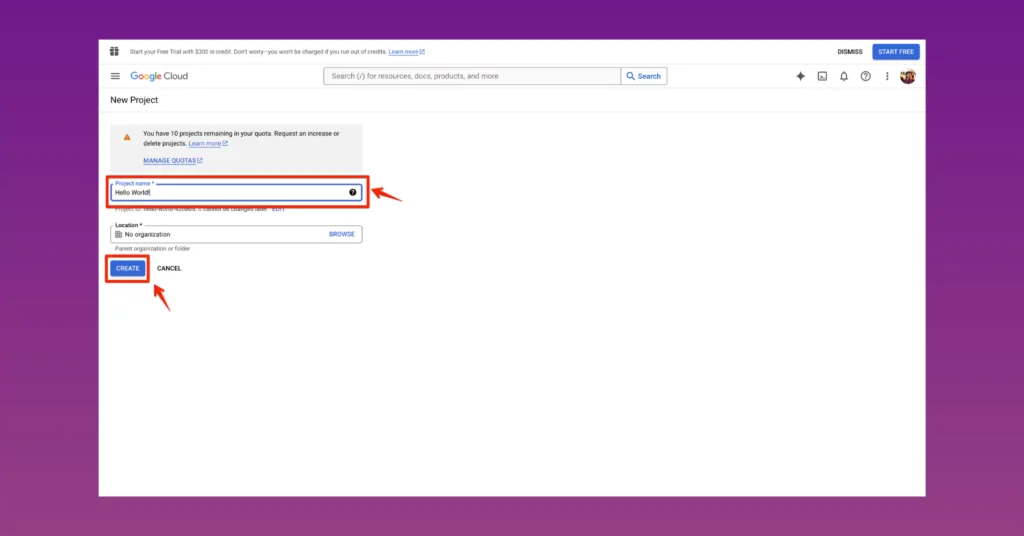
After that, you need to get the API Key to connect. First of all, go to console.developers.google.com oauth. To acquire the API Key from the Google APIs, you need to create a New Project from the Credentials section.

Then, give your project a name and click the Create button.
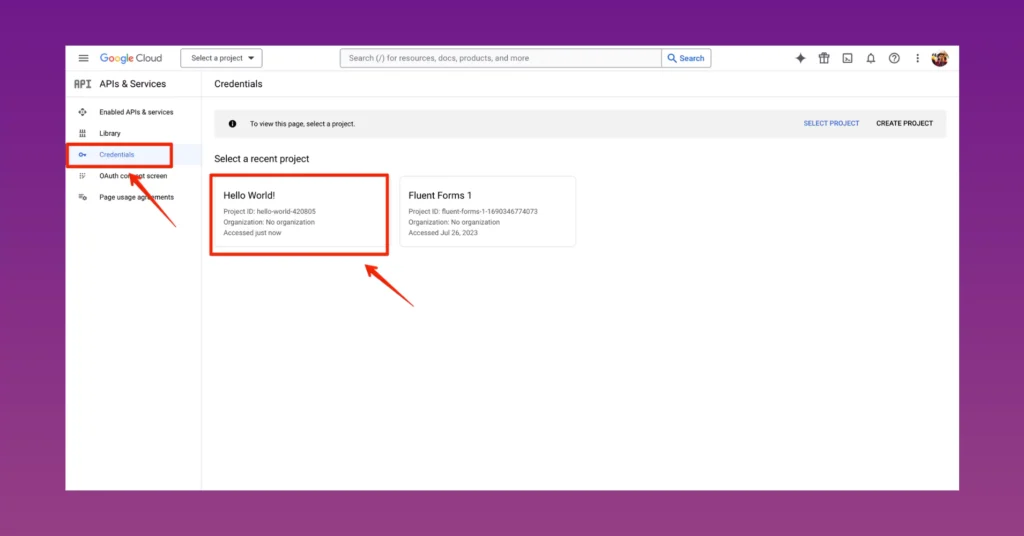
Click on the API & Services button.

Then, select your project.
Click the Create Credentials button to create the API key, then click the API Key button.
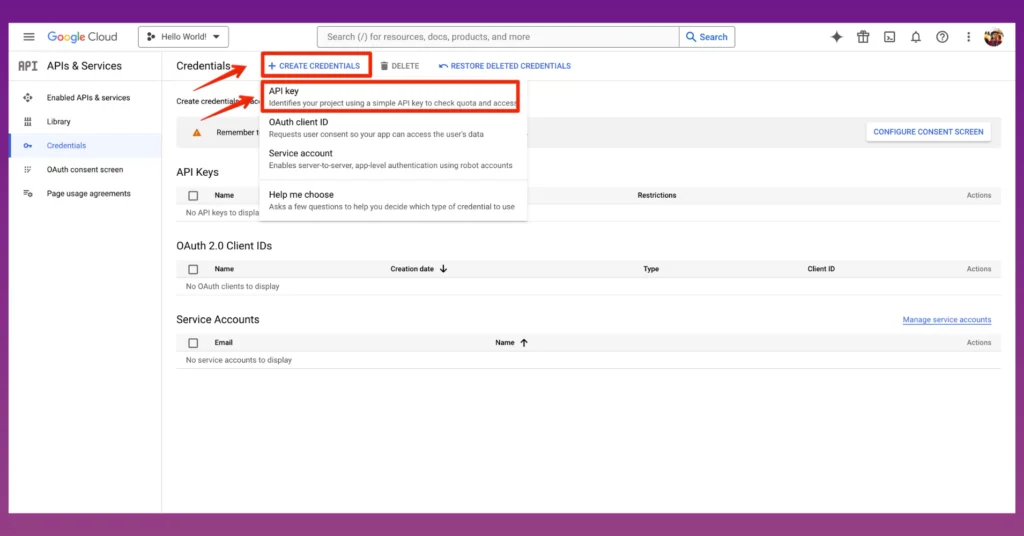
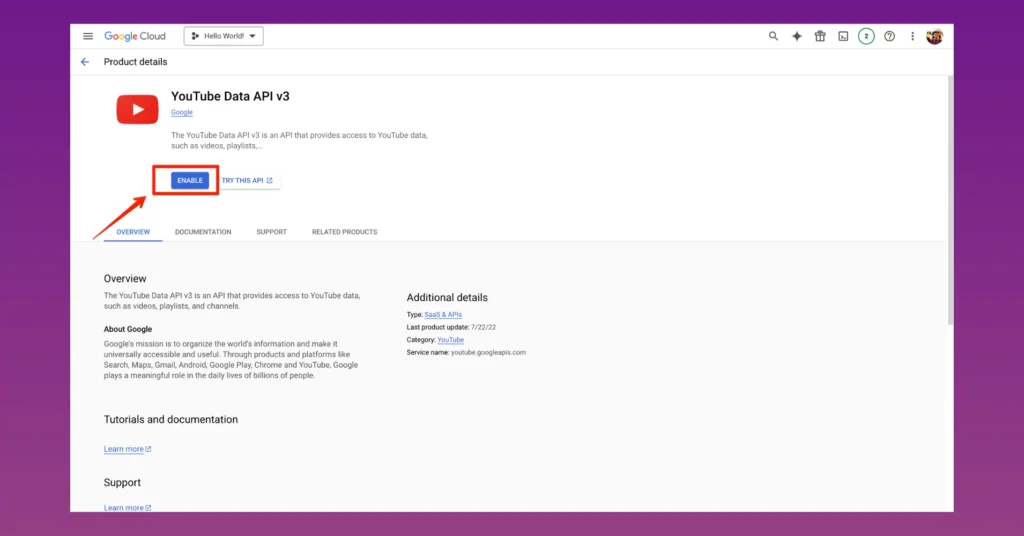
Congratulations! You have got your YouTube API Key. To configure the YouTube Feed, you must enable the YouTube Data API v3 button; otherwise, the API Key will not function.
Now click on the Library to enable the YouTube Data API v3. From the API Library, scroll down and select the YouTube Data API v3.
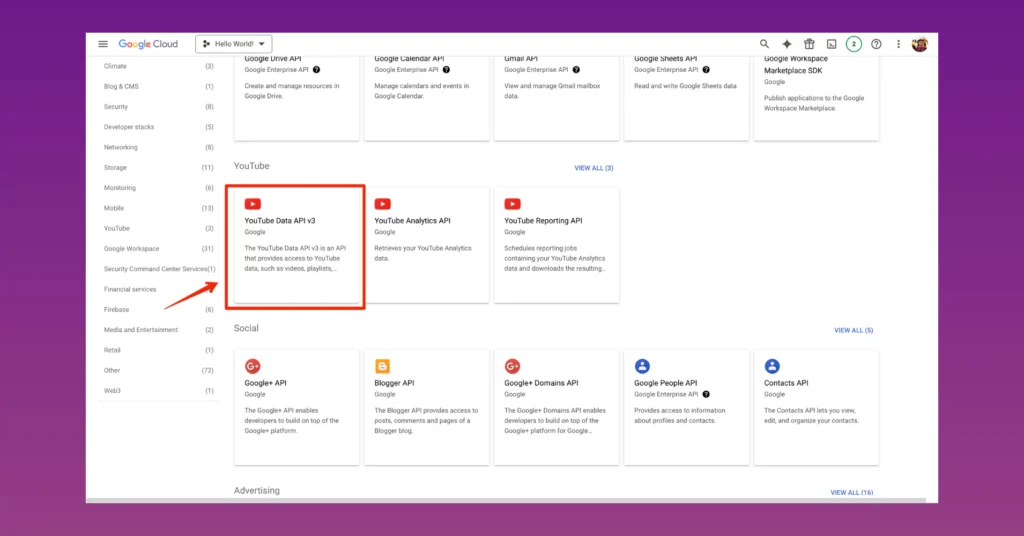
Now, enable the button.
After that, return to the WP Social Ninja dashboard, paste the API, and click the Save button.
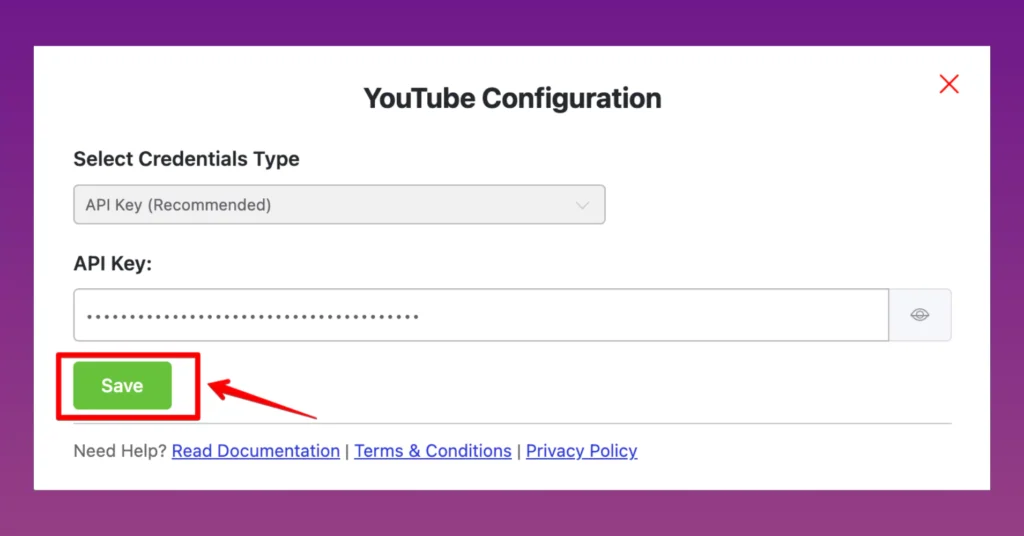
And you are all done, all set! You can find the detailed Documentation for more detailed information and additional functionalities.
Final words
Configuring your YouTube feed with WP Social Ninja is a non-technical task. WP Social Ninja, the ultimate social media plugin, has a painless configuration process.
Win your customers’ hearts with exceptional features
Discover how WP Social Ninja can assist you in designing outstanding customer experiences.
All you need to do is follow the basic guidelines. Moreover, we have created a series of how-to guides on YouTube to explain even the smallest steps. Contact our support team for any queries!

Subscribe To Get
Weekly Email Newsletter
Connect, Customize, and Display Social Feeds, Reviews, and Chat widgets


Trending Posts
-
 Mashfik Upal Aumy
 -

-


Hey! Before you leave…
Visitors buy from brands they trust. WP Social Ninja helps you earn that trust through social proof, keep buyers engaged, and turn your traffic into sales.