How to Get an Instagram Access Token in 2026 (Step-by-Step Guide)


You’ve installed an Instagram feed plugin on your WordPress site. You followed every step. And then it stops and asks for an Instagram access token.
Suddenly, you’re wondering: what even is that? Where do you get it? Do you need to be a developer?
The answer is no. You don’t need any technical skills. An Instagram access token is something every WordPress user can generate on their own, and this guide will show you exactly how to do it.
We’ll cover what the token is, why Instagram requires it, and two ways to get it; one manual method through Facebook’s developer tools and one much faster option using WP Social Ninja. By the end, you’ll have your token ready and your Instagram feed live on your site.
So let’s get started!
TL;DR
- An Instagram access token is a secure key that allows your WordPress site to fetch and display Instagram content through Meta’s API
- You need it to connect your Instagram account to your website and display feeds using plugins or widgets
- You can generate an Instagram access token either manually through Meta for Developers or instantly using tools like WP Social Ninja
- Tokens are short-lived by default but can be extended to last up to 60 days using the Access Token Debugger
- Keeping your token active requires extending or regenerating it periodically, especially if your Instagram feed stops working
- Most common issues, such as invalid tokens or feeds not loading, can be fixed by reconnecting your account or generating a new token
What is an Instagram Access Token?
An Instagram access token is like a digital key that allows your WordPress site to pull and display your Instagram posts. Without it, your site simply cannot access Instagram’s data.
Here’s a simple way to think about it. When your WordPress site wants to show your Instagram photos, it has to ask Instagram for permission. The access token is how Instagram confirms: “Yes, this website is allowed to do that.”
Instagram access tokens work through Meta’s official API system, which you can explore in more detail in the Instagram Platform documentation. The token is your site’s pass to use that channel securely. So if you want to embed an Instagram feed on your WordPress site, manually connecting your account, it requires a token.
Why do you need an Instagram Access Token?
Instagram doesn’t let just any website pull its content. There’s a whole permission system in place, and the access token is your proof that your site has been given the green light. Here’s a breakdown of exactly why it matters.
Keeps your data secure
The access token ensures that only your site has permission to retrieve and display your Instagram content. Without it, Instagram won’t grant access, keeping your data secure from unauthorized websites.
Protects your privacy
The token acts as a security key. Only authorized apps and websites can use it to access your account data, ensuring that no one can pull your content without your explicit permission.
Fetching real-time content
To display your latest Instagram photos, reels, or stories on your site, the widget needs to request the data from Instagram’s API. The token is required for this request to be processed and the content to be fetched.
Decides how your site gains access to Instagram
The token determines whether your site is authorized to access Instagram’s API and fetch content. Every time your site loads an Instagram feed, it sends this token, like an ID check at the door; without it, the door stays closed.
Expiration and refreshing tokens
Instagram access tokens are temporary. Short-lived tokens usually expire in one hour, while long-lived tokens can last up to 60 days. Regularly refreshing or regenerating tokens ensures continuous access to Instagram content.
If you’re planning to use Instagram beyond just displaying posts, like selling products, you’ll eventually need to set up an Instagram shop, which requires proper account configuration and permissions.
Two ways to get an Instagram Access Token
There are two paths here. One is the manual route. It works, but it takes a few steps. The other is the quick route using WP Social Ninja, which gets you the token in under a minute.
To generate an Instagram access token, create a Meta app, add the Instagram product, give your account access, and generate the token from the dashboard. For better stability, extend it into a long-lived token that lasts up to 60 days.
If you prefer a faster method, tools like WP Social Ninja let you generate your Instagram access token instantly without using the Meta developer dashboard.
Let’s cover both.
Method 1: Generate an Instagram Access Token manually (Via Meta for developers)
This is the official 2026 method using Meta’s developer portal. It’s free and works for both personal and business Instagram accounts. The steps differ slightly depending on your account type, so we’ve called that out clearly below.
Step 1: Create a Meta App
Head over to Meta for Developers and log in with your Facebook account. Click My Apps and select Create App.
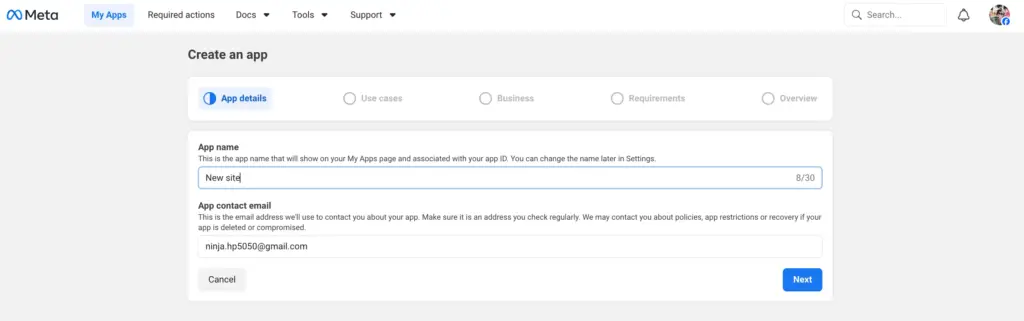
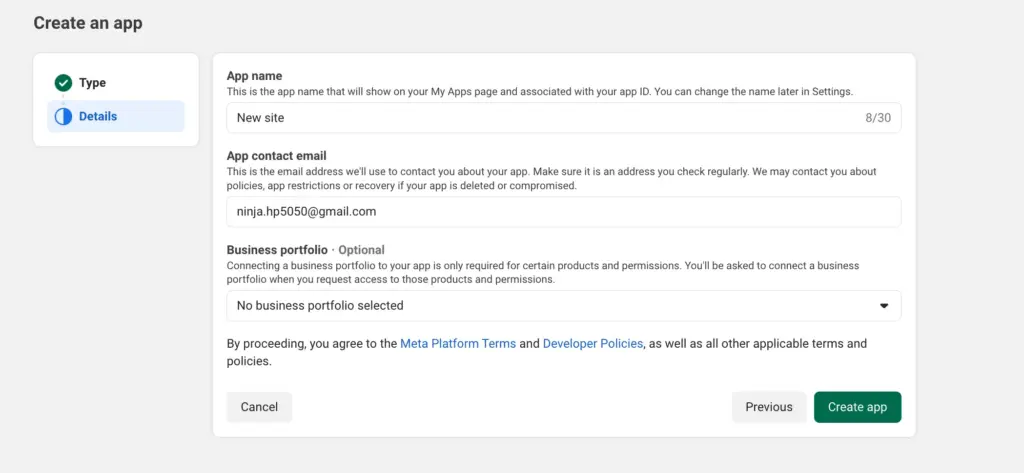
When asked for a use case, choose Other. On the next screen, select Business as your app type. Give your app a name; avoid using “Instagram” or “Facebook” in the title, as Meta doesn’t allow that. Enter your contact email, then click Create App.
After that, a pop-up screen will appear and ask you to give your Facebook credentials. Place that to proceed to the next steps.
Step 2: Add Instagram
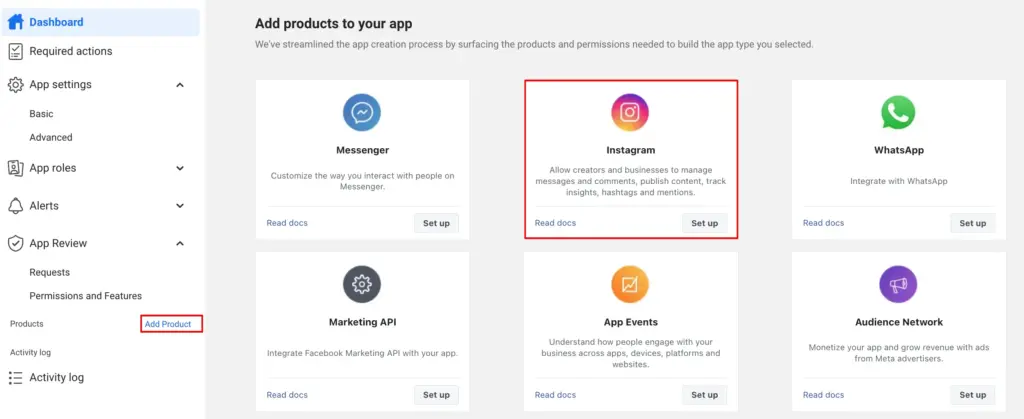
Inside your app dashboard, scroll down to the Add a Product section and find Instagram. Click Set Up.
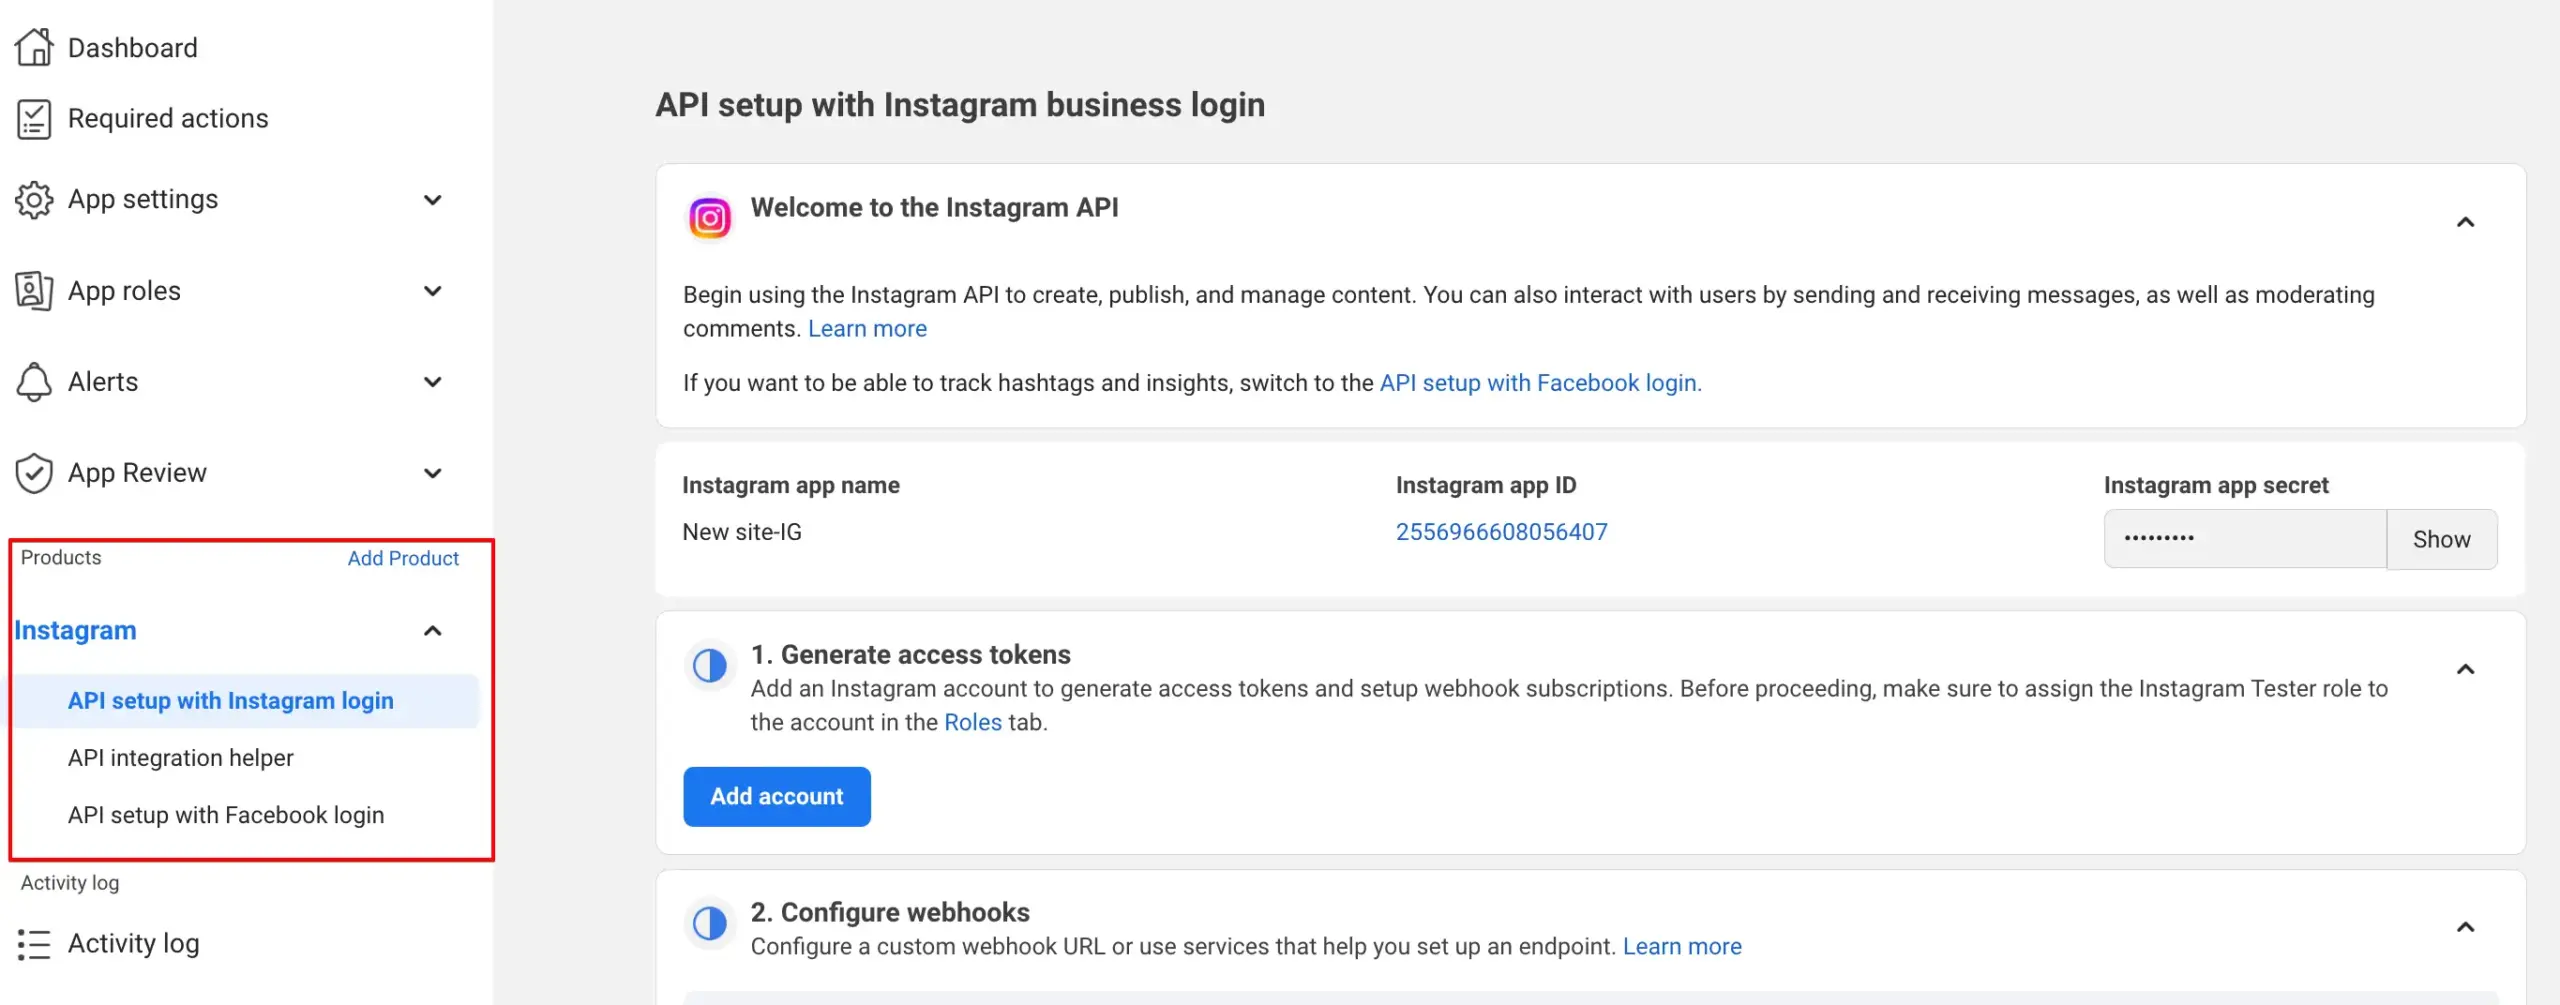
Next, choose the correct Instagram API setup
In the left sidebar under Instagram, you’ll see two options:
- API setup with Instagram login
- API setup with Facebook login
Choose based on your use case:
API setup with Instagram login
- Best for simple access token generation
- Works for most use cases (like displaying feeds on your website)
- Recommended for this guide
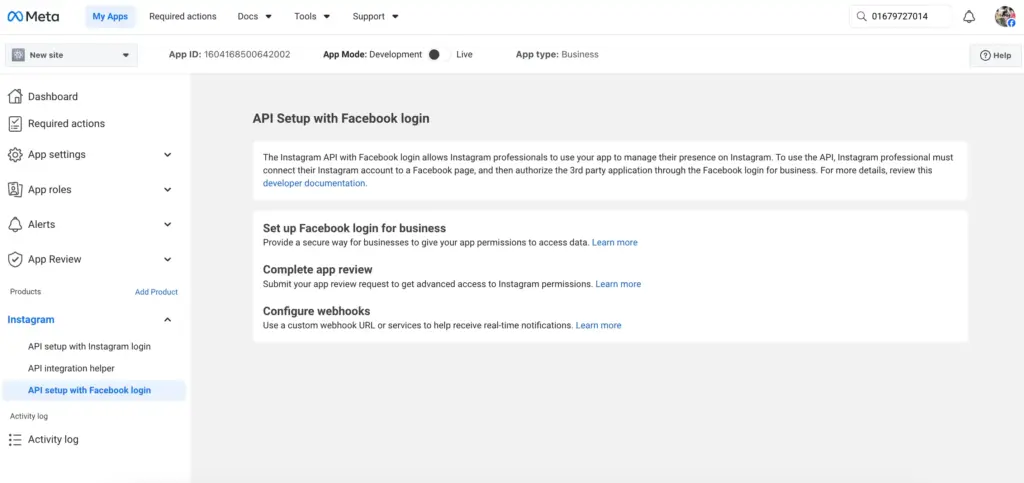
API setup with Facebook login
- Required for advanced features
- Used for business integrations, analytics, or managing accounts at scale
Choose the one that matches your account and follow the on-screen prompts to continue.
Step 3: Add a Tester
Before you can generate an access token, you need to give your Instagram account access to the app.
- Go to your app dashboard
- Open App roles (or Roles)
- Add your Instagram account as a tester, developer, or admin

Then:
- Open Instagram
- Go to Settings → website permissions → Apps and websites → Tester invites
- Accept the invitation
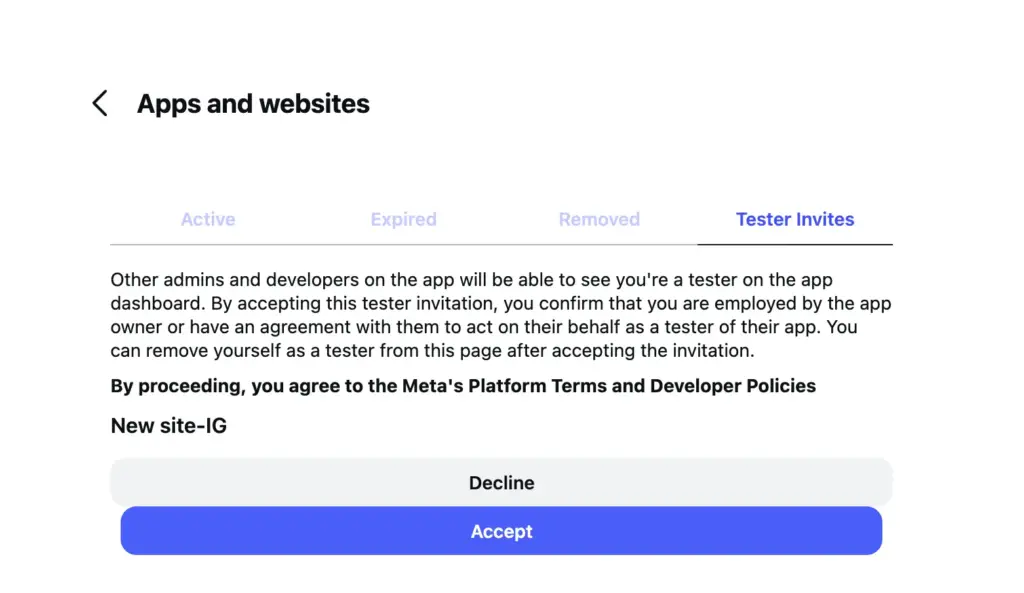
Important: Do not skip accepting the invitation. This is the most commonly missed step, and your token will not work without it.
Step 4: Generate your access token
Now that your account has access, you can generate your token. In your app dashboard, go to:
Instagram → API setup with Instagram login.
You’ll see your Instagram username listed there. Click on Generate Token
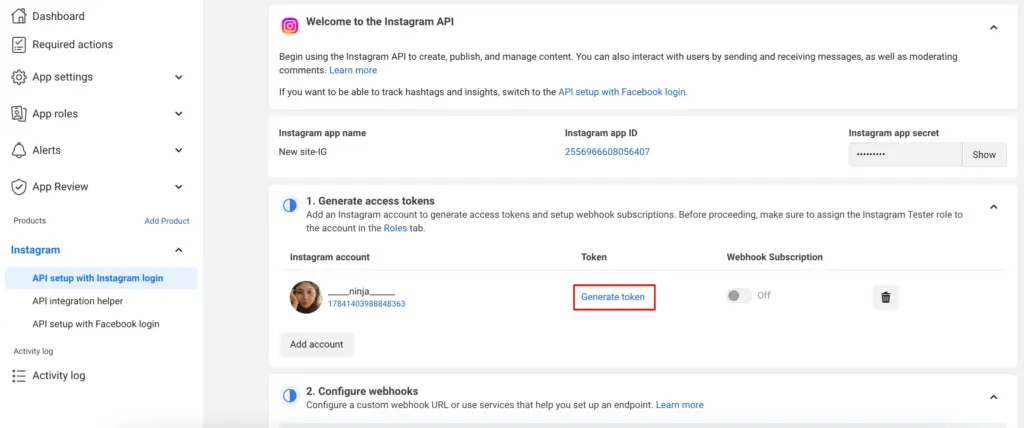
A Meta/Instagram window appears asking you to allow access. Once you approve, you’re redirected back to the Meta for Developers dashboard. You’ll find your Instagram username listed, and your access token will appear directly.
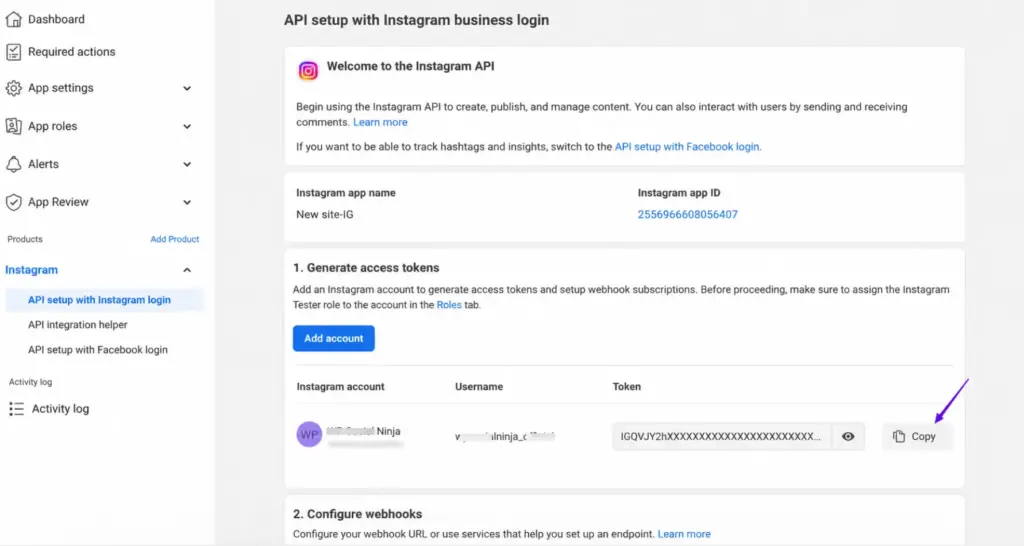
Copy it to use it later.
Step 5: Extend your token to 60 days (Recommended)
Tokens generated through this process are short-lived by default and can expire in as little as one to two hours. To make your token last up to 60 days, follow these quick steps:
- Go to the Access Token Debugger
- Paste your token into the field and click Debug
- Scroll to the bottom of the page and click Extend Access Token
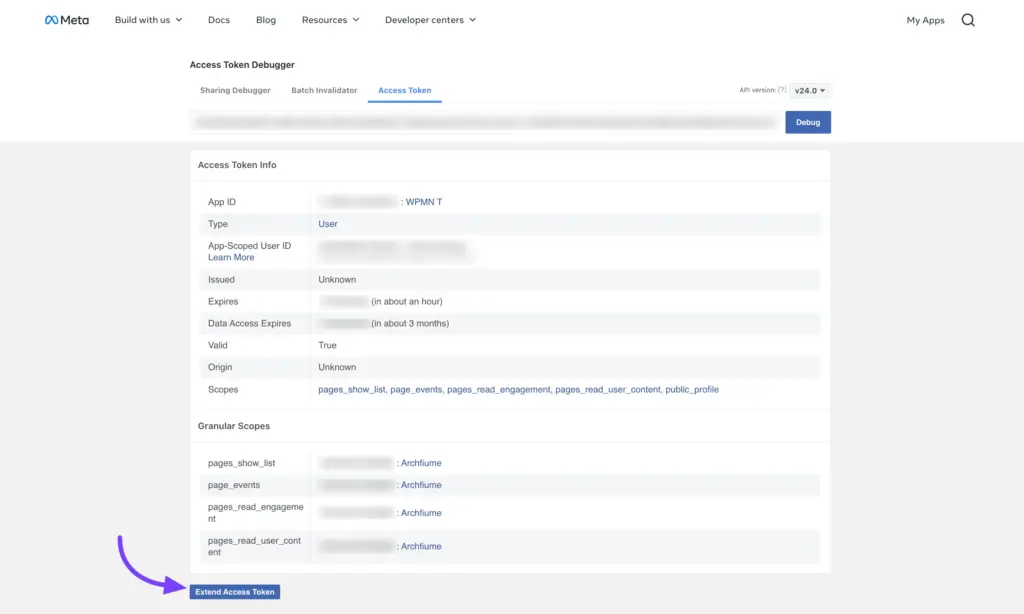
Copy the new long-lived token that appears and replace the old one in your plugin settings.
Note: Even long-lived tokens expire after 60 days. Most plugins like WP Social Ninja handle renewal automatically, but it’s worth knowing how to extend it manually if needed. If you’d prefer to skip all of this entirely, Method 2 below takes care of everything in under a minute.
Method 2: Get your Instagram access token using WP Social Ninja (The easy way)
With WP Social Ninja, you can generate your Instagram access token in seconds. No technical skills needed. No Facebook Developer account required.
It’s ideal for WordPress users who aren’t comfortable working inside Facebook Developer tools, and it takes less than a minute from start to finish.
Here’s how it works:
- Go to the WP Social Ninja Access Token Generator page
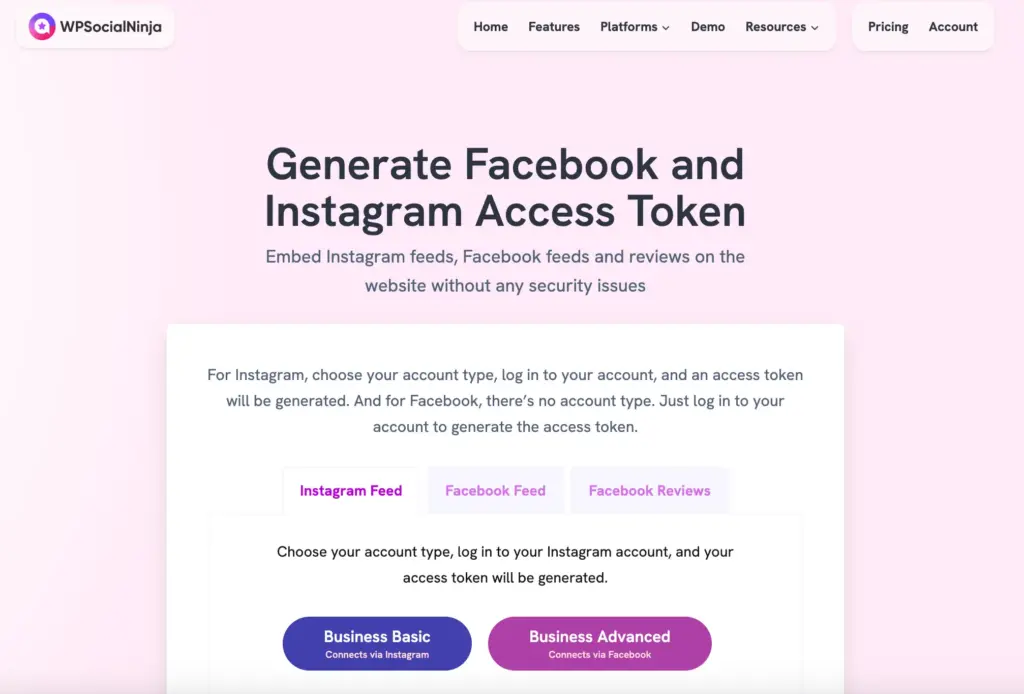
- Click Instagram Feed
- Choose your account type: Business Basic (personal account) or Business Advanced (business or creator account)
- Authorize the connection
- Copy your token, and you’re done

No app setup. No OAuth configuration. Just connect and go. Once your token is active, you can display your feed as an Instagram slider widget, a hashtag wall, or even a shoppable feed that links directly to your products.
You can also manually connect Instagram on your website using WP Social Ninja’s detailed guide if you prefer a more hands-on setup.
Best practices for using your Instagram access token
Once you have your token, a few things are worth knowing so you don’t run into problems later.
Tokens expire every 60 days: Instagram tokens are short-lived by design. To keep your feed live, use WP Social Ninja to refresh your token automatically, or manually regenerate it before it expires.
Treat your token like a password: Your token gives access to your Instagram data. Don’t paste it in public forums, share it in screenshots, or leave it visible in your site’s source code.
Store it inside your plugin’s settings field: Most Instagram plugins for WordPress have a dedicated field for your token. Paste it there and the plugin handles everything else from that point.
Regenerate it if your feed breaks suddenly: Instagram and Meta update their API policies from time to time. If your feed stops working without warning, generating a fresh token is usually the quickest fix.
Once your Instagram connection is set up, staying updated with the latest Instagram trends can help you make the most out of your content and engagement strategy.
Troubleshooting: Common errors and quick fixes
Even when you follow the steps carefully, things can sometimes go wrong. Here are the most common issues and how to fix them.
“Invalid token” error: This means your token has expired or was entered incorrectly. Here’s how to fix it:
- Generate a new token: Go to your app in Meta for Developers → Instagram → API setup with Instagram login → click Generate Token again, then copy and replace the old token in your plugin
- Extend your token: Open the Access Token Debugger → click Extend Access Token → replace your existing token with the new long-lived one
- Check connection issues: Make sure your Instagram account is still connected, app permissions haven’t been revoked, and reconnect/re-add the account if needed
Feed not loading or permission error: This usually happens when your Instagram account wasn’t added correctly, the tester invite wasn’t accepted, or app permission wasn’t approved during token generation.
To fix it, go back to Meta for Developers → Instagram → API setup with Instagram login, reconnect/add your account, accept any tester invite from Instagram → Apps and websites, then generate a new token and replace the old one in your plugin.
Authorization or permission error: This usually happens when the Instagram account has not been added to the app, the tester invite was not accepted, or the user did not approve the permission screen during token generation. Meta’s authorization window is where users grant app permissions.
Instagram feed connected but no posts showing: This usually happens when your account has no recent posts, the connection didn’t sync properly, or access wasn’t granted fully. To fix it, make sure your account has visible posts, reconnect your Instagram account in Meta for Developers, generate a new token, and update it in your plugin. If the issue continues, remove and re-add the account connection completely.
If your feed still isn’t showing even after reconnecting your account, it’s worth checking the common causes behind an Instagram feed not loading, as there are a few additional fixes that might be affecting the connection.
Your Instagram Access Token is ready, what’s next?
Generating an Instagram access token might seem complicated at first, but once you go through the steps, it’s a quick and straightforward process. Whether you use the manual setup through the Meta developer dashboard or a tool that simplifies the process, you can connect your Instagram account in just a few minutes.
Once your token is ready, you can display your Instagram feed directly on your website without manual updates, keeping your content fresh and engaging for visitors.
If you prefer an easier way to manage everything, tools like WP Social Ninja can handle token generation and feed display in one place.
And if you found this blog helpful, you might also like:
- Instagram Graph API: Complete Developer Guide
- Instagram for B2B Marketing: 10 Strategies That Actually Work
- How to Add Elementor Instagram Feed to WordPress (2 Minutes)
Frequently Asked Questions
Why do I need an Instagram access token for WordPress?
Without this token, your website cannot fetch Instagram feeds from your account. It acts as a secure bridge between your WordPress site and Instagram’s API, verifying that your site has permission to display the content.
Can I generate an Instagram access token for free?
Yes. The manual method uses Facebook’s free developer tools, and WP Social Ninja’s token generator is also free to use.
How long does an Instagram access token last?
Basic tokens expire after 60 days. Most WordPress plugins, including WP Social Ninja, handle token refreshing automatically so you don’t have to do it manually. If you’re using the manual method, you’ll need to regenerate it yourself.
How do I know if my Instagram token has expired?
The clearest sign is that your Instagram feed suddenly stops showing on your website. You may also see an error message in your plugin settings. If your feed disappears without any other changes on your site, check your token first.
What should I do if my Instagram feed stops loading?
The most common reason is an expired token. Regenerate it using either method in this guide and update it in your plugin settings. If you used the manual method, also check that your tester invitation is still active.
Can I use the same access token on multiple WordPress sites?
Yes. The same Instagram access token can be used across multiple websites as long as it’s valid. The token is linked to your Instagram account, not a specific site. Just make sure you keep it secure and update it everywhere if it expires or is regenerated.

Subscribe To Get
Weekly Email Newsletter
Connect, Customize, and Display Social Feeds, Reviews, and Chat widgets


Trending Posts

Comments
-
it was very helpful , thanks
-
Super Helfpul, thank you!
-
Pleasure!
-
-
Thank you Piya, for the superbly detailed steps.
-
Welcome, Sunil. Glad it helped you!
-
-
Tutorial perfettamente accurato! Son riuscita a far funzionare tutto anche io <3
Grazie 🙂-
Welcome 🙂
-
-
This was very helpful. Do you have a second part of the tutorial on how to implement the access token to generate feeds on a web page? Currently, we don’t use WordPress, so we where thinking in something that can be embedded using jQuery or PHP.
-
Hello Raul, glad that you find the piece helpful.Unfortunately we don’t have the second part yet. But we will keep that in mind and prepare a content to help you. Thanks.
-
This article was VERY helpful, thank you for putting it together! I implemented it within my wordpress site. So you will copy the APP ID and the Access Token for elementkits. I set token expiry to 60 and the generation date far out in the future.
-
Glad to hear it was helpful! Let us know if you need any further assistance
-
-
-
Hi, I was wondering if there was an updated version of this page? It doesn’t appear to match what i’m seeing in 2024. Maybe i’m overlooking?
-
Yes, there have been some changes in the meta, which is why you may be experiencing differences with the steps. We are currently working on updating the blog to reflect these changes.
In the meantime, if you would like, you can generate an Instagram Access Code using WP Social Ninja. Check it out:
https://wpsocialninja.com/access-token-generator/?id=instagram-feed
-
-
Thank you for the tutorial, still working
-
Glad you’ve found it helpful 🙂
-
-
does this still work in August 2024? I get to the login window for Instagram in step 12 and it just stops. does not go further when adding the verification code sent by whatsapp.
-
Yes, it still works. There have been a few changes in the steps that we have already updated previously. Please follow the steps thoroughly, these should work accordingly. Still, it doesn’t work for you, try this out: Discover the Easiest Way to Manually Connect Instagram on Website (https://wpsocialninja.com/manually-connect-instagram).
-


Leave a Reply to Sunil Cancel reply