
How to Embed Yelp Reviews on WordPress Website in 2 Minutes


Have you ever thought of embedding Yelp reviews on your WordPress website?
Yelp is a dedicated social review platform with 176.46 million monthly active visitors. The stat alone shows how many people trust this platform and go through Yelp reviews before conducting business online.
If someone wants to be sure about the quality of your business, he/she will likely check your Yelp reviews. In that case, wouldn’t it be a great user experience for your website visitors if they could directly see the Yelp reviews without having to search manually through the platform?
If you agree with us, then this article will be your messiah! We will show you the easiest way to embed Yelp reviews on your WordPress website.
Let’s start.
Why should you embed Yelp reviews on your WordPress website?
Social media reviews are like recommendations from friends and are crucial to online businesses. Every single person who goes through Yelp reviews is a potential customer that you don’t want to lose.
Here are some interesting statistics from Yelp and Statista:
- Yelp has 5.8 million businesses in more than 1500 categories
- 54% of Yelp users value customer service as a basis for their reviews
- Reviews are more relevant to 79% of Yelp users
- Yelp’s organic traffic has reached 133.9 million
Now, if you embed Yelp reviews on your site, and whenever a visitor lands on your site and sees them, he/she will surely have a good impression of your business and the quality of your services.
On a special note, all the numbers and their impacts mentioned above might be tempting, but whatever the situation is do not buy Yelp reviews.
This will severely damage your business. You can check our blog for some effective, professional, and clever ways to ask for reviews.
What is the easiest way to embed Yelp reviews on WordPress?
Using a WordPress Yelp review plugin would be the easiest way to embed Yelp reviews. There are many plugins on the WordPress repository. However, going through the trial and error process to find the most suitable plugin to embed Yelp reviews can be quite challenging.
In that case, let us introduce you to WP Social Ninja, an all-in-one social media solution for WordPress websites.

Let’s look at some of its features for Yelp review integration:
- Connect multiple accounts
- Customize the review box down to each element
- Choose from multiple templates and layouts
- Show/hide specific reviews based on the particular word/s
- Shortcode supported
With WP Social Ninja, it’s not just straight integration. You can build your own Yelp review templates and make them match your brand voice.
But that’s not all! Like Yelp, you can collaborate with 10+ social review platforms, including Google Business Profile, Amazon, WooCommerce, and more.
Moreover, you can integrate Facebook, Instagram, YouTube, and TikTok feeds, create chat widgets with 15+ platforms, build custom testimonial widgets, and add notification popups.
You can check the Feature Page for more detailed information.
How to embed Yelp reviews with WP Social Ninja
When you talk about a plugin, the first thing that comes to anyone’s mind is- Is it a user-friendly tool? Well, WP Social Ninja is a simple and sturdy plugin with diverse useful features.
Install and activate WP Social Ninja
The first step is the installation of WP Social Ninja. The process is simple and the same as Installing a WordPress plugin. You can do that in two ways:
- From your Dashboard
- From the WordPress Repository
Here’s how to install it from your Dashboard:
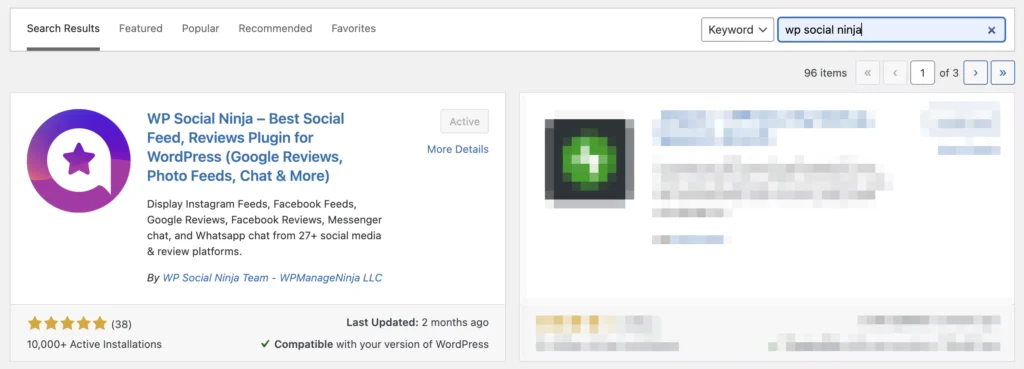
- Navigate to the WordPress Admin panel. From the WordPress Dashboard, go to Plugins > Add New
- Next, on the search input field, type WP Social Ninja and wait for a moment for it to come up
- Now click on the Install Now button
- Then Activate
If you decide to install from the WordPress Repository:
- Search WP Social Ninja in the WordPress Repository, and it will appear on the top. Once you click it, hit the Download button
- Now go to the Dashboard and go to Plugins > Add New > Upload Plugin > Choose the zip file
- After that, click the Install Now button and then Activate
Configure your account to embed Yelp Reviews
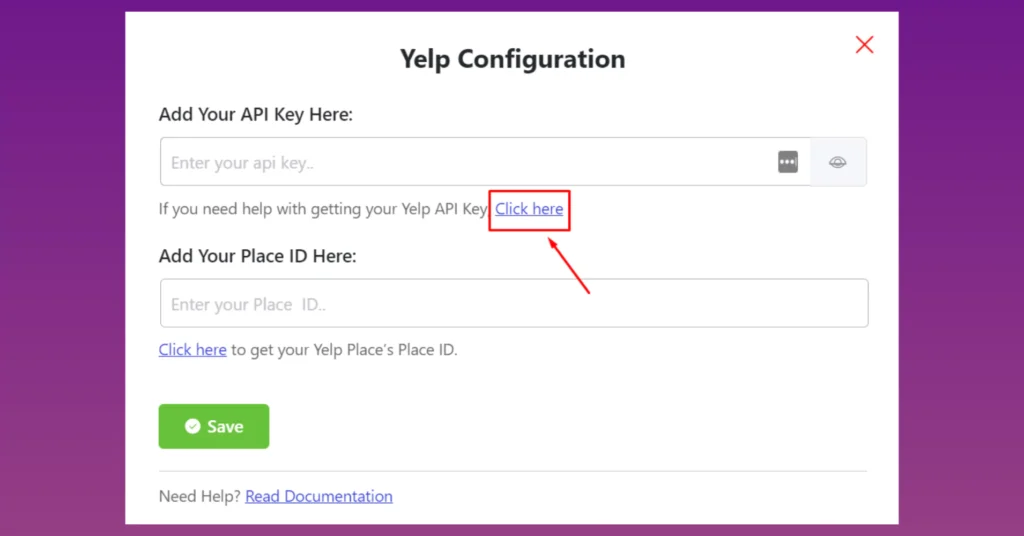
First of all, go to the dashboard of WP Social Ninja. Then click on the Yelp under the Social Reviews section. After that, you need to obtain a Yelp API Key and Place ID.

To get the Yelp API Key, you need to follow this URL, as stated on the very first pop-up you see when clicking the gear icon on Yelp reviews. Then, click on the Click here button to get the API Key.
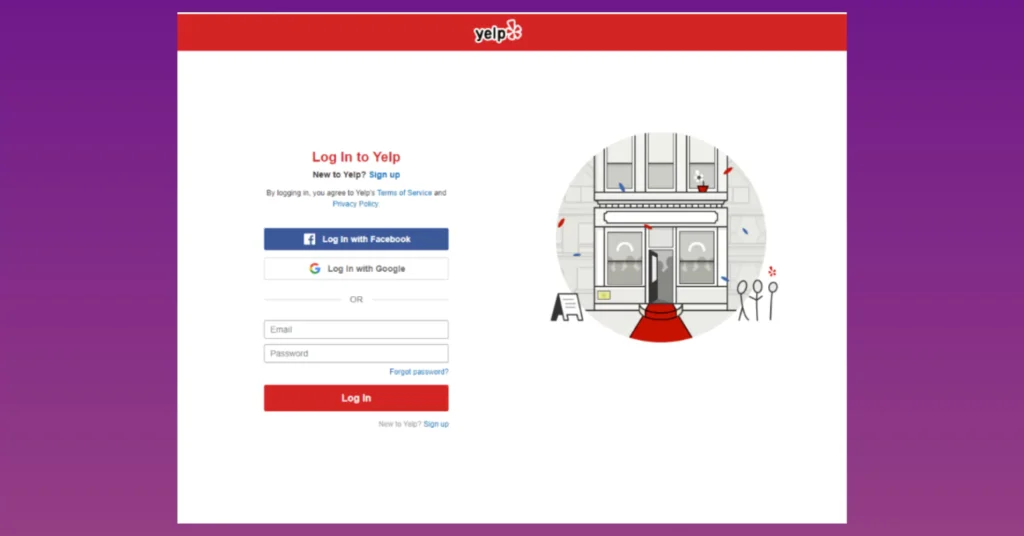
Now log in with your Email and Password to get started, or if you don’t have a Yelp account, you can Sign Up to create one.
Once you log in, you need to create a new app. To begin the process, fill in the boxes with relevant information. To get the API Key, you must provide your credentials, such as your App Name, Industry, Contact Email, and Description.
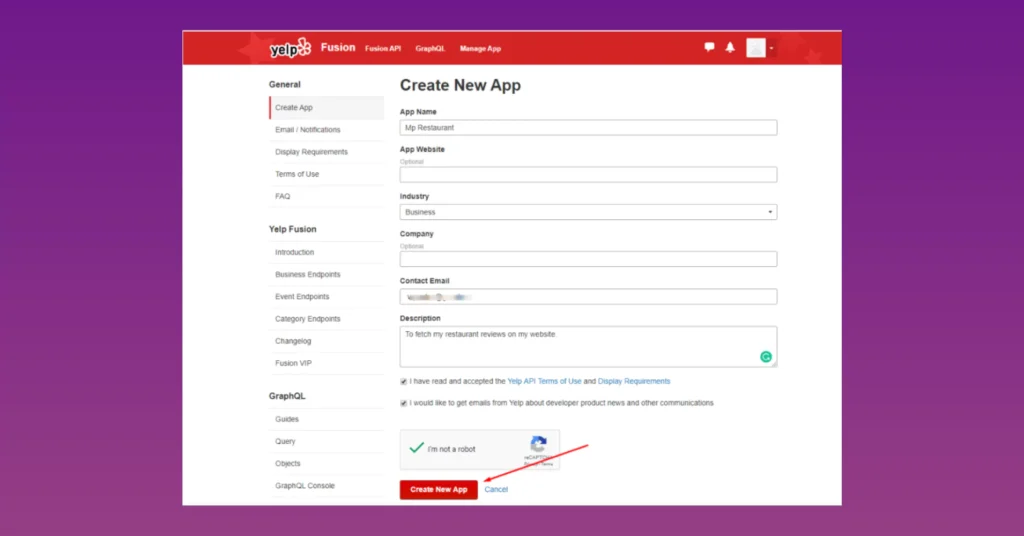
However, you don’t have to worry about your personal information. Your credentials are absolutely safe with WP Social Ninja. Now, click on Create New App to create the Yelp API.
And there you go! You got your API Key.
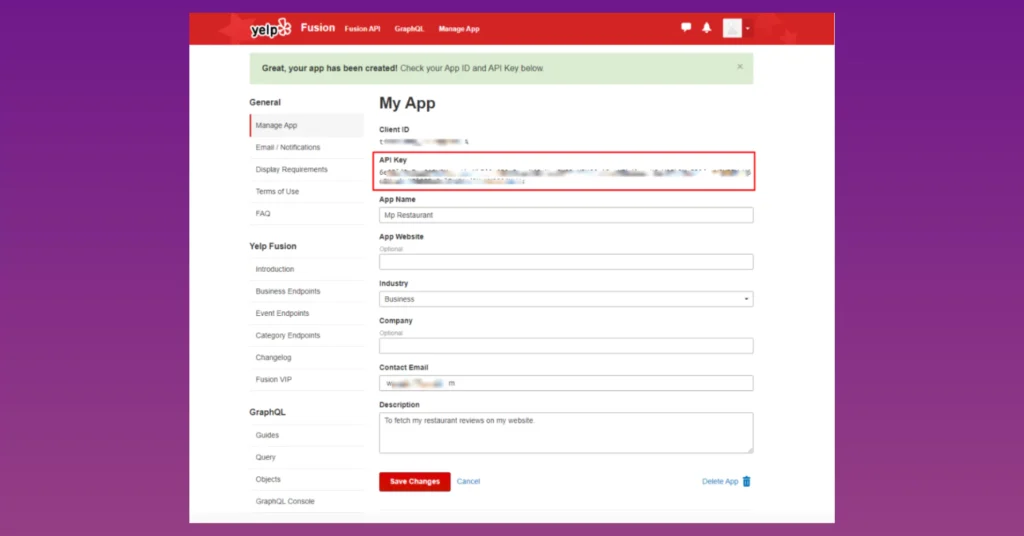
Copy and paste the API Key into the Yelp Configuration WP Social Ninja form on your WordPress Dashboard.
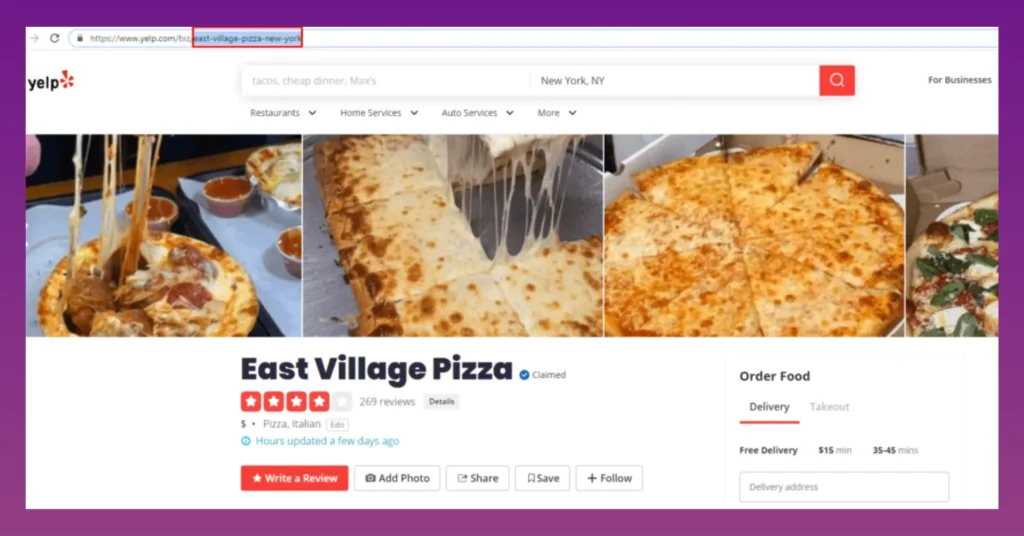
Next, we need to obtain the Place ID. Click on the Click here button to retrieve the Yelp review Place ID. It’ll take you to Yelp.com.
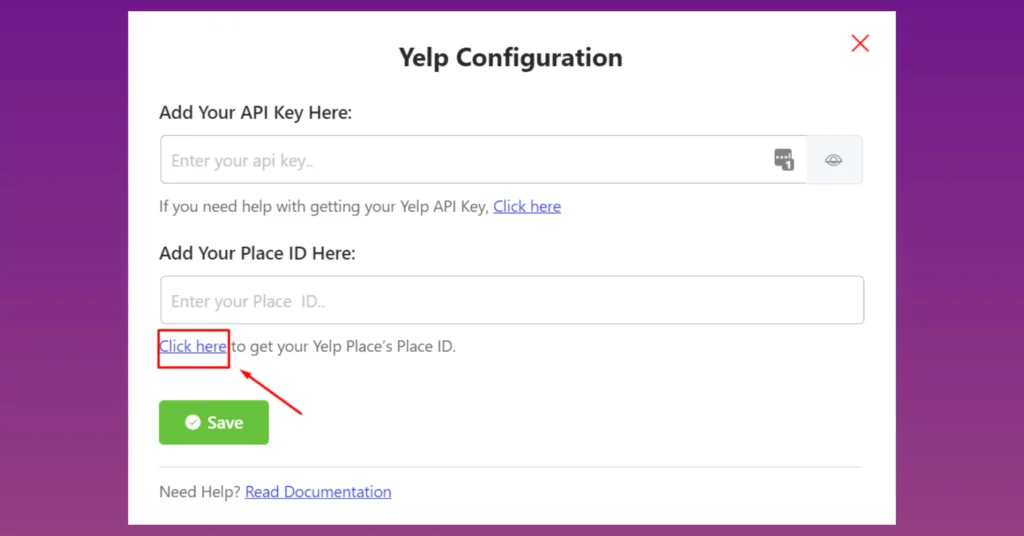
To get your Place ID, search for your Restaurant in the search bar.
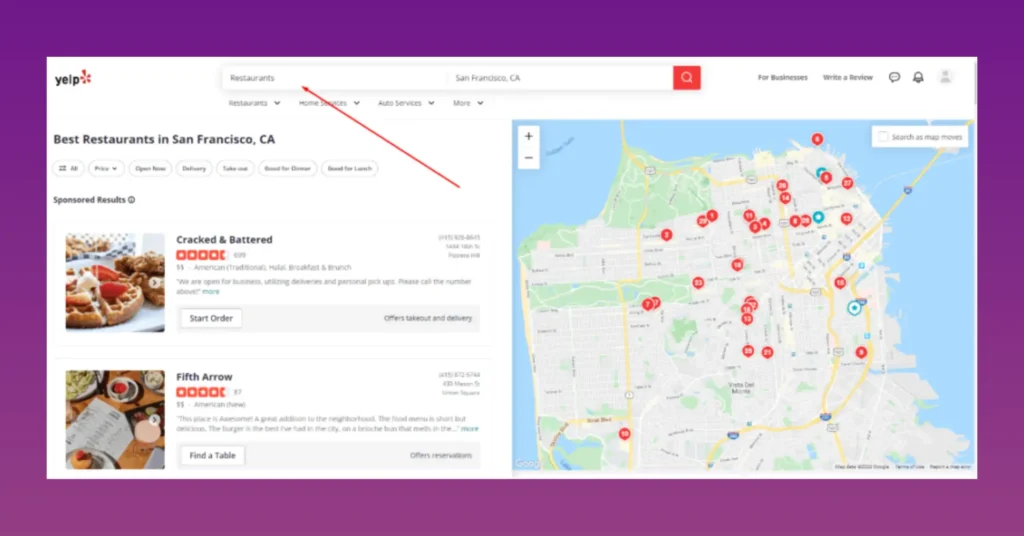
You can see the URL. Copy the URL from after biz/ and paste it to insert it. You’ve successfully received your Place ID!
WP Social Ninja connects to Yelp’s Fusion API, which provides up to 3 reviews per business for free. You don’t need a Yelp Pro account to see these — it’s simply the default limit of Yelp’s public API.
If you want to display more reviews, Yelp offers paid plans:
- Pro Enhanced → Up to 3 review excerpts per business (same as free)
- Pro Premium → Up to 7 review excerpts per business.
These limits are controlled by Yelp, not WP Social Ninja. Check Yelp Plan and Pricing.
Customize your template
With a plugin so full of comprehensive features, it’s okay for a user to get confused sometimes. So in the next part, we’ll guide you through the features and functionalities of Yelp.
To select your platform, click on the Source button from the dashboard, and a drop-down menu will appear.
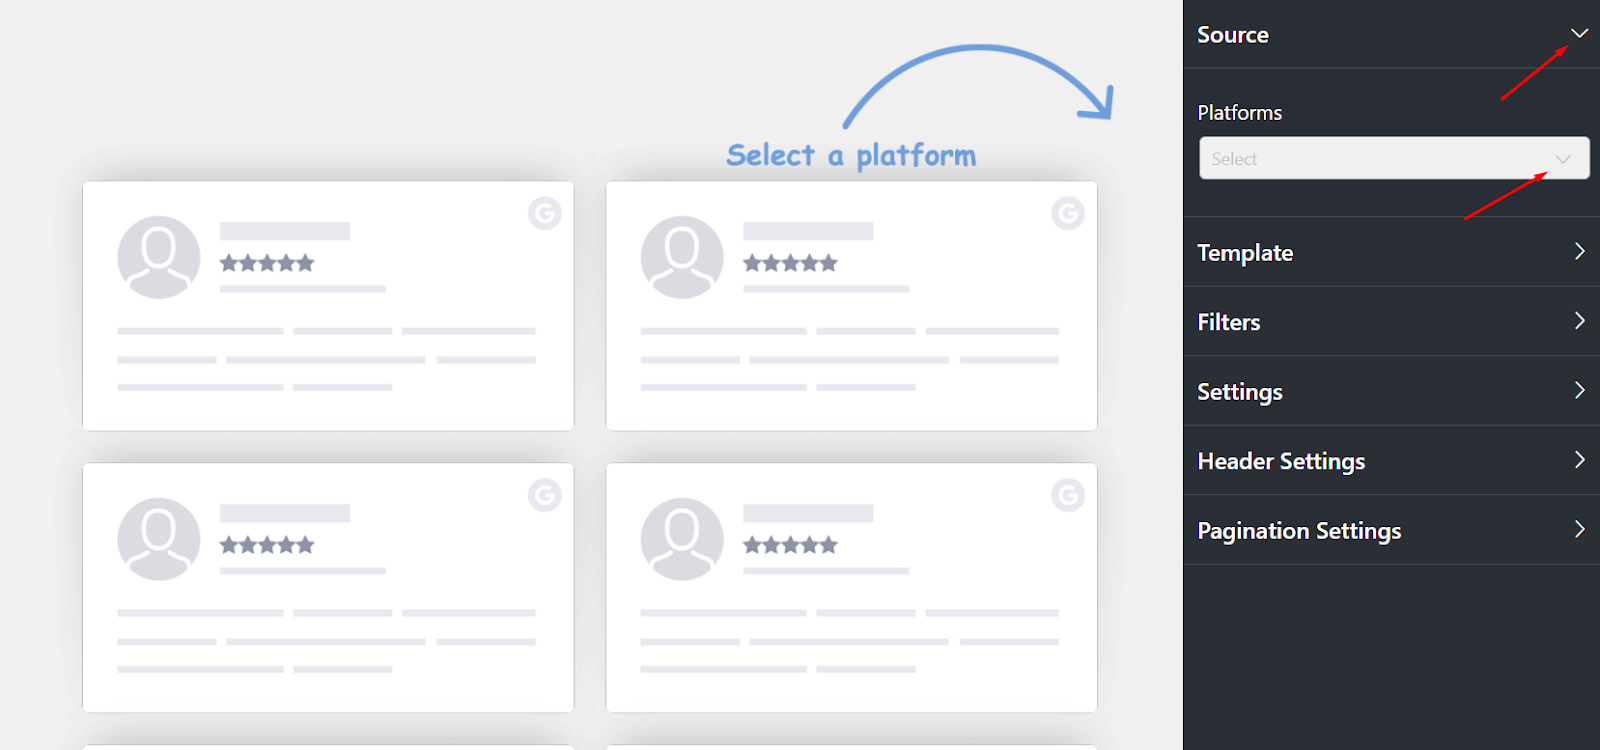
Here, you can select a platform or multiple platforms. For demonstration, we’ll select Yelp.
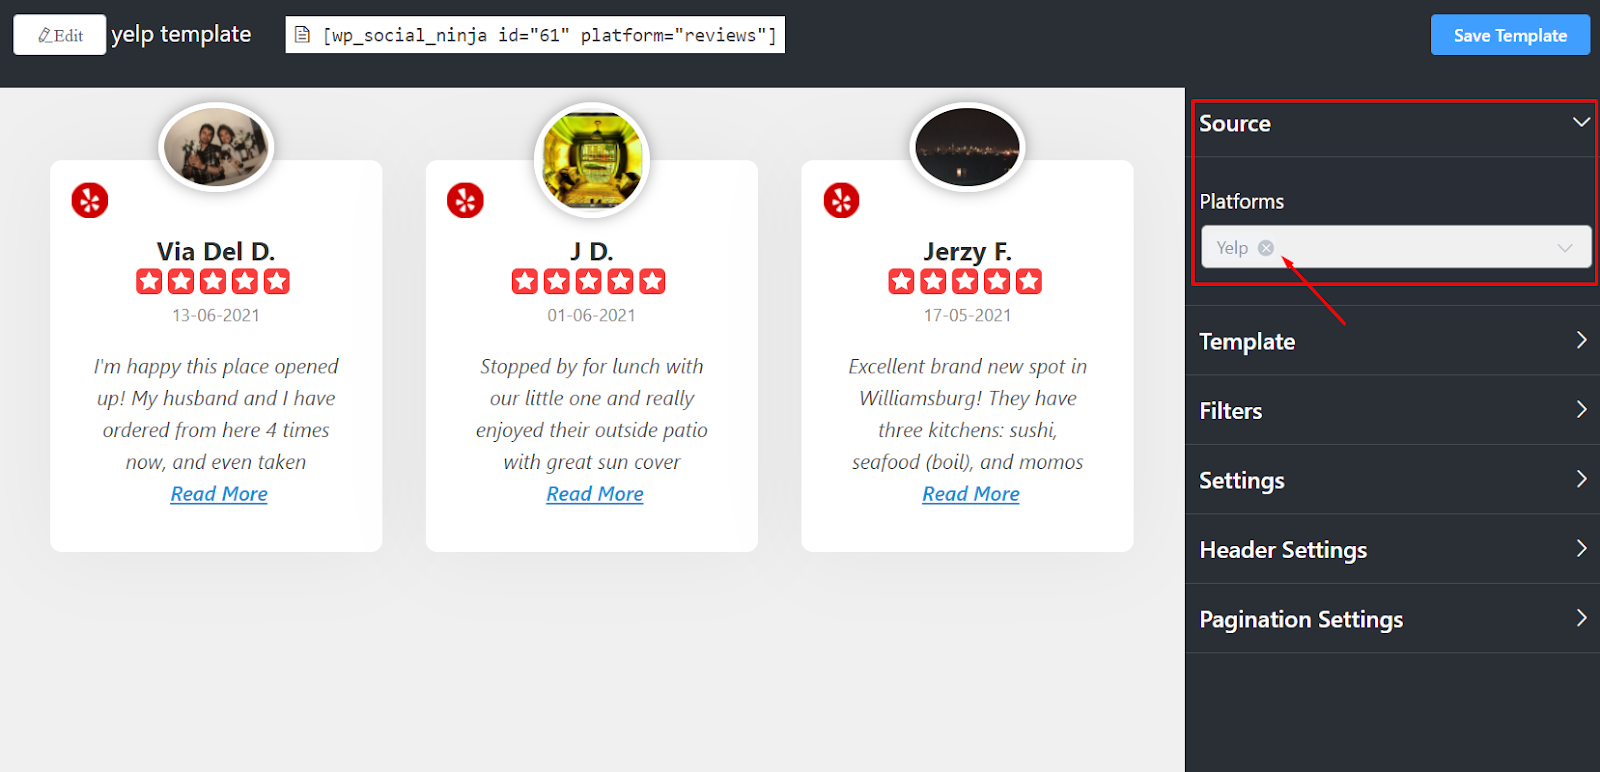
As you can see, once you select the platform, all the reviews will come automatically.
Next, click on the Template button, and a drop-down menu will appear. We have three options here at the moment.
Three Types of Layout are available right now: Grid, Slider & Masonry. These layouts have different looks and impressions on your brand.
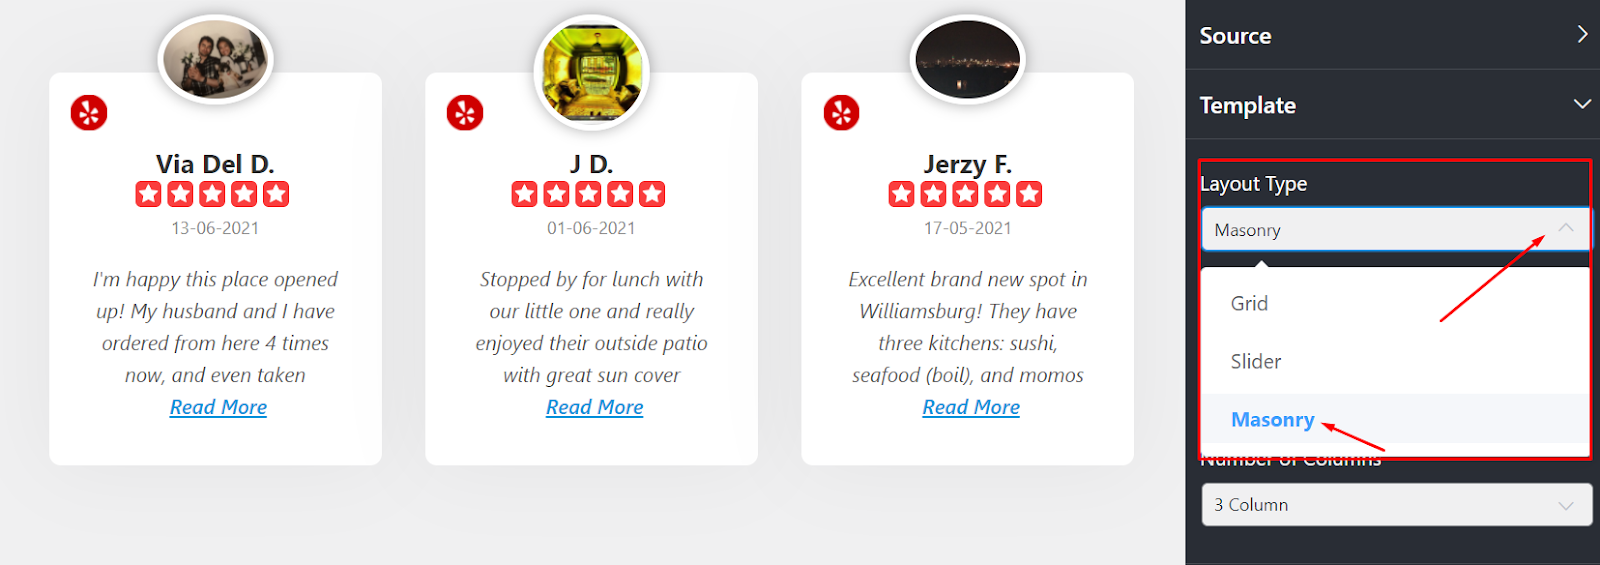
We’ve selected Masonry Layout Type here; you can select any to display Yelp reviews.
Once you’re done, it’s time to adjust the Template Types. WP Social Ninja has nine Template Types.
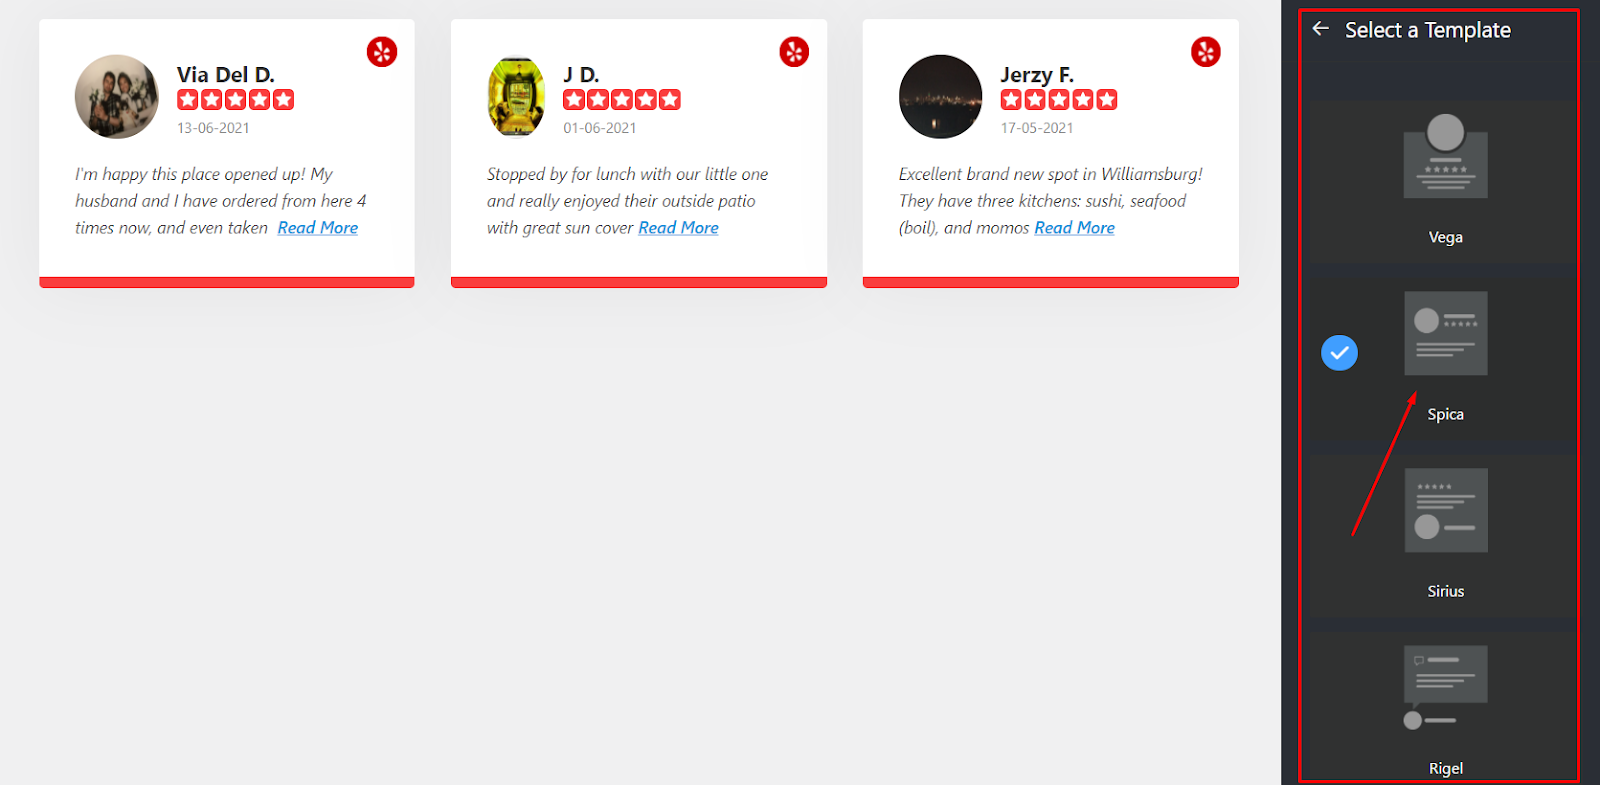
Vega, Spica, Sirius, Rigel, Procyon, Pollux, Mimosa, Hadar, and Deneb. Select any Template that suits your brand totally.
The next customization is the Number of Columns. Like the previous features, a drop-down menu will appear once you click.
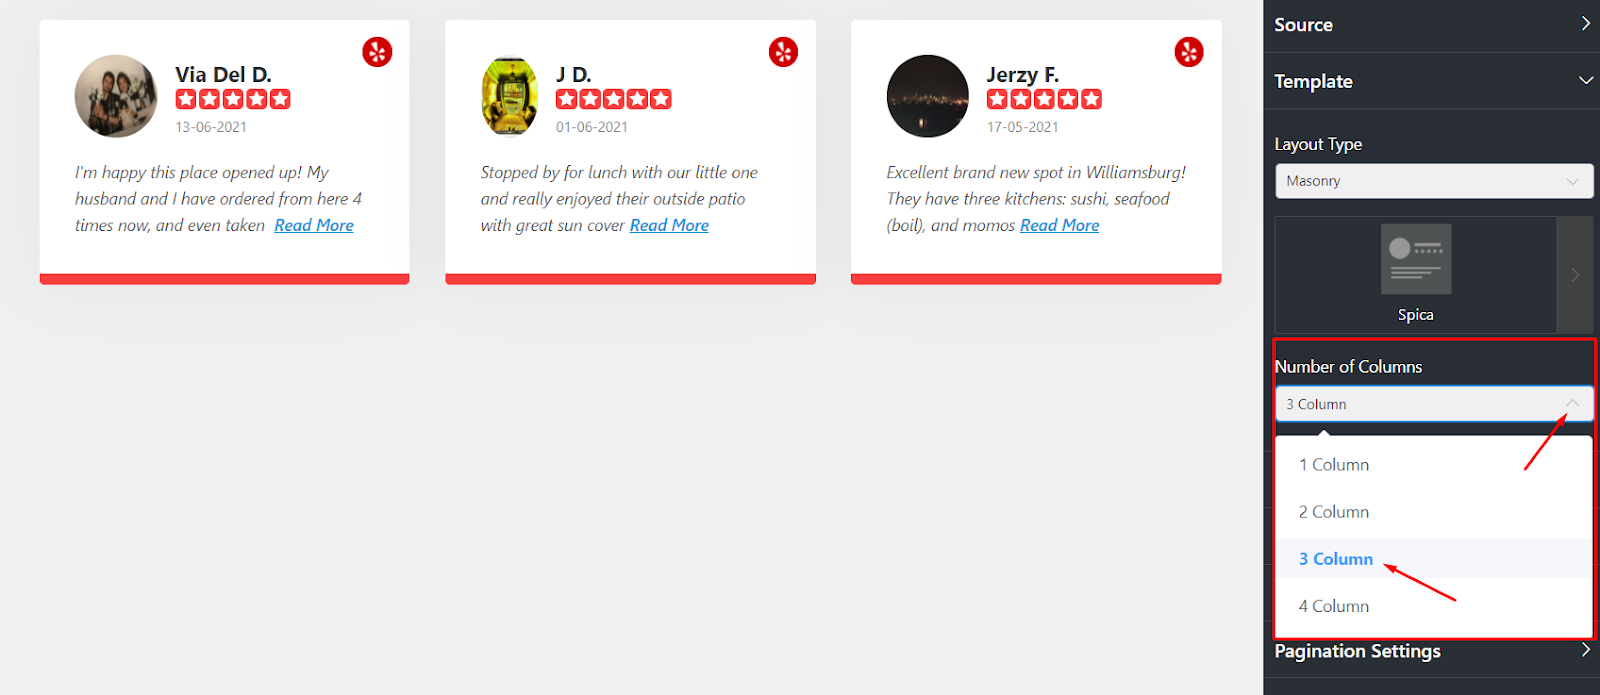
Right now, we have 1 Column to 4 Columns. For demonstration purposes, 3 Columns are selected to display the Amazon reviews. You can choose any column options.
Now that you’ve selected the platforms and templates, we’ll jump into the Filters section. To get started, click on the arrow sign, and you can adjust your Number of Reviews.
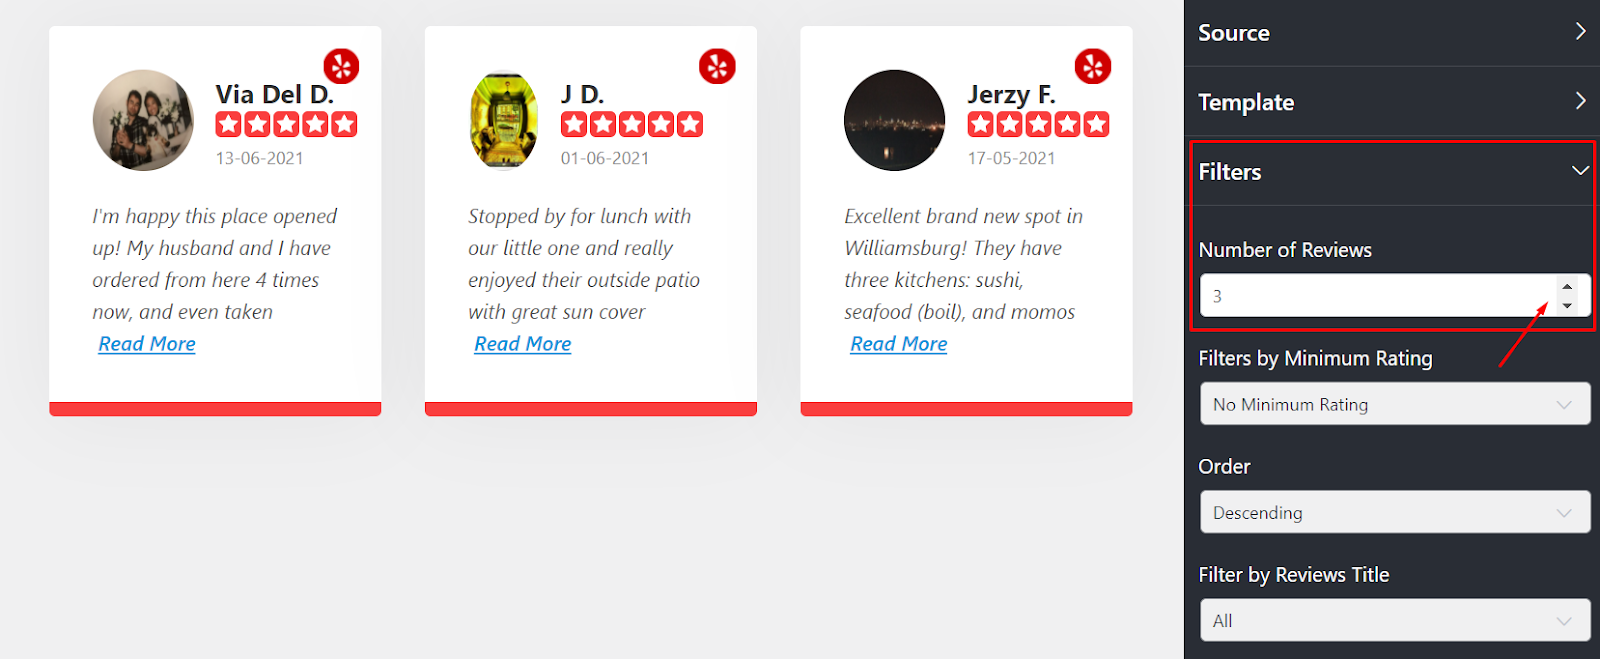
You can select different numbers of reviews for different platforms. However, for Yelp, you can only select three Yelp reviews.
You don’t need every single rating on your website. Filter your ratings and highlight the best ones.
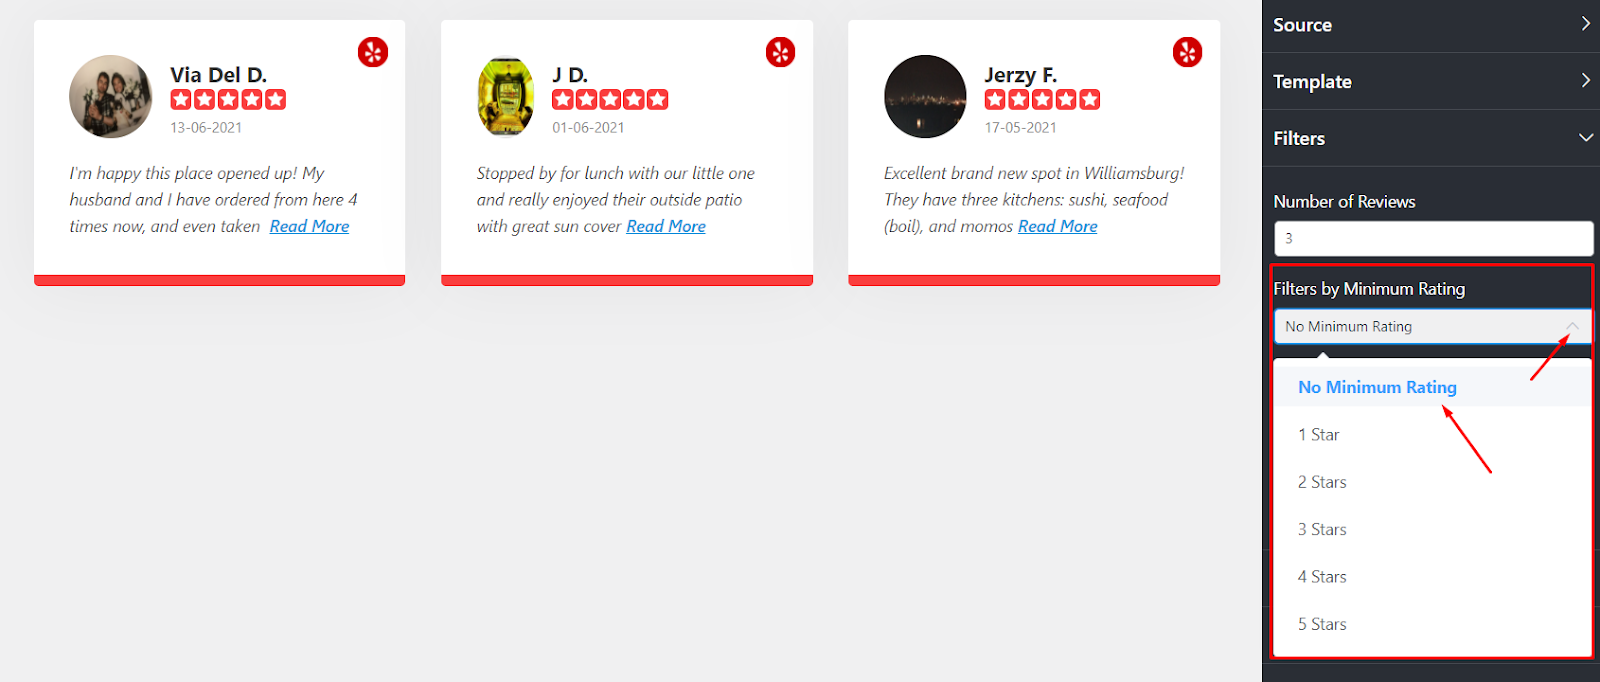
You’ll have six options to choose from: No Minimum Rating, Five Star, and to display your online reviews. Here, we have selected “No Minimum Rating”; you can pick any rating.
In the next section, you can arrange your reviews in a specific order.
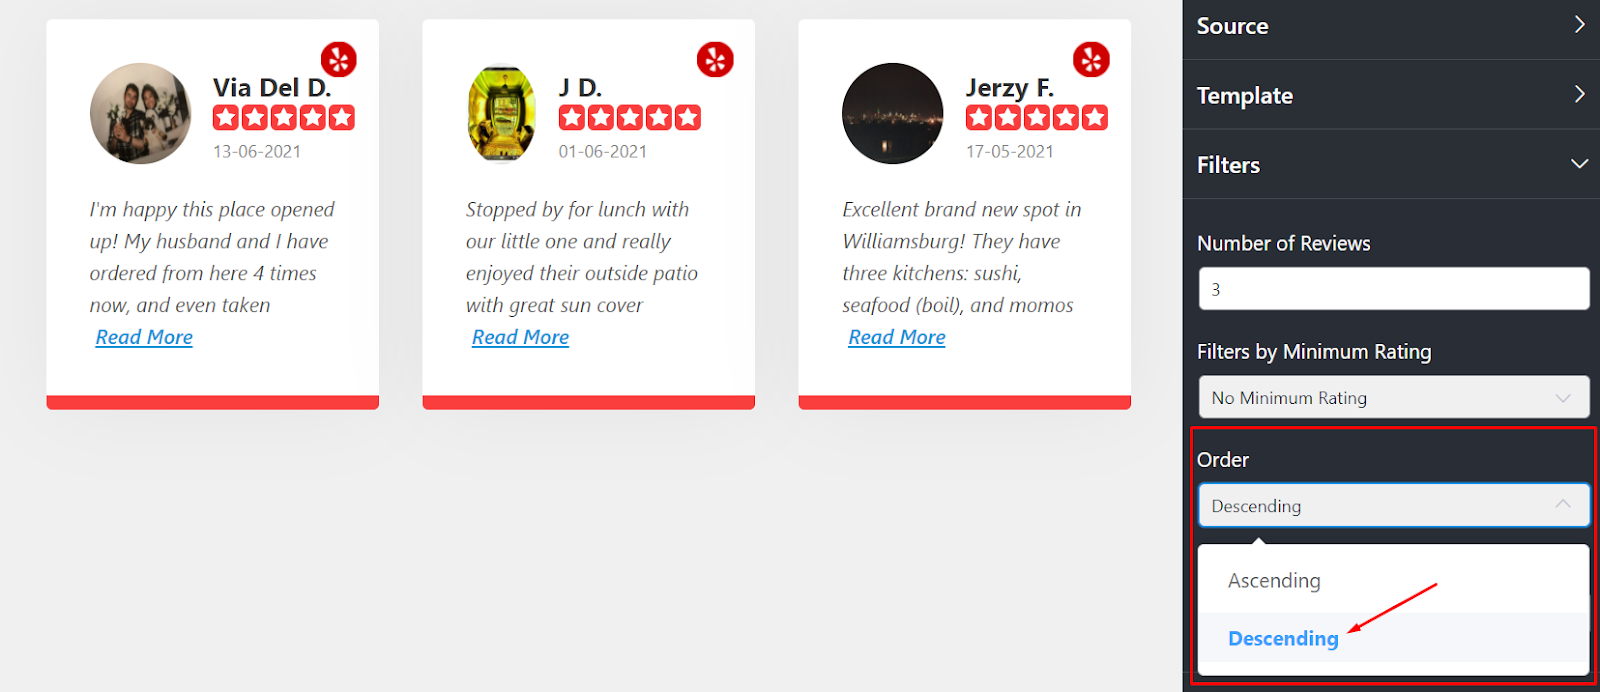
You can select the Ascending or Descending option to display your reviews on your website.
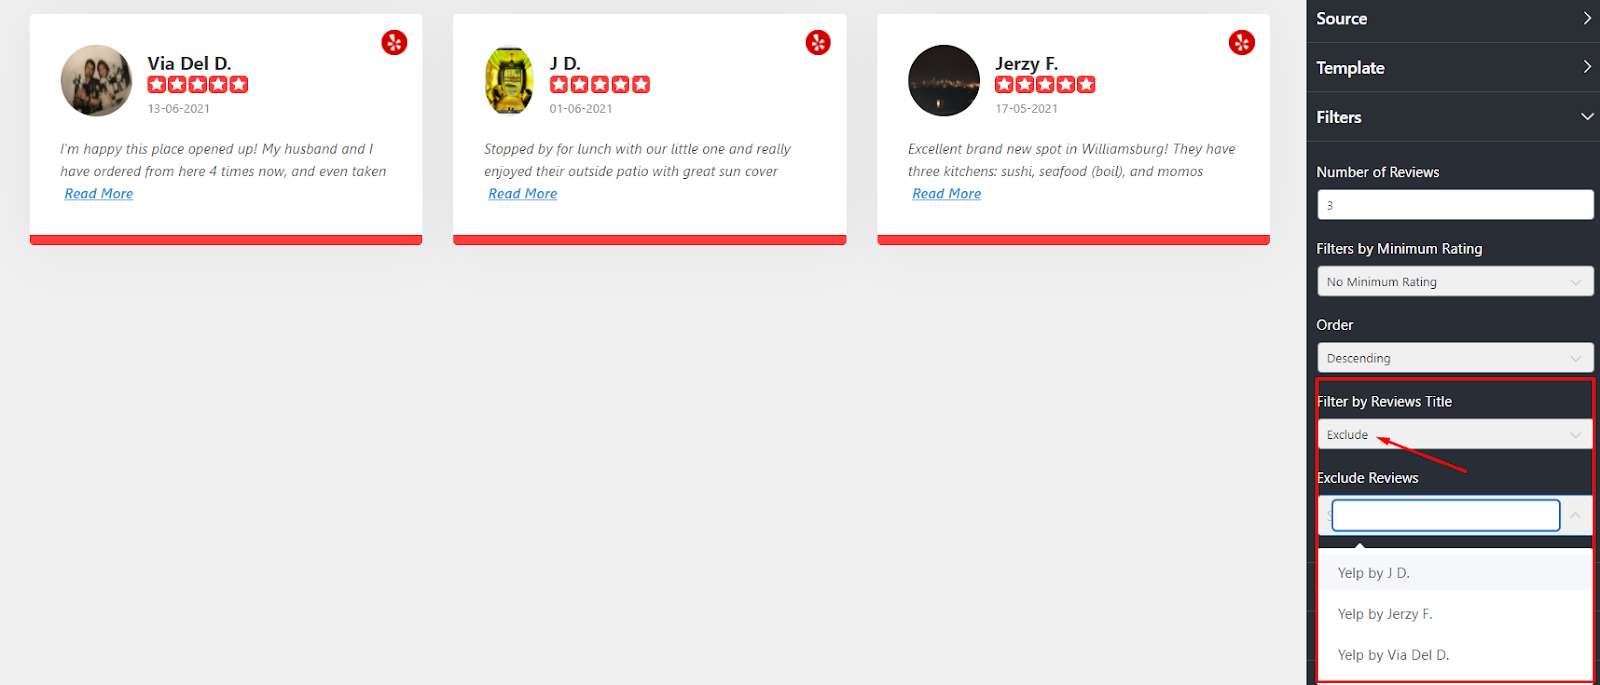
If you want to filter your website reviews, WP Social Ninja offers this option as well. In the Filter by Reviews Title, we currently have three options. You can choose to select All Yelp reviews or Include/Exclude any.
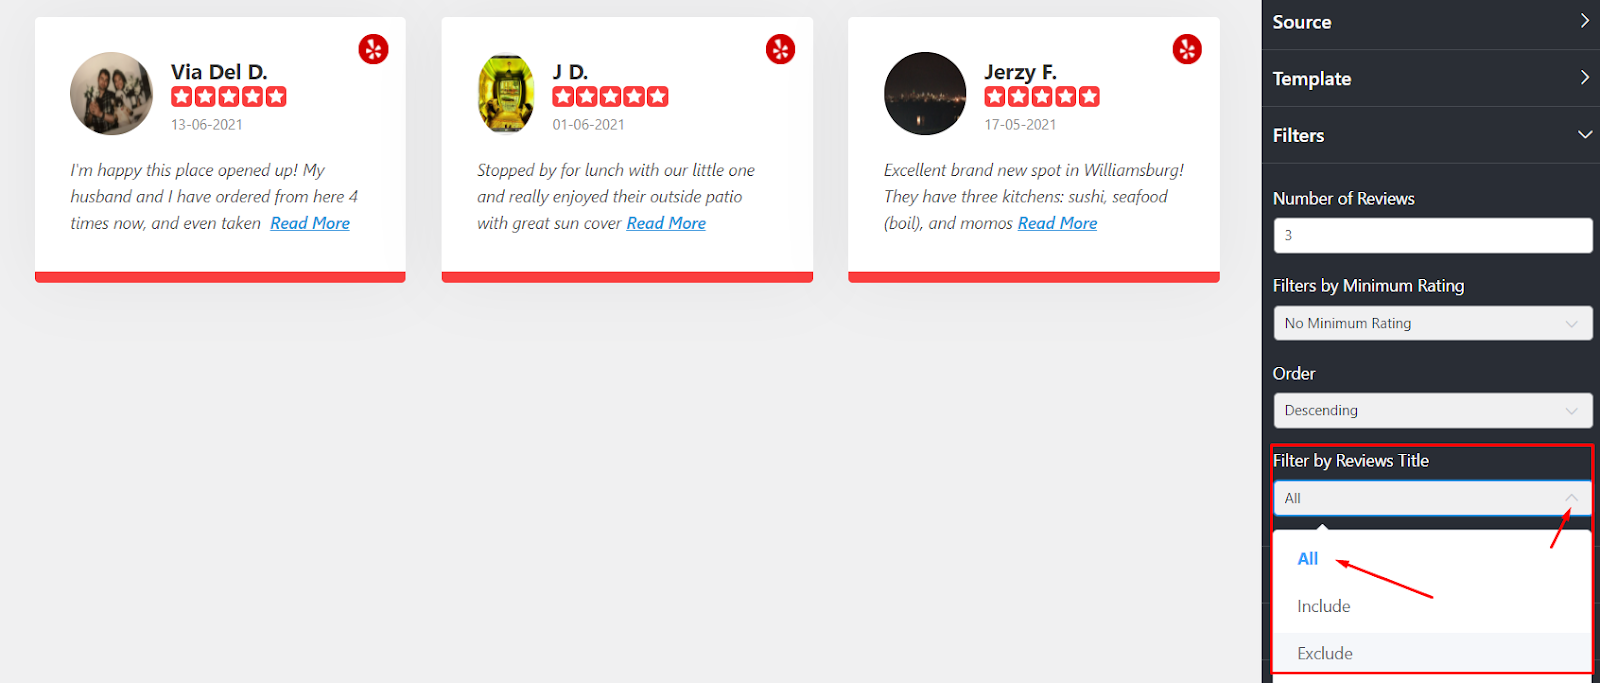
If you click on the Include button, a drop-down menu will appear.
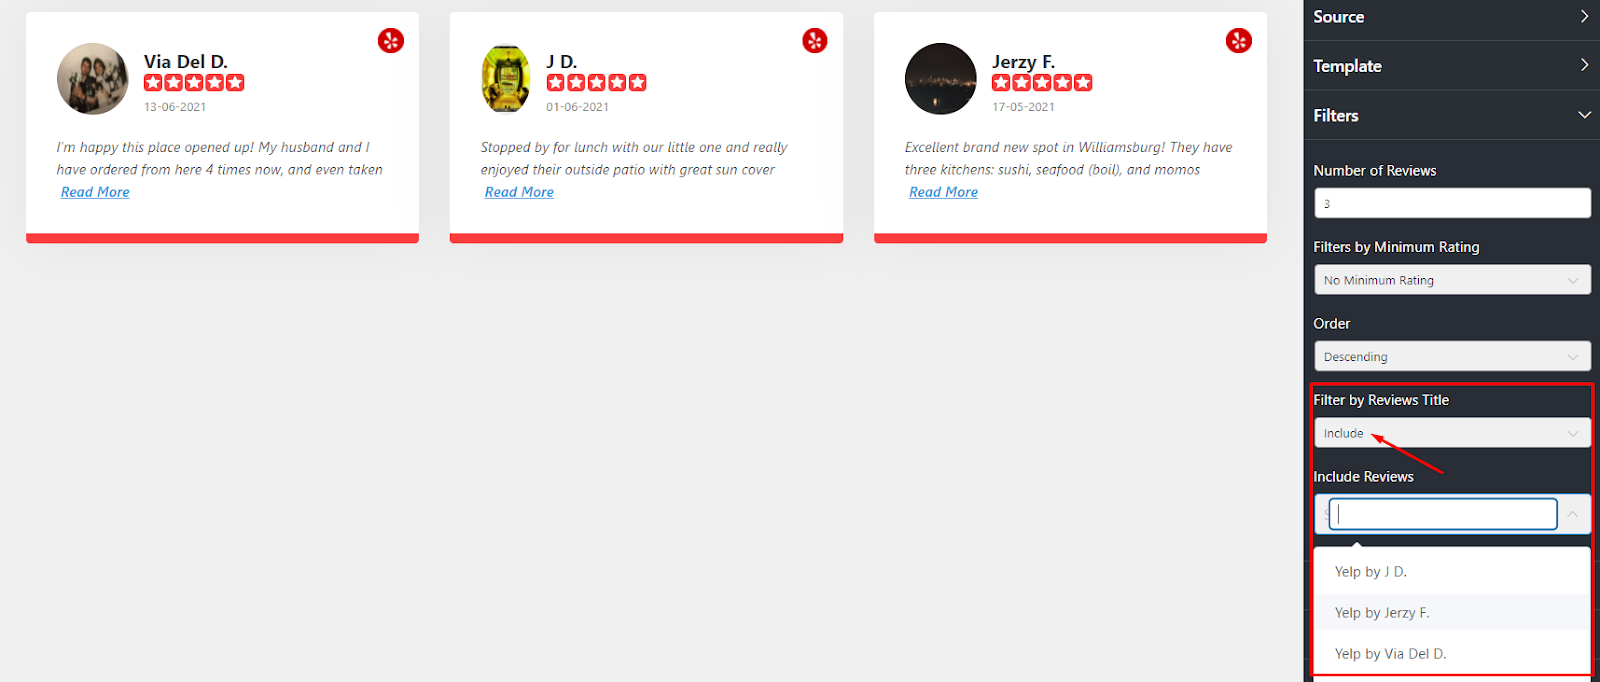
WP Social Ninja lets you select specific reviews by reviewer name to display on your website.
There will be reviews you won’t want to display on your website. Click on the Exclude button; you can eliminate the specific Yelp reviews by their names.
Once finished, click the Save button to preserve the changes.
So now, it’s finally time to adjust your Yelp reviews to WordPress. Let’s start with the Display Rating.
Want to change your Display Ratings? Click the button on your dashboard you manage ratings on your website.
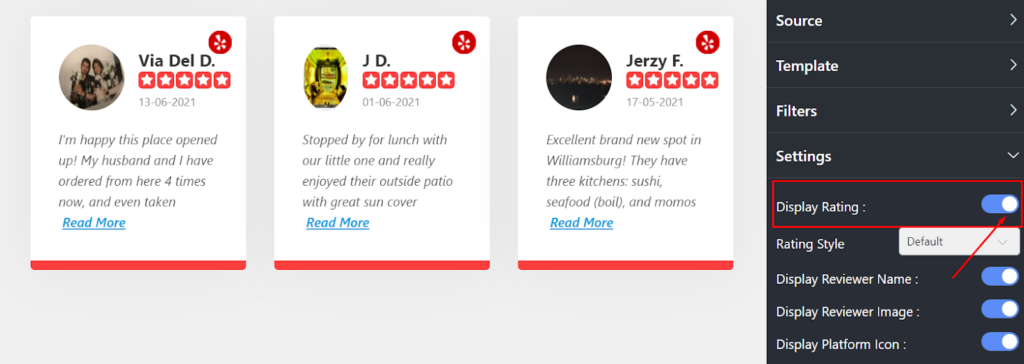
Just turn the button on to display the reviews on your website. If you don’t want to display the Yelp reviews, turn off the button to hide the reviews.
Next is Rating Style. Here, you can change your rating style from the three options given.
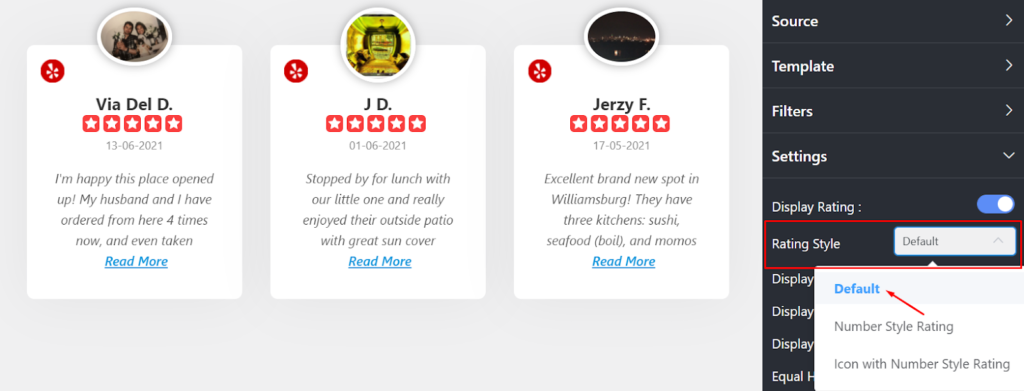
Default, Number Style Rating, and Icon with Number Style Rating are available right now.
To change the look of your website, pick any from the drop-down menu.
Privacy is essential for any website. WP Social Ninja offers a 100% customizable settings panel. As with Rating Style, you can also take control of your Display Reviewer Name.
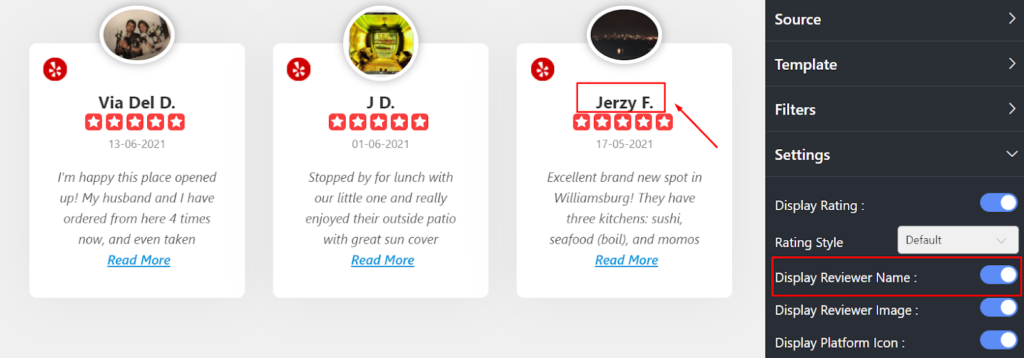
Here, we have turned on the button. You can turn off the button if you don’t want to display the Reviewer Name on your website.
As we’ve said, WP Social Ninja has all the necessary things that can secure users’ privacy.
In the Display Reviewer Image section, you can stop the images from being displayed on the website.
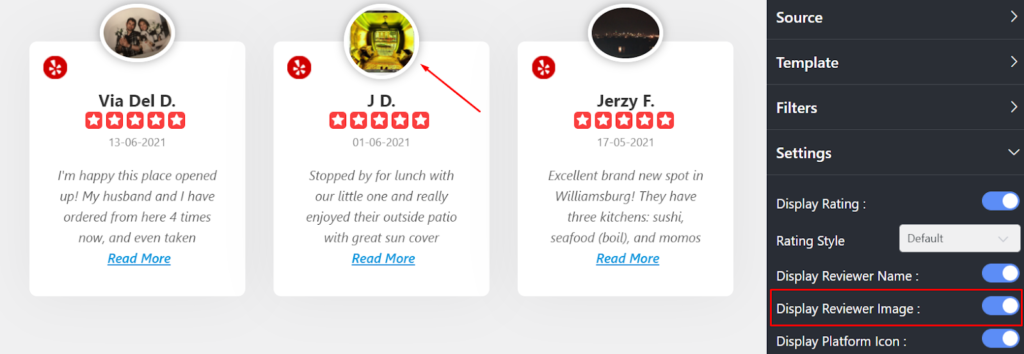
Enable the reviewer image button; images will be displayed on your site. However, turning off the button will hide the image.
The next feature is the Display Platform Icon. Turn off the filter icon if you want to adjust the platform icon.
To do that, click the button to enable or disable.
The next filter is Equal Height. Adjust your text height by turning on/off the button.
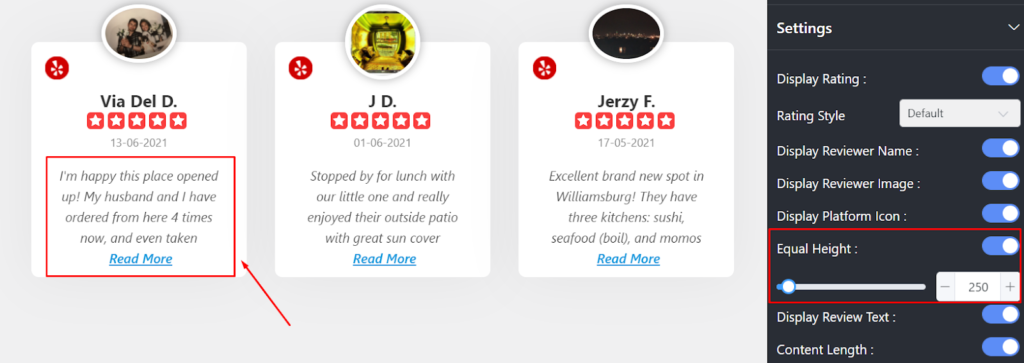
If you turn it on, all the Yelp reviews, if you have Yelp restaurants, will be in Equal Height, as you can see in the screenshot.
Additionally, you can adjust the height based on the text. To do that, click on the Plus/Minus button.
After you adjust your Equal Height, you can change your Reviewer Text and Content-Length from your dashboard.
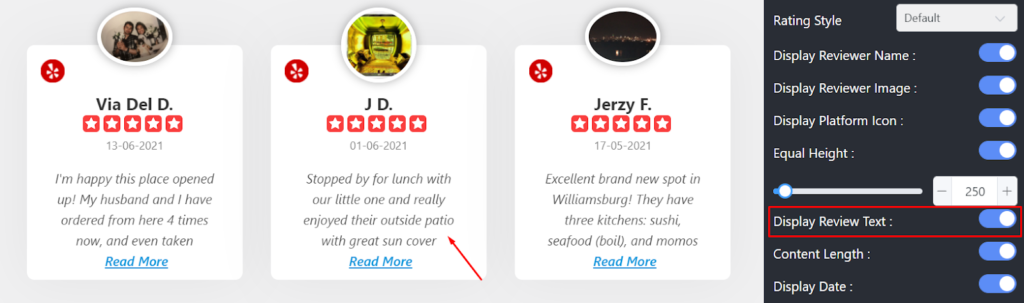
If you disable the Display Reviewer Text button, you won’t be able to display the Content Length.
However, if you want to align your reviews section on the same horizontal line, enable the Content-Length button.
We’re not done yet! WP Social Ninja allows you to take complete control of your reviews section. Yes, you can also control your Display Date.
Moreover, we offer four options for customizing the date format on your website.
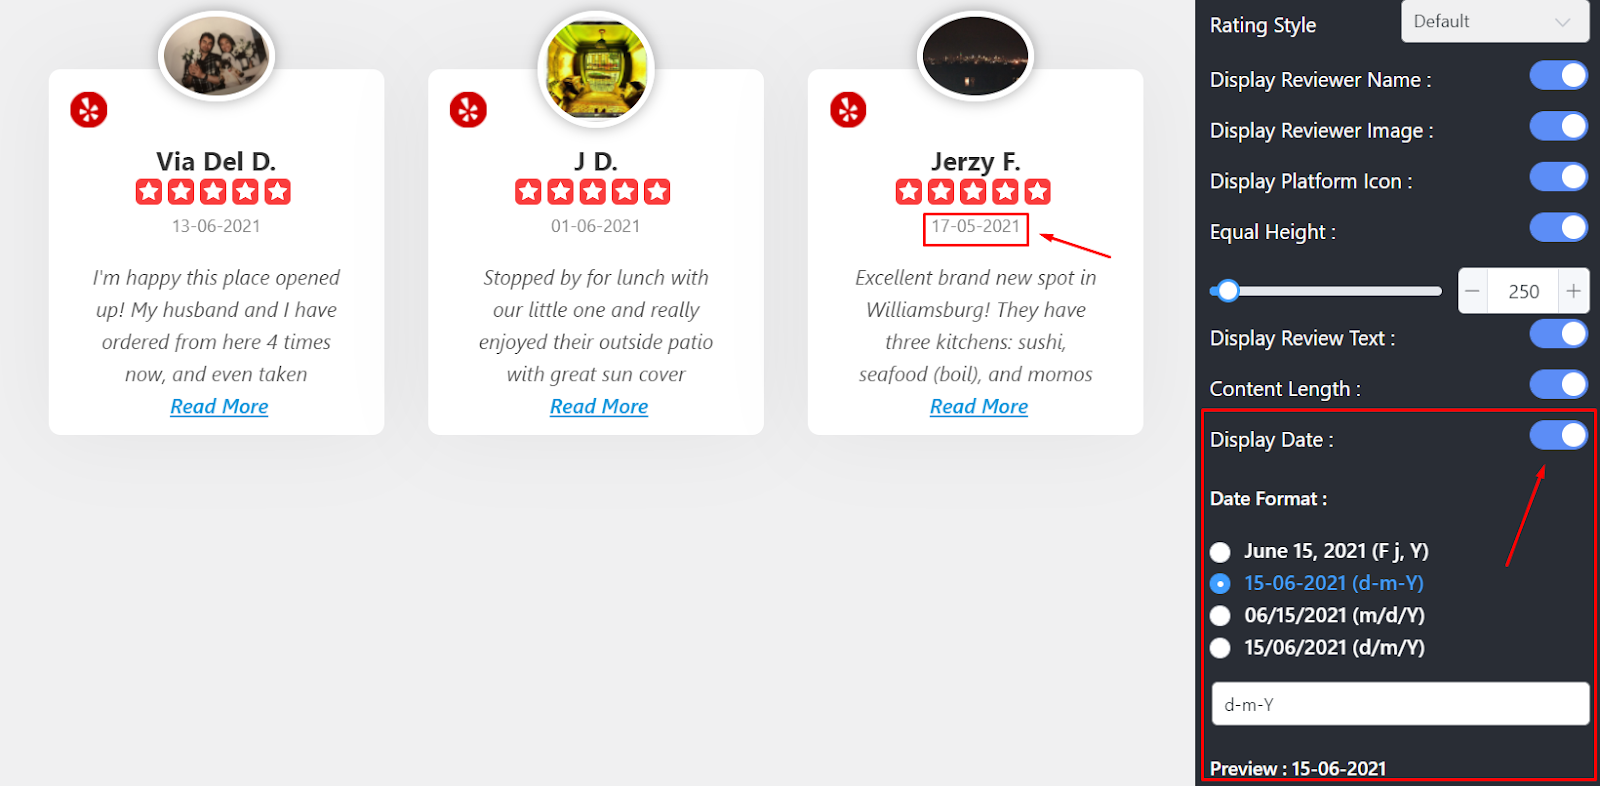
However, in case you don’t like to keep the date displayed on the website, turn the button off.
Reviews and ratings are pretty effective marketing strategies when used correctly. Displaying the user’s testimonials praising your product can convince your website visitors to take you seriously. In the next part, we’ll discuss Yelp reviews Header Settings.
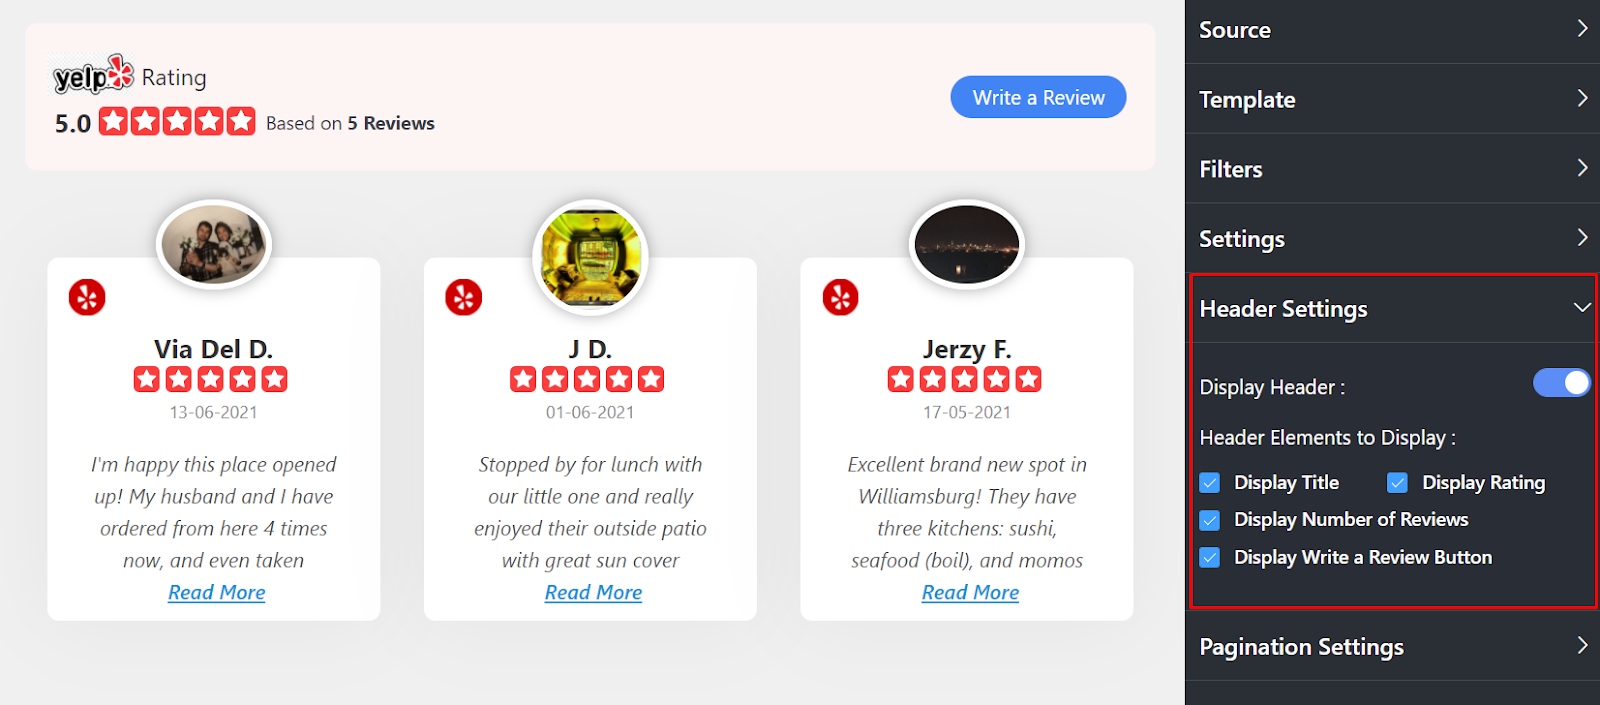
In this part, four Layout options are available in the WP Social Ninja dashboard: Display Title, Display Rating, Display Number of Reviews, and Display Write a Review Button.
If you click on the Display Title, the Business name will be displayed on the Front End.
Next is Display Rating. You can tick the box to display the rating. However, untick the box if you don’t want to show off your Display Rating.
If you turn on the Display Number of Reviews button, the total number of reviews will be displayed on your website.
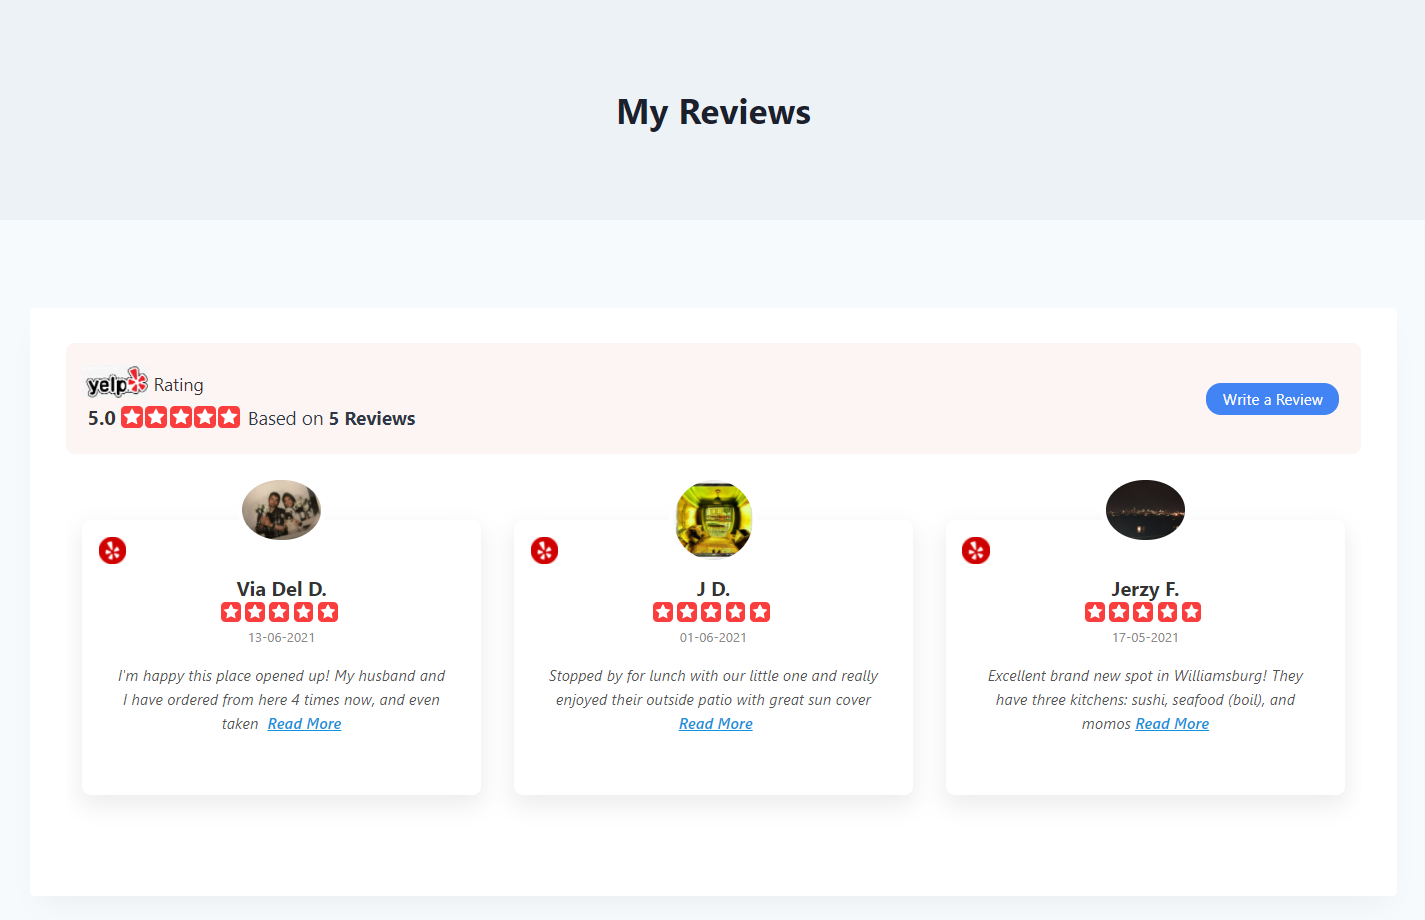
In this section, a Call To Action button will appear on your website. Your users can submit reviews via the CTA button. Moreover, for multiple platforms, this CTA will be taken to individual sites.
Lists can become too lengthy on your website. Hence, it’s important to display them in smaller portions. Pagination Settings can help here.
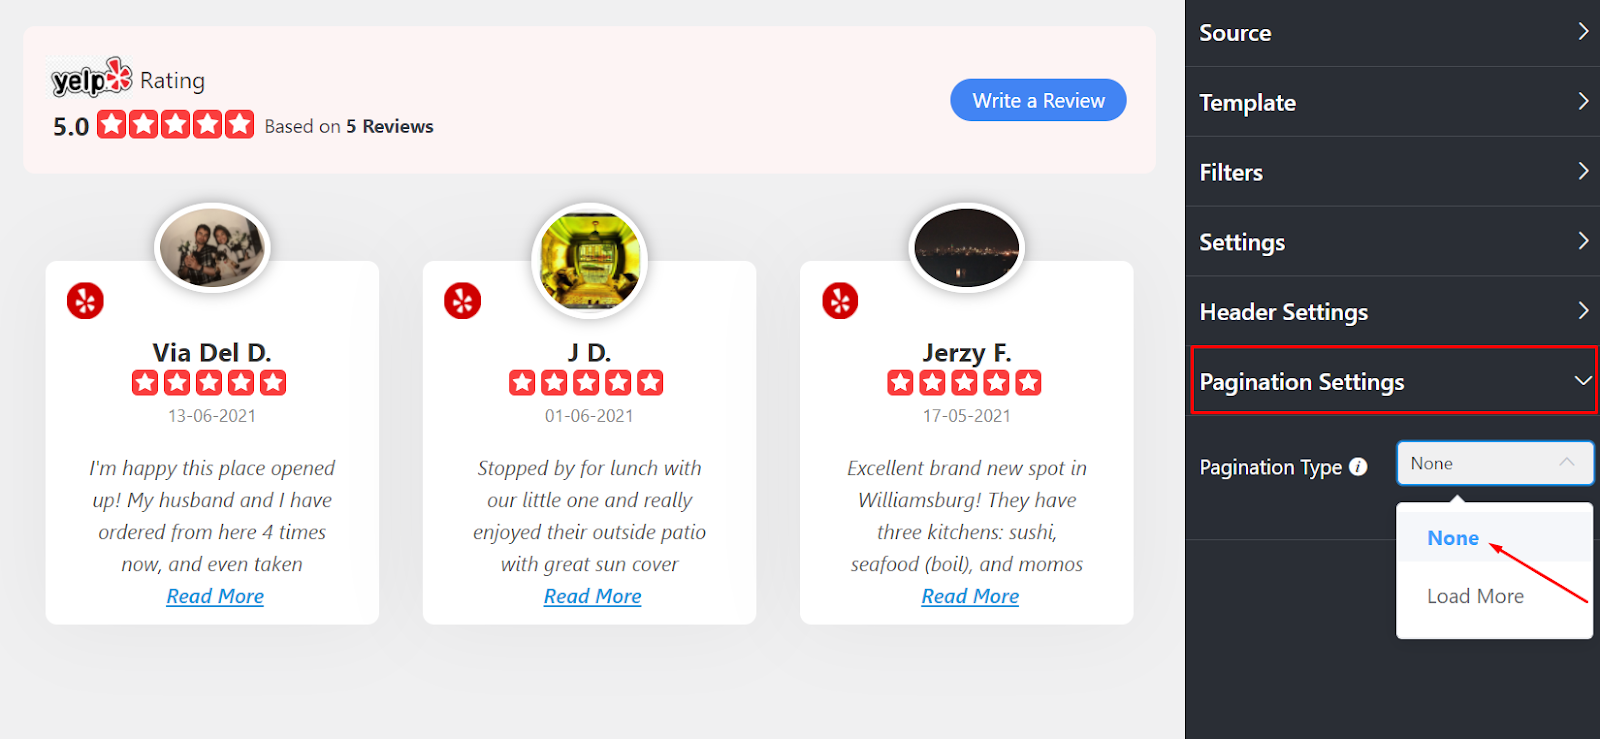
Pagination Type has two options currently. You can pick any from None or Load More. If you select the Load More option, you’ll be prompted to adjust your Reviews Per Page setting.
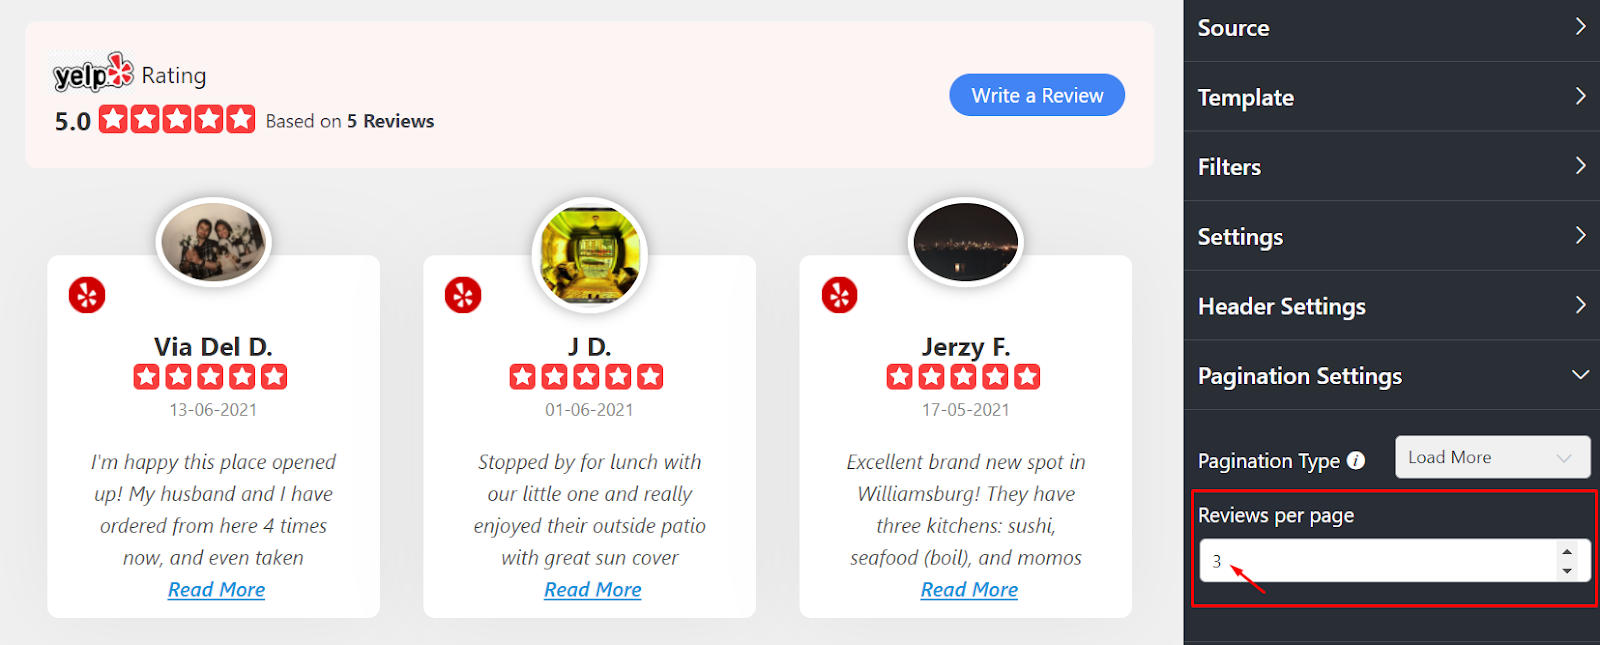
Here, in this Review Per Page, you can adjust the review number for every page on your website from the scroll bar.
Once you’re done, click on the Save button to preserve your settings.
Ending notes
Did you know 76% of consumers say they trust online reviews as much as word-of-mouth marketing?
Embedding Yelp reviews with WP Social Ninja doesn’t take much. It’s easy, time-saving, and user-friendly.
Win your customers’ hearts with exceptional features
Discover how WP Social Ninja can assist you in designing outstanding customer experiences.
We hope the article was helpful. Now that you know how to manage online reviews on your WordPress website, you can also check out our other article on embedding social media feeds.

Subscribe To Get
Weekly Email Newsletter
Connect, Customize, and Display Social Feeds, Reviews, and Chat widgets


Trending Posts
Comments
-
After study a few of the blog posts on your web site now, and I truly like your way of blogging. I bookmarked it to my bookmark website record and will likely be checking back soon. Pls take a look at my website as properly and let me know what you think.
-
Thank you!
-


Leave a Reply