

How to Add AliExpress Reviews on Your WordPress Website


Are you a seller on AliExpress and envisioning to make your business the top choice for your potential customers?
If your answer is yes, the first thing you must do is add your AliExpress reviews to your website!
AliExpress is one of the most popular small business platforms for consumers and businesses. Embedding reviews from such a reputed platform on your business website helps your visitors better understand your products or services.
Moreover, adding social reviews can leverage your sales and connect with your customers right away. Your reviews are like certification of the quality of your business.
Today, we’ll show how you can quickly add your online reviews to your WordPress website. So, buckle up and join us for this amazing journey.
Why should you embed AliExpress reviews on your business website?
AliExpress is one of the biggest online shopping platforms and trusted by millions of consumers to buy their necessary products. If you are a seller on this platform and maintaining your E-commerce website at the same time, adding customer reviews can be the quickest way to earn their trust.
Aside from improving your review management strategy, here’s how adding customer reviews from AliExpress on your business website can help your business to stay ahead of the competitors:
- Build More Trust and Credibility: Reviews are the purest form of user-generated content. Adding reviews from trusted platforms like AliExpress on your website can ensure the visitors about the quality of your business and help them overcome their initial hesitation.
- Increase Conversion Rate: You can make more sales only when people trust you- that has been the iron rule of online business. The trust you build by adding customer reviews can heavily influence your prospects to take the leap of faith and make them buy from you.
- Better Customer Retention: Showcasing your latest AliExpress reviews let your existing customers know that you are still at the top of the game. So, naturally your brand become the first choice whenever your old customers needs something.
- Enhanced User Experience: Reviews provide valuable insights into product quality, fit, and creative use cases. This influences customers to make information-driven purchase decision.
Reviews are like gold mines for businesses especially when they come from globally accepted platforms like AliExpress. While positive reviews drive more sales, negative ones point out your area of improvements.
Bonus tips: Customer feedback is the greatest source of knowledge for improving your business strategy. Learn how to get customer feedback in the most effective way to build a solid strategy that can bring you to the top.

Get exclusive social media marketing tips and tutorials in your inbox!
The easiest way to add AliExpress reviews to WordPress websites
The most fascinating thing about WordPress is its vast collection of plugins that serve almost every functionality you can think of, making WordPress the top CMS on this planet.
There are dozens of plugins for embedding AliExpress reviews as well. However, they can vary in terms of functionality, operation, and prices, and to be honest, choosing the most suitable one can be quite a hassle.
But let us save you from all the trouble! Let’s meet WP Social Ninja, the most versatile social media integration plugin for WordPress websites.
This multidimensional social media plugin is packed with features like social feeds, business review integration, chat widgets, notification popups, and custom testimonials, all with the simplest integration process.
The reviews feature of WP Social Ninja will allow you to add AliExpress reviews along with 10+ platforms that include Google Business Profile, WooCommerce, Airbnb, Booking.com, and more.
From now on, we will walk you through the step-by-step process of how to embed AliExpress reviews in two minutes with WP Social Ninja. Let’s go.
Step 1: Install and activate WP Social Ninja
If you are familiar with installing WordPress plugins, WP Social Ninja is no different. It will take only a few steps.
You can do that in two ways:
- From your Dashboard
- From WordPress Repository
Here’s how to install it from your Dashboard:
- Navigate to the WordPress Admin panel. From the WordPress Dashboard, go to Plugins > Add New
- Next, on the search input field, type WP Social Ninja and wait for a moment for it to come up
- Now click on the Install Now button
- Then Activate
If you decide to install from WordPress Repository:
- Search WP Social Ninja in the WordPress Repository, and it will appear on the top. Once you click it, hit the Download button
- Now go to the Dashboard and go to Plugins > Add New > Upload Plugin > Choose the zip file
- After that, click the Install Now button and then Activate
Win your customers’ hearts with exceptional features
Discover how WP Social Ninja can assist you in designing outstanding customer experiences.

Step 2: Configure your product to embed AliExpress reviews
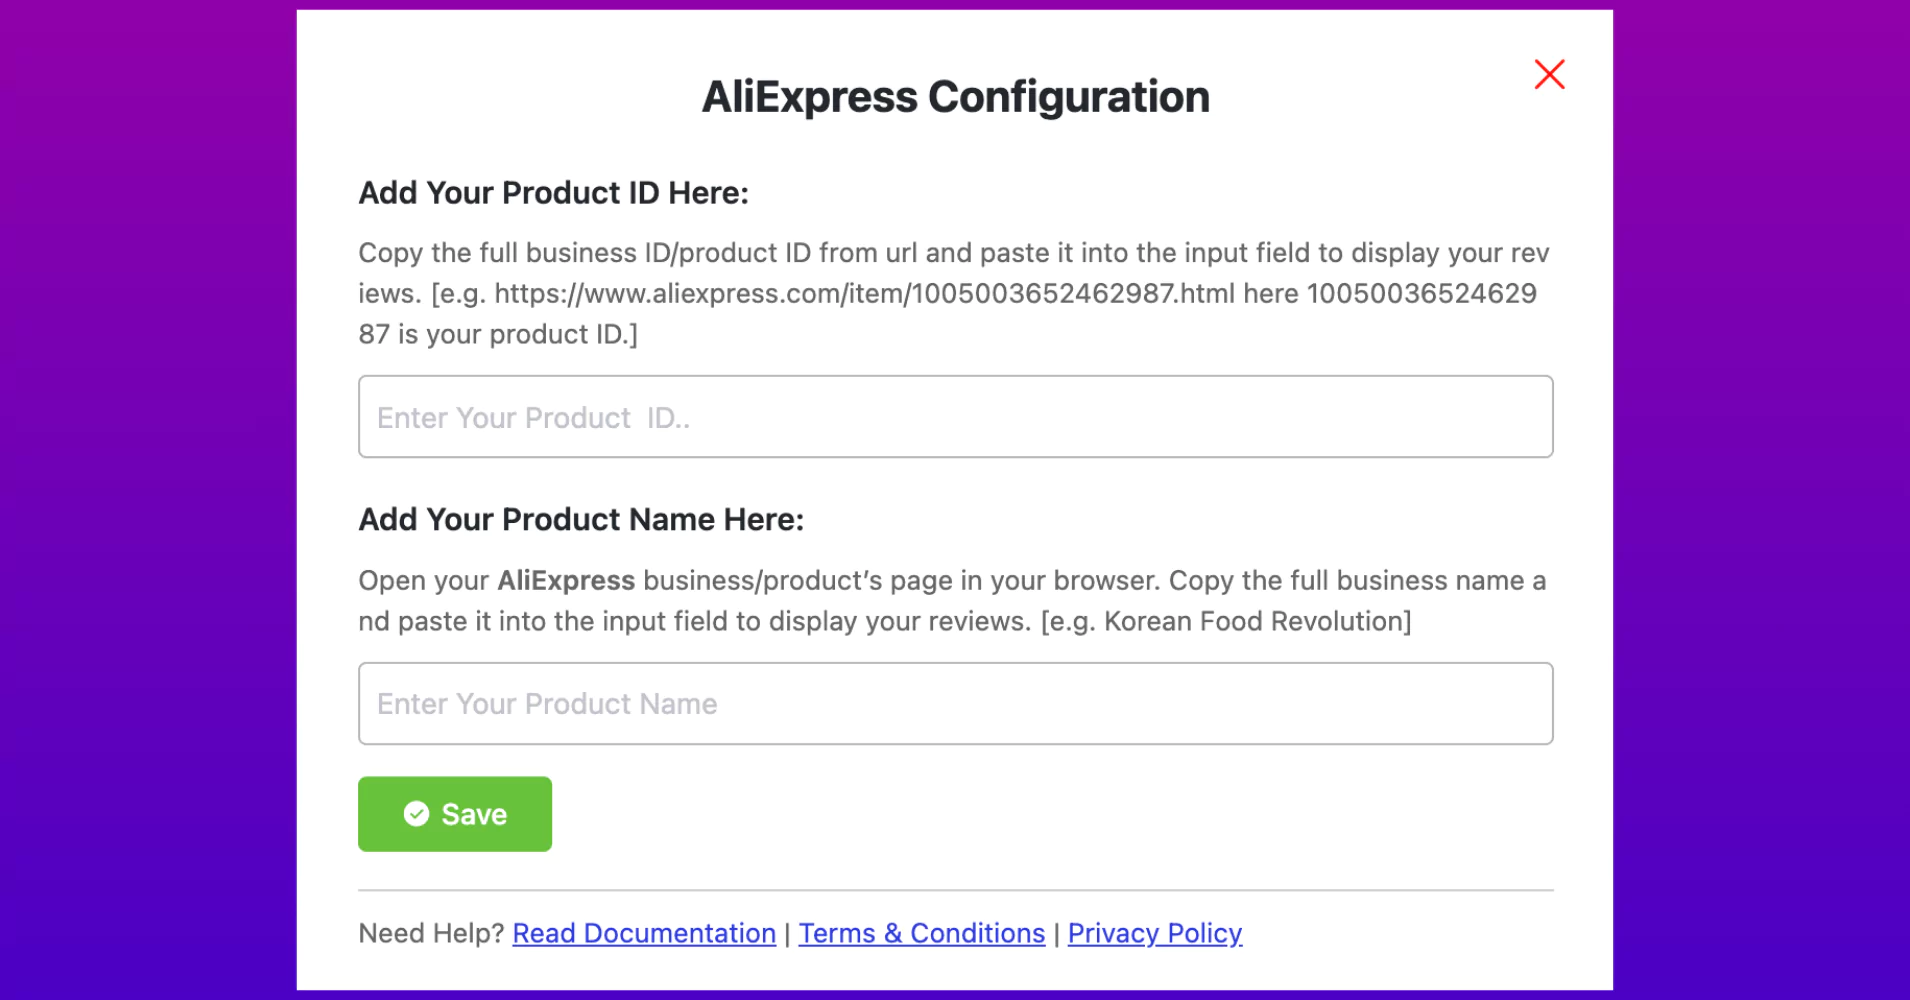
First, go to the Platforms from the WP Social Ninja dashboard and select AliExpress from the Social Reviews section. Then, you have to provide your product ID and name to fetch reviews.
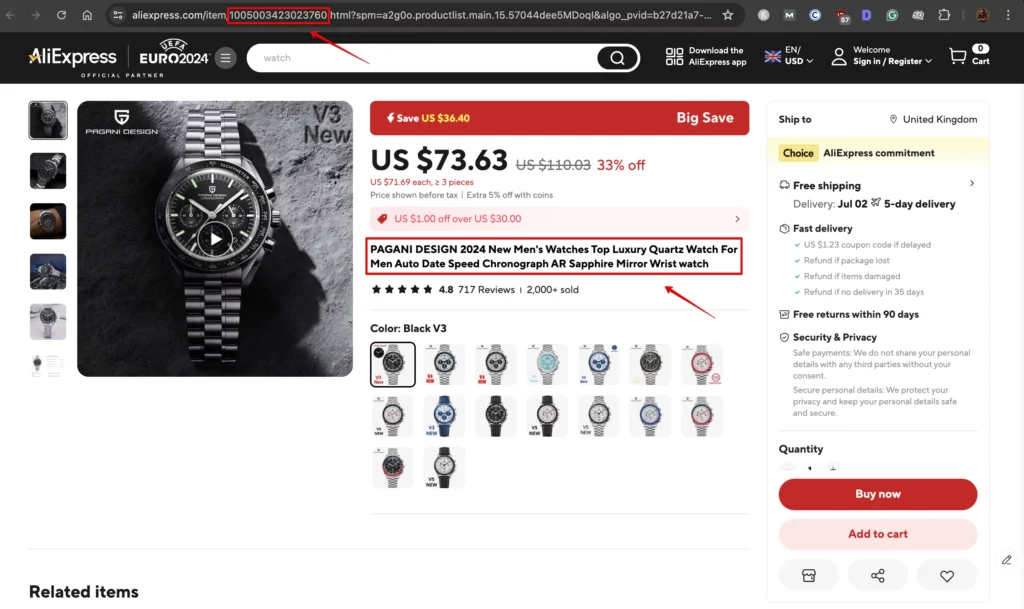
Go to the ALiExpress site and select the product you want to show review. Then, copy the product ID from the URL section and copy the product name.
Then, provide the correct inputs and click on Save.
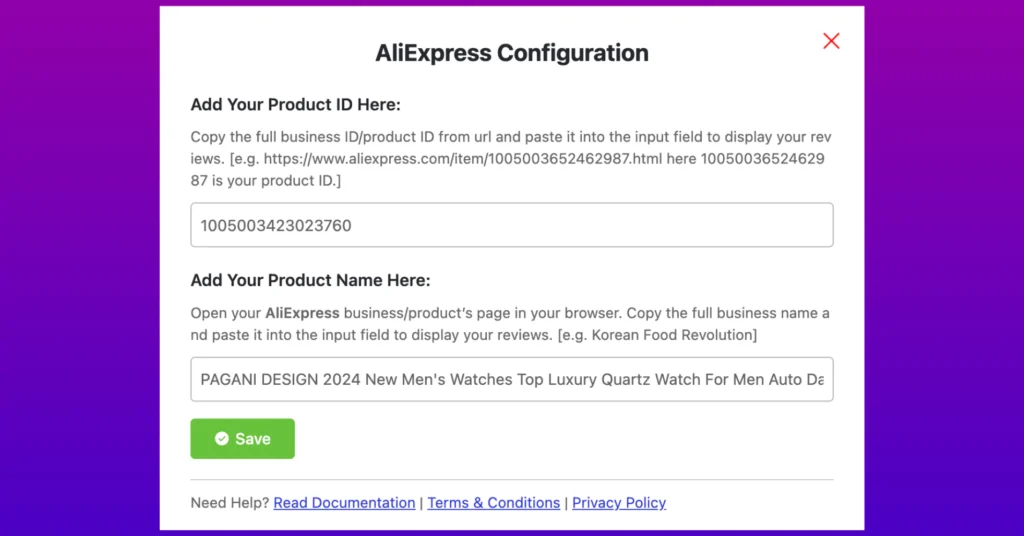
Here you will see the Success notification after clicking on the Save button. That means you are done with it and can go ahead with further customization.
However, sometimes, loading reviews could take a few minutes. In that case, you might have to wait until the reviews come back.
Step 3: Customize your review template
In the next part of this post, we’ll show you how you can adjust your template layouts in just a few steps.
Source
First, click on the Templates from your dashboard. Then, hit the Add New Template button, and a drop-down menu will appear. Select Add Reviews Template from the option.
Then, hit the Source button, and the Platforms section will appear.
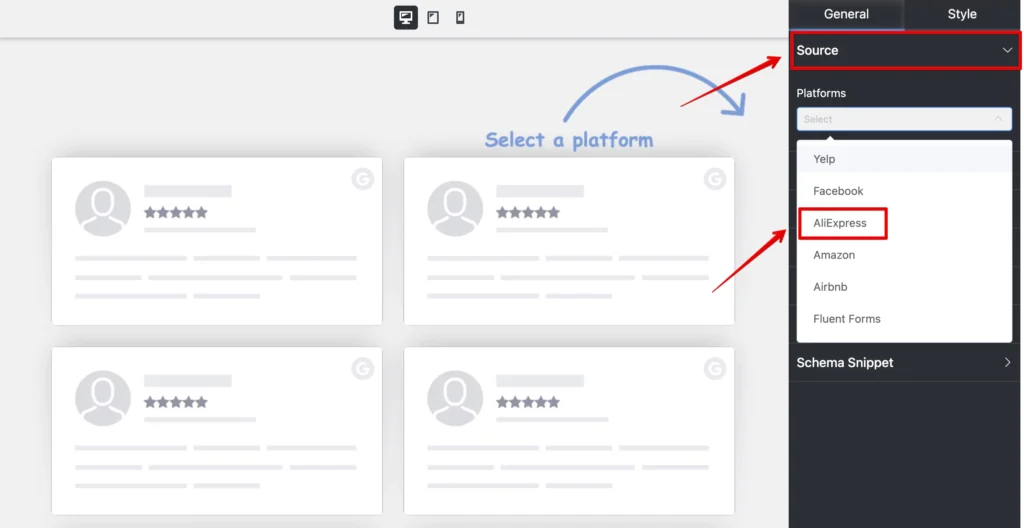
Here, you can select a platform or multiple platforms. We’ll select AliExpress for demonstration.
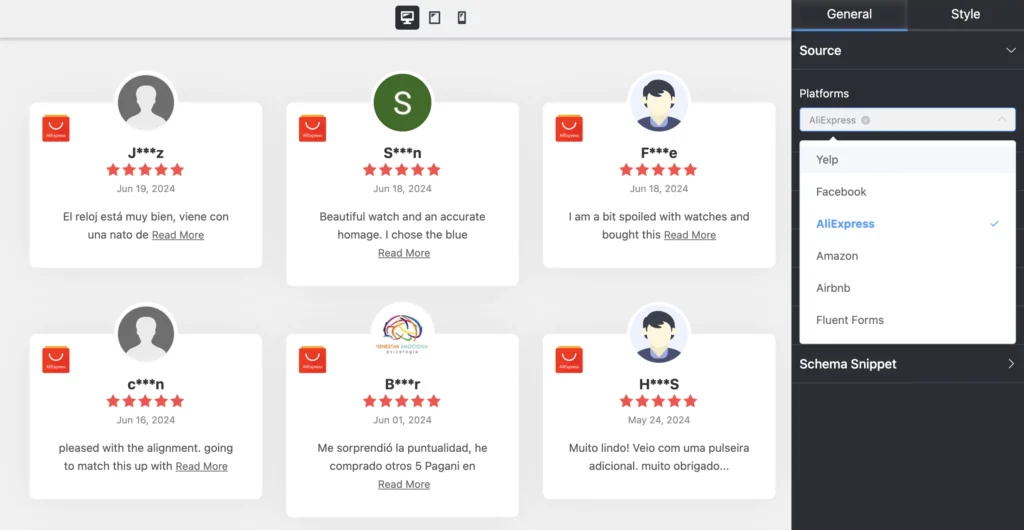
Once you select the platform from the dashboard, all the reviews will come automatically.
Template
Next, click on the Template button, and a drop-down menu will appear. From here, you can adjust the Layout Type, Template Type, and Number of Columns.
Layout Type
WP Social Ninja has four types of layouts right now: Grid, Slider, Masonry, and Badge. Pick any layout types to give your website a new look!

We’ve selected Grid Layout Type here; you can choose any for displaying AliExpress reviews!
Template Types
In this section, we can set up the Template Types. We’ve nine Template Types at the moment.
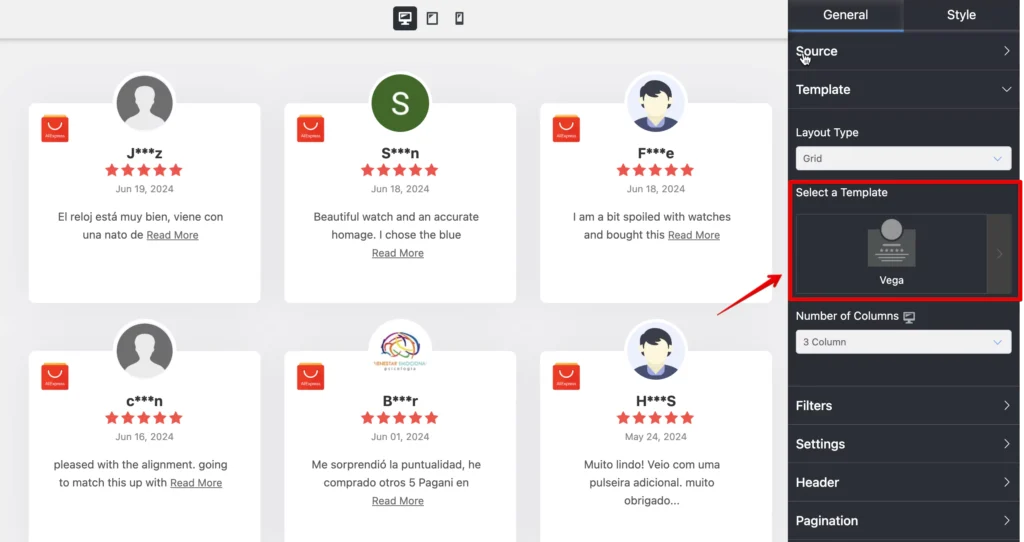
Vega, Spica, Sirius, Rigel, Procyon, Pollux, Mimosa, Hadar, and Deneb. We’ve selected Vega; you can select any that can suit your website.
Number of Columns
Next, we have the Number of Columns. To select this, click on the arrow sign, and a drop-down menu will appear.
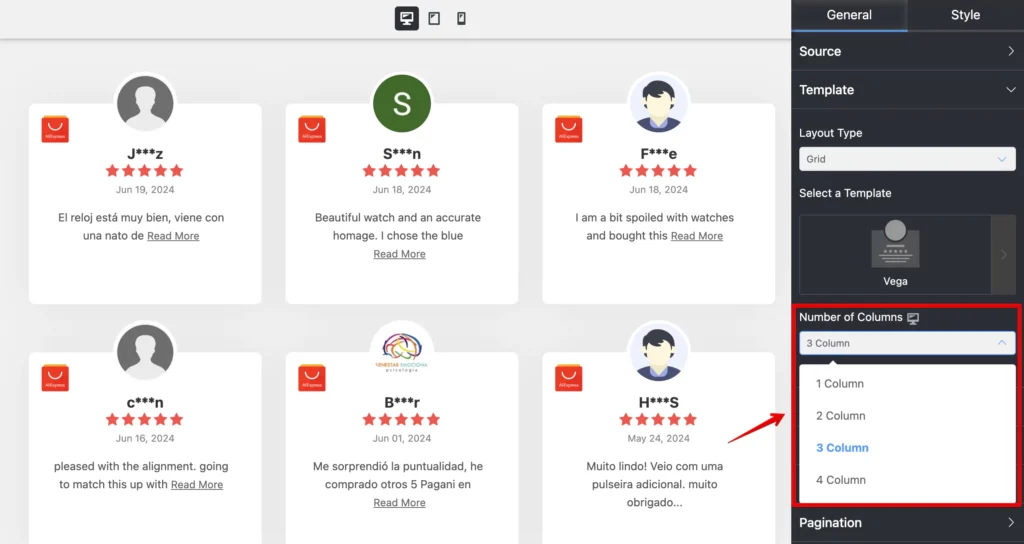
We’ve 1 Column to 4 Columns right now. For demonstration purposes, 3 Columns are selected to display the AliExpress reviews. You can choose any that looks good on your brand.
Filters
WP Social Ninja has a detailed Filters option, so you can customize your settings to match your brand. Let’s see the options.
Number of Reviews
Click on the arrow sign from your WP Social Ninja dashboard to select your Number of Reviews.
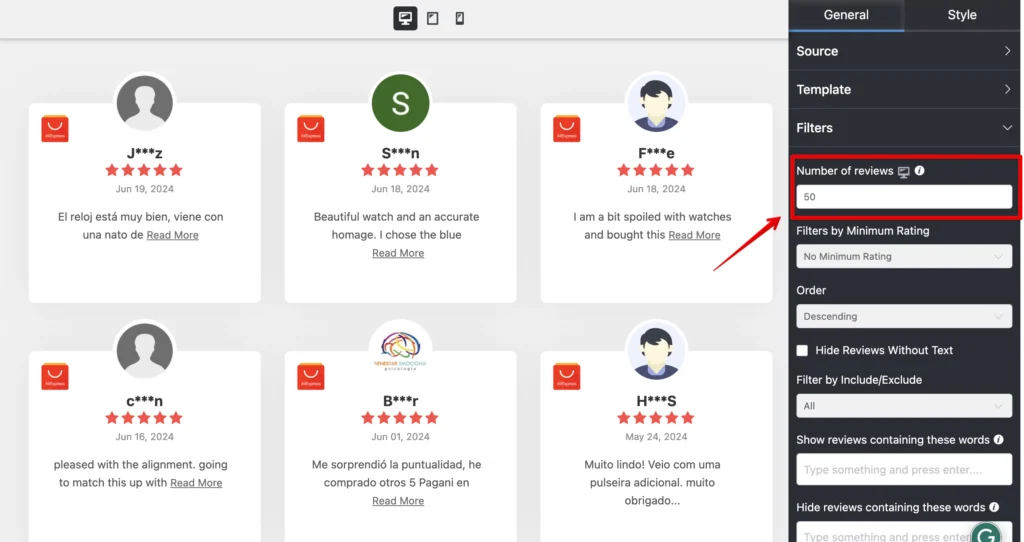
Select the number of reviews that you want to display for your website.
Filters by Minimum Rating
Your business doesn’t need to show off every single rating on your website. Here, filter your ratings and display the best ones that you’ve got!
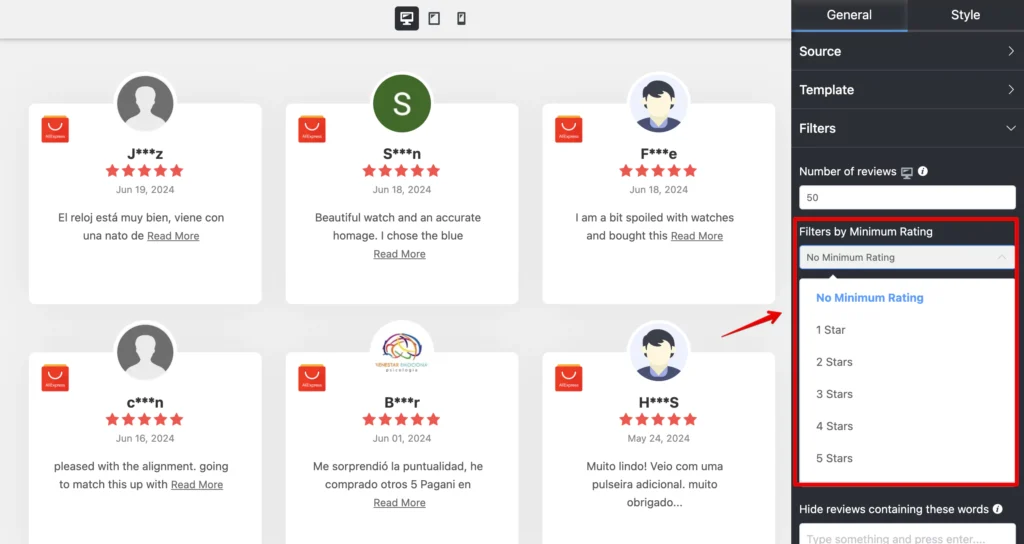
You’ll have six options to choose from: No Minimum Rating to Five Stars to display your reviews. Here, we have selected No Minimum Rating; you can pick any.
Order
In the next part, you can arrange your online reviews in a particular Order.
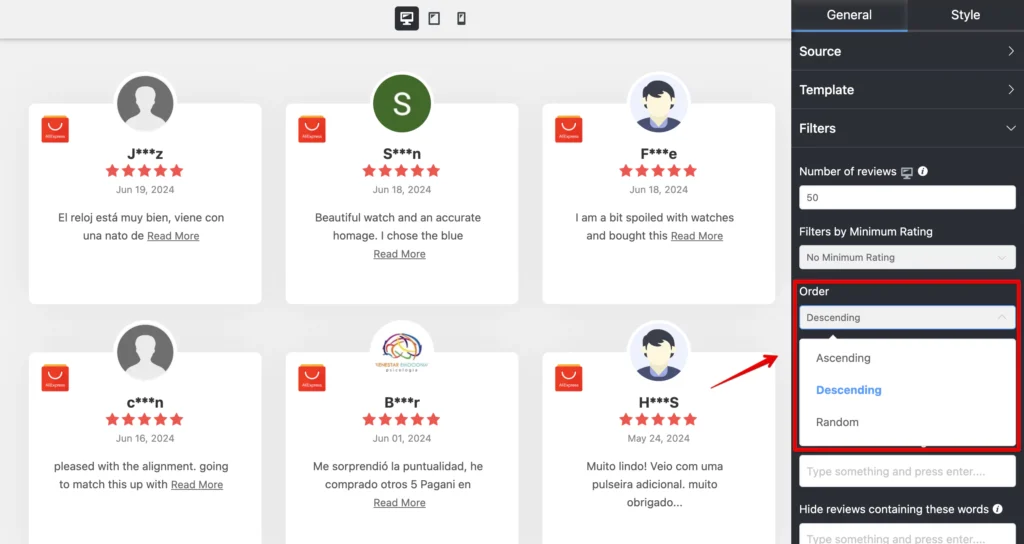
You can select the Ascending, Descending, or Random option to display your reviews on your website.
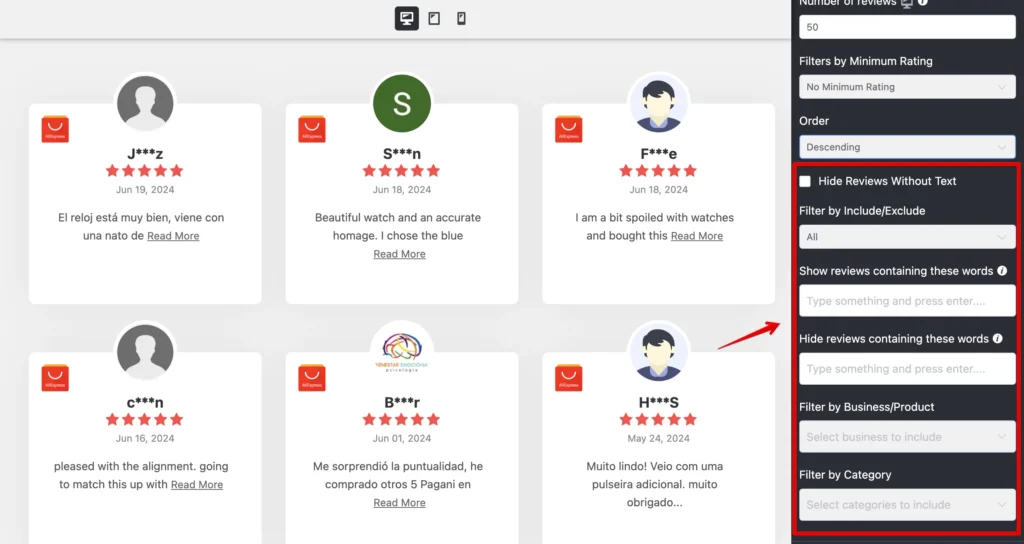
Other filter features
WP Social Ninja has more filtering options to offer for your reviews. You can include/exclude reviews based on the reviewer’s name, show/hide reviews based on specific words, and filter reviews based on product and category!
AliExpress reviews Settings
When your social tool can personalize every section of your website, you can decorate your brand the way you want. Let’s see how to adjust your Settings with WP Social Ninja.
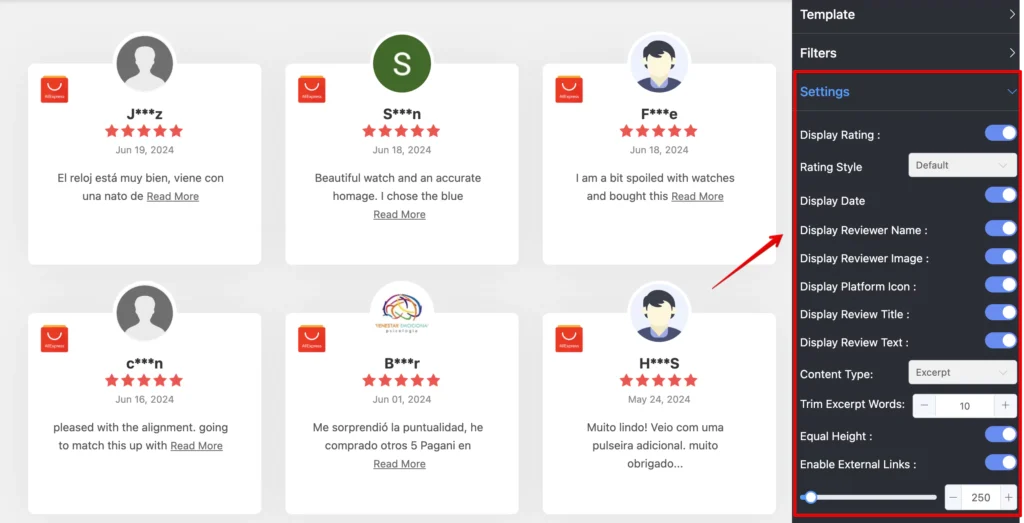
If you want to customize your rating, click on the Display ratings and take control of it. Next is Rating Style. WP Social Ninja allows you to change your rating style from the three options given. WP Social Ninja lets you do an in-depth integration to secure users’ privacy. Like Rating Style, you can take control of your Display Reviewer Name and Image as well.
The next feature is the Display Platform Icon. Turn off the filter icon if you want to adjust the platform icon. You can even choose if you want to display the title and text of your AliExpress reviews.
Another interesting filter is Equal Height. Adjust your text height by turning on/off the button. You can decide whether to display the AliExpress review date or not.
Header
WP Social Ninja has a lot of features and functionalities. You can also set up your Header from the dashboard and give your website a stylish look.
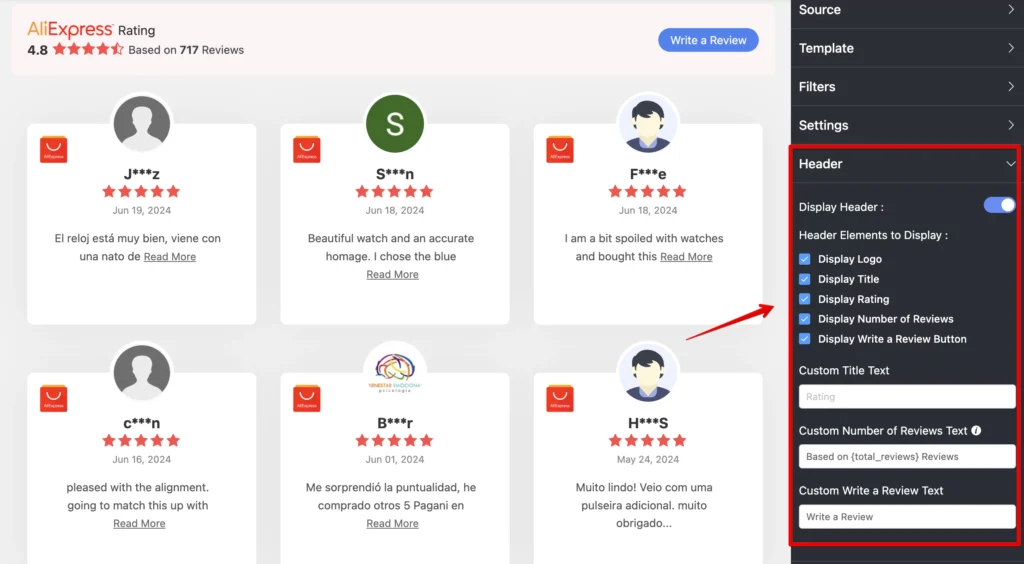
In this part, four Layout options are available in the WP Social Ninja dashboard: Display Title, Display Logo, Display Rating, Display Number of Reviews, and Display Write a Review Button.
A Call To Action button will appear on your website if you enable the Write a Review option. Your users can give their reviews using the CTA button. Moreover, for multiple platforms, this CTA will be taken to individual sites.
Pagination
We’re not done yet! When you display your AliExpress reviews in smaller portions, it gives your website a smart outlook. For that, you need Pagination Settings.
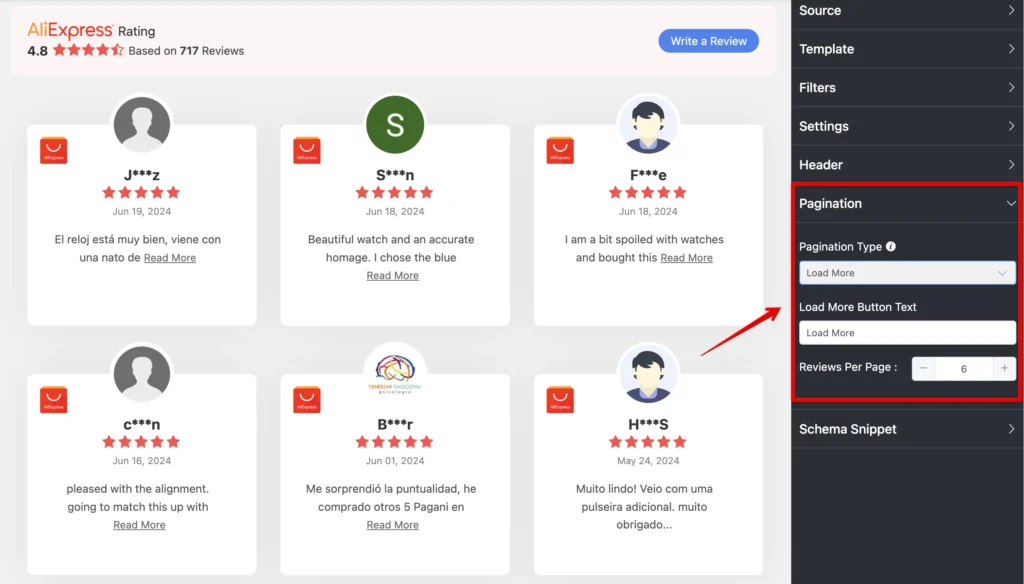
The Pagination Type has two options currently. You can pick any from None or Load More. If you select the Load More option, it’ll ask you to adjust your Reviews Per Page number.
Here, in this Review Per Page, you can adjust the review number for every page on your website from the scroll bar.
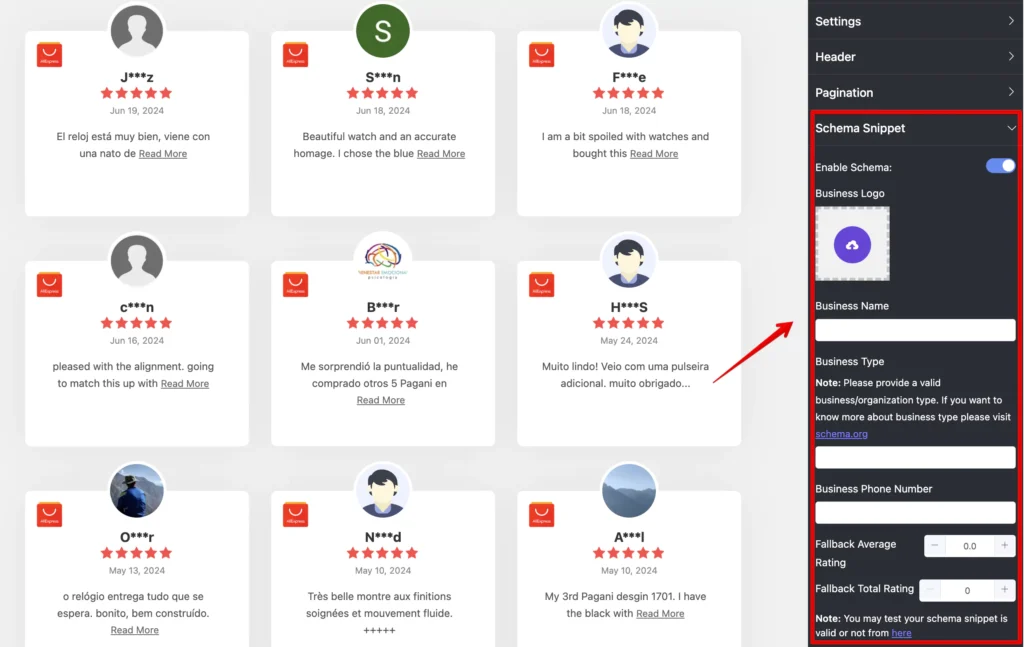
Schema Snippets
Add schema for AliExpress reviews with WP Social Ninja to get better search engine results. First, click on the Schema Snippet option and enable it. Then, fill out all the relevant information accurately.
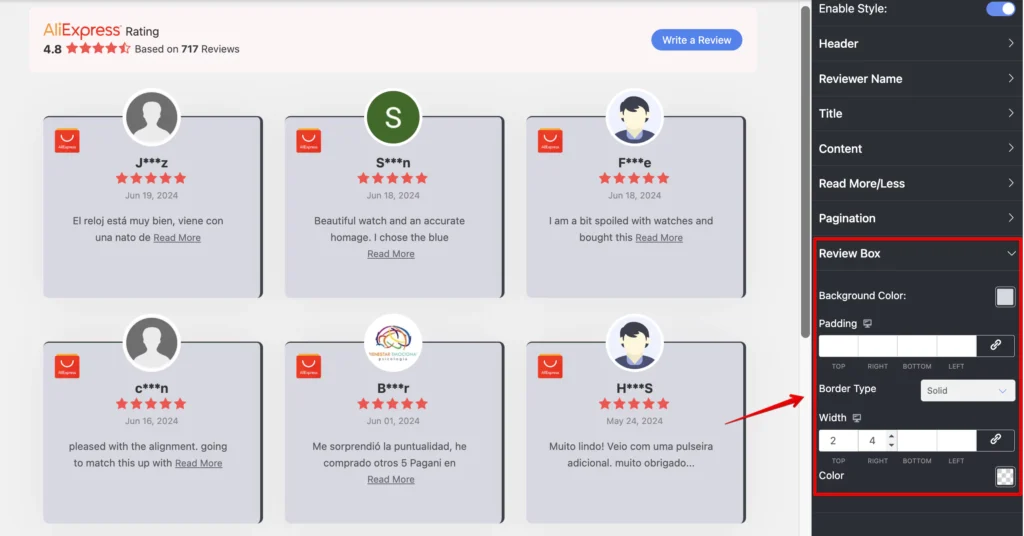
Style options
By now, you have seen many cool and handy customization options for your reviews, but that’s not all. With the advanced styling options of WP Social Ninja, you can perform more in-depth customization.
You can change the color of the font, background, review box, typography, and font style and do much more with WP Social Ninja.
For example, we have done some customization for the review box, but you can customize your entire template down to each element.
After you’ve completed the customization of your reviews, make sure you click on the Save Template button to preserve all your changes.
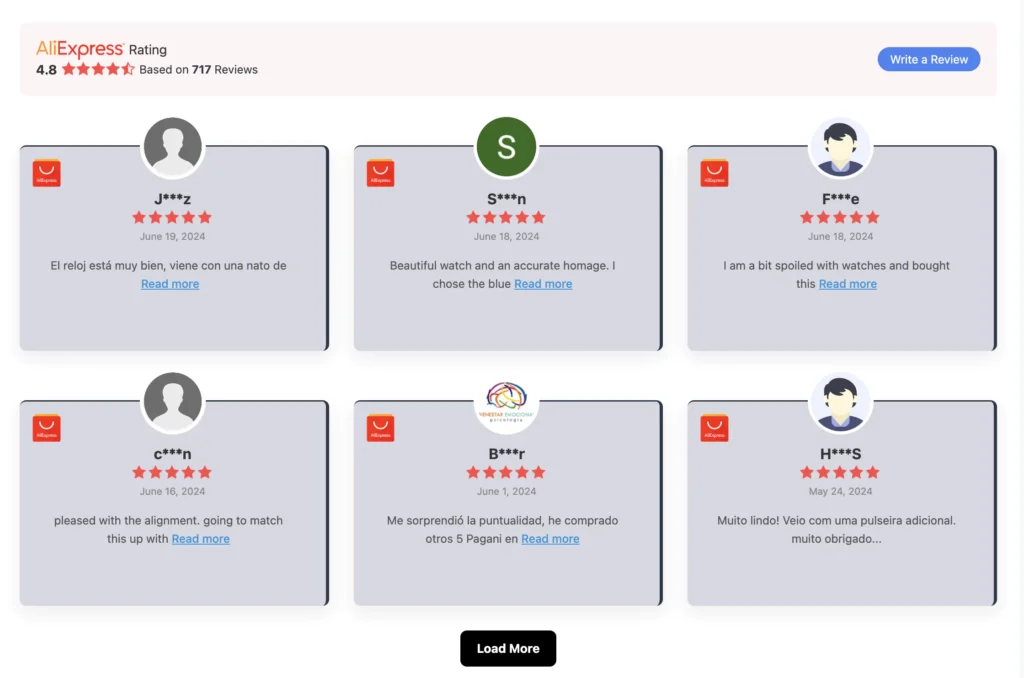
After saving the template, copy the shortcode and paste it to any page you like! This should look like this on your website.
Make the best out of your AliExpress reviews
AliExpress is an amazing e-commerce platform that allows you to get almost everything you want. Its charm has reached beyond borders and won the hearts of a global audience.
Considering its popularity and acceptance, AliExpress reviews provide an excellent opportunity for business owners who want to expand their business globally and attract international customers.
If you dream of going big with your business, don’t stop. Let WP Social Ninja add your AliExpress reviews to your website and impress your visitors.
We hope you found this article helpful. Now that you know how to add your AliExpress reviews on your WordPress website, you may also want to try your hand at our other resources to skyrocket sales-
Win your customers’ hearts with exceptional features
Discover how WP Social Ninja can assist you in designing outstanding customer experiences.
In these posts, we’ve discussed more ways to grow your brand using social platforms and testimonials.

Subscribe To Get
Weekly Email Newsletter
Connect, Customize, and Display Social Feeds, Reviews, and Chat widgets


Trending Posts
-
-
 Mashfik Upal Aumy
 -


Leave a Reply