How to Add Viber Chat Widget to WordPress Sites and WooCommerce Stores


Businesses usually focus on popular chat platforms like WhatsApp, Messenger, or Telegram. That’s understandable. They work well for most markets.
But sometimes, the real opportunity hides elsewhere. And Viber is a perfect example.
Viber has over 1 billion active users worldwide. In Central and Eastern Europe and the Philippines, it is often the primary messaging app, not a secondary one.
Brands are already proving their impact. In the Philippines, Primer Group achieved a 401% increase in sales using Viber.
If your WordPress site targets these regions, ignoring Viber means leaving conversions behind.
In this article, you’ll learn how to add a Viber chat widget to a WordPress site and a WooCommerce store the right way.
So, let’s get started.
TL;DR
- Viber is often overlooked, but it has over 1 billion users and is a primary messaging platform in regions like Central and Eastern Europe and the Philippines.
- If your WordPress site targets these markets, adding a Viber chat widget can help visitors reach you through a platform they already trust and use daily.
- You can add and embed Viber chat on WordPress and WooCommerce sites using a Viber plugin for WordPress like WP Social Ninja, without writing any code.
- WP Social Ninja lets you perform WordPress Viber integration to create and customize the widget’s design, placement, visibility, and behavior to match your site and audience needs.
- It also supports 14+ chat platforms, so your WordPress business website can stay available and never miss a potential customer conversation.
The easiest way to add Viber chat to WordPress websites
The easiest and most reliable way to add Viber chat to WordPress is to use a Viber chat widget plugin, such as WP Social Ninja.
It offers a complete no-code solution. So you can add a Viber chat widget and use advanced customization options without touching HTML or scripts.
Key features of the WordPress Viber widget by WP Social Ninja:
- One-click Viber chat integration so visitors can start a conversation instantly
- Multiple account connections for better customer support
- Flexible chat bubble positioning on the bottom left or bottom right
- Language selection to match your audience
- Page-level control to show or hide the chat widget on specific pages
- Custom chat button visibility based on pages, posts, or products
- Device-based control to hide the widget on desktop or mobile
- Optional chat label to highlight availability and guide users
- Chat popup mode to keep users engaged on your site
- Online and offline status display to set clear response expectations
- Lightweight setup with fast performance and no coding required
So, using a Viber plugin WordPress site owners can rely on keeping the setup simple and flexible. WP Social Ninja also supports 14+ chat widgets, including WhatsApp, Messenger, Telegram, and more.
You can connect multiple chat widgets at once and set custom priorities to decide which one appears first.
This way, your WordPress business website never misses a potential customer conversation.
Win your customers’ hearts with exceptional features
Discover how WP Social Ninja can assist you in designing outstanding customer experiences.
How to embed Viber chat on WordPress with WP Social Ninja
Now that you know why WP Social Ninja is a practical choice, let’s move to the setup. Adding a Viber chat widget takes only a few clicks and fits naturally into your existing WordPress site.
You can embed Viber chat on WordPress using WP Social Ninja, following these three simple steps:
1. Install and activate WP Social Ninja
2. Add Viber chat widget
3. Customize and embed your chat box
Let’s move forward as we walk you through the detailed process.
1. Install and activate WP Social Ninja
WP Social Ninja is available on the WordPress repository and is super easy to install.
If you are familiar with installing WordPress plugins, WP Social Ninja is no different.
You can do that in two ways:
- From your Dashboard
- From WordPress Repository
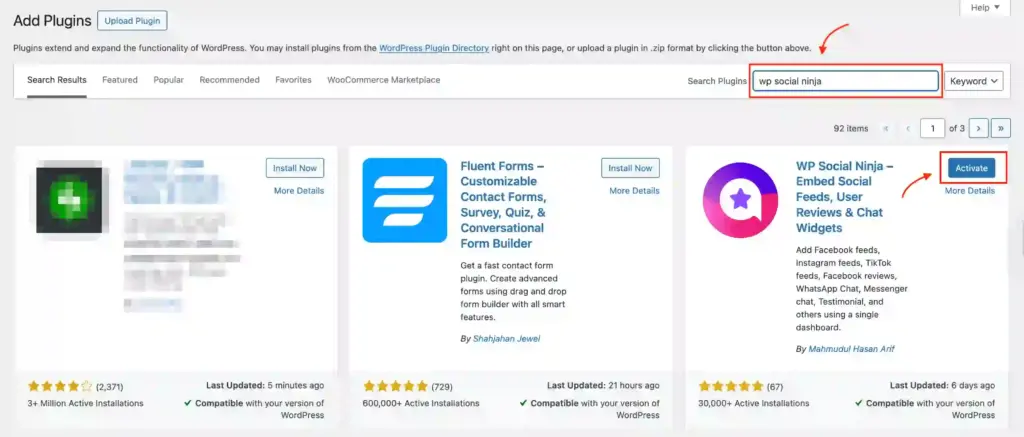
Here’s how to install it from your dashboard:
- Navigate to the WordPress Admin panel. From the WordPress Dashboard, go to Plugins > Add New
- Next, in the search input field, type WP Social Ninja and wait for a moment for it to come up
- Now, click on the Install Now button
- Then Activate
If you decide to install from the WordPress repository:
- Search WP Social Ninja in the Repository, and it will appear at the top. Once you click it, hit the Download button
- Now go to the Dashboard and go to Plugins > Add New > Upload Plugin > Choose the zip file
- After that, click the Install Now button and then Activate
2. Add Viber chat widget with the phone number
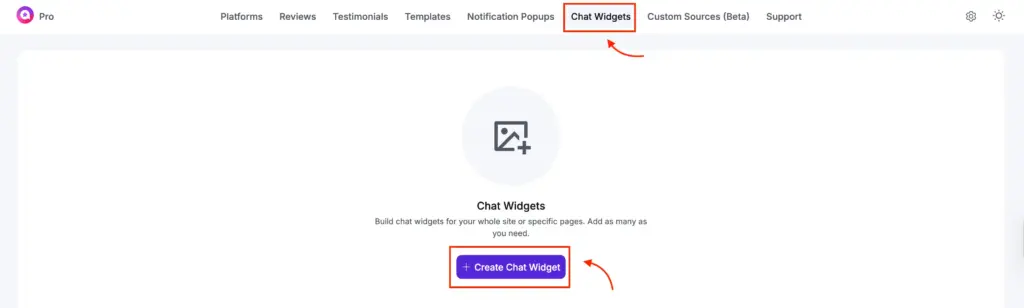
After installing the plugin, go to the dashboard of WP Social Ninja, go to the Chat Widgets, and hit on the Create Chat Widget button.
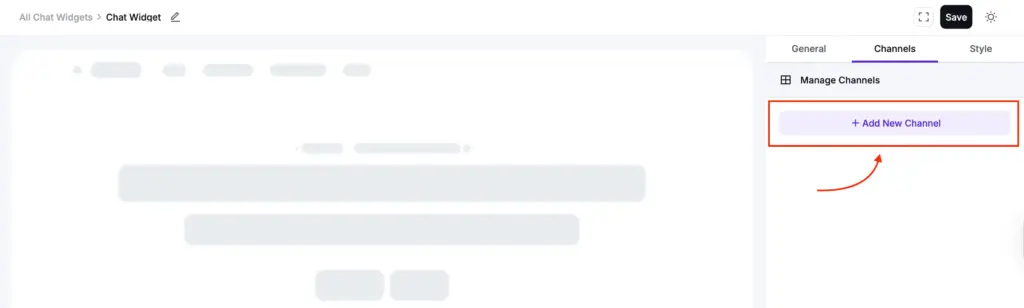
After that, click on the Add New Channel button to select a platform.
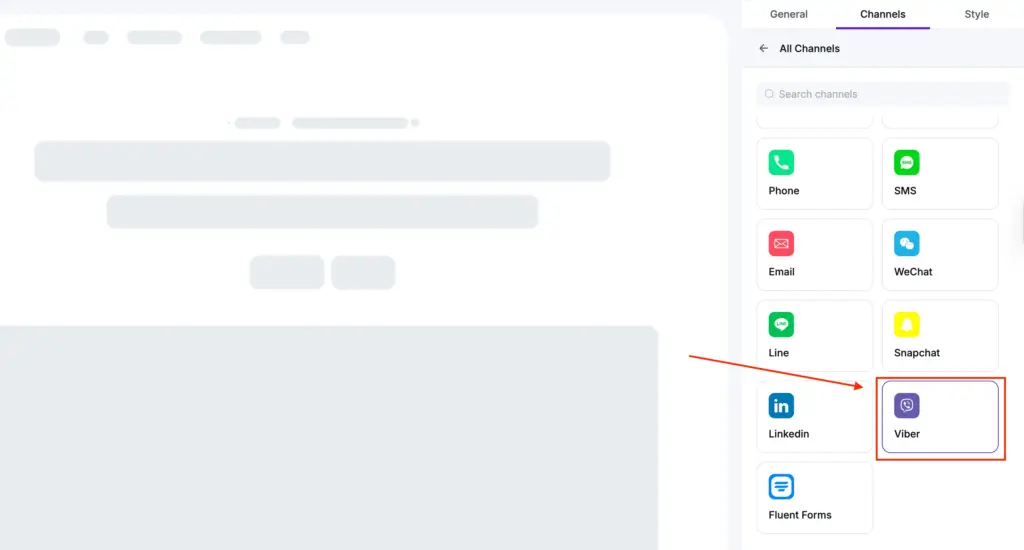
You will find all the available platforms for creating your social chat widgets. To embed Viber WordPress, select Viber, and this will take you to the account connection procedure.
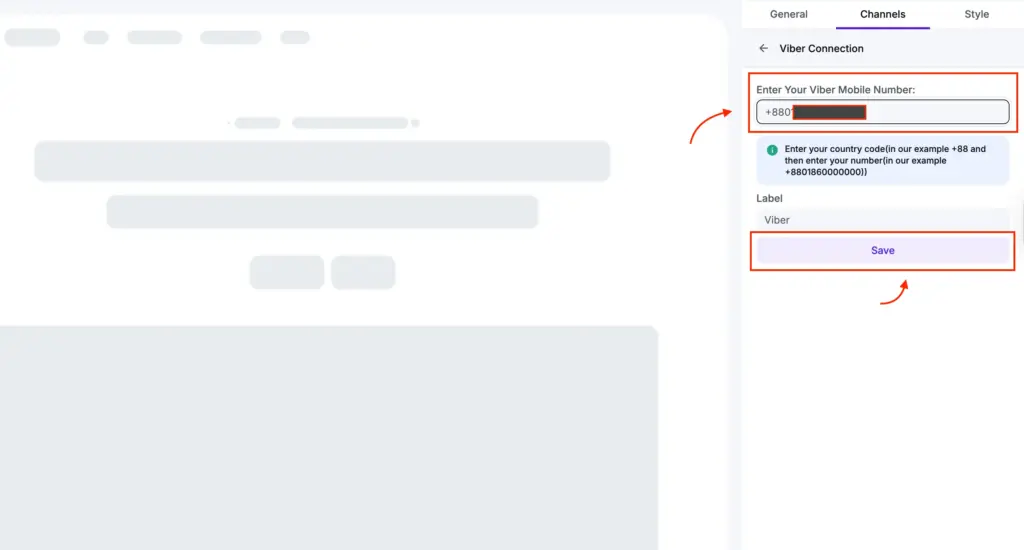
Now, you’ll have to provide your Viber mobile phone number with the country code and click the Save button. And you’re all set.
3. Customize your chat box to fit the site’s design
WP Social Ninja gives you full control over how your Viber chat widget looks on your site. You can adjust its appearance and behaviour to match your WordPress website’s design, without writing any code.
Now, let’s look at the customization options available for the Viber chat widget.
Template
In order to select your templates, click on the right sidebar and then click on the Template button. A drop-down menu will appear.
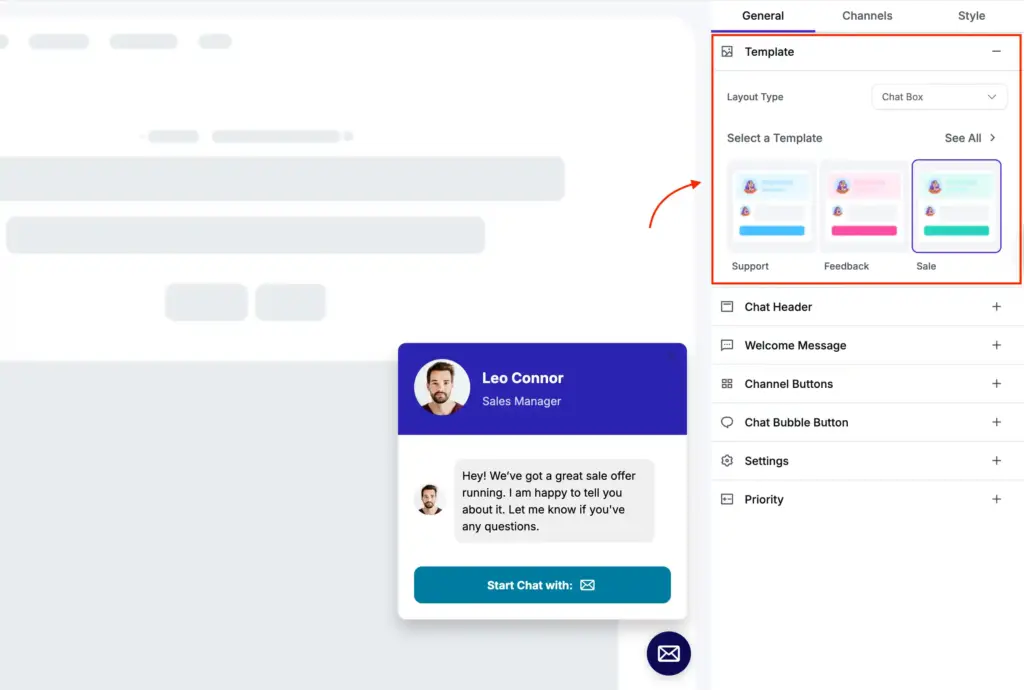
It has different pre-built templates. Four types of templates are available – General, Support, Feedback, and Sale. Select any Template for your site.
Remember to click the Save button to finalize your choice.
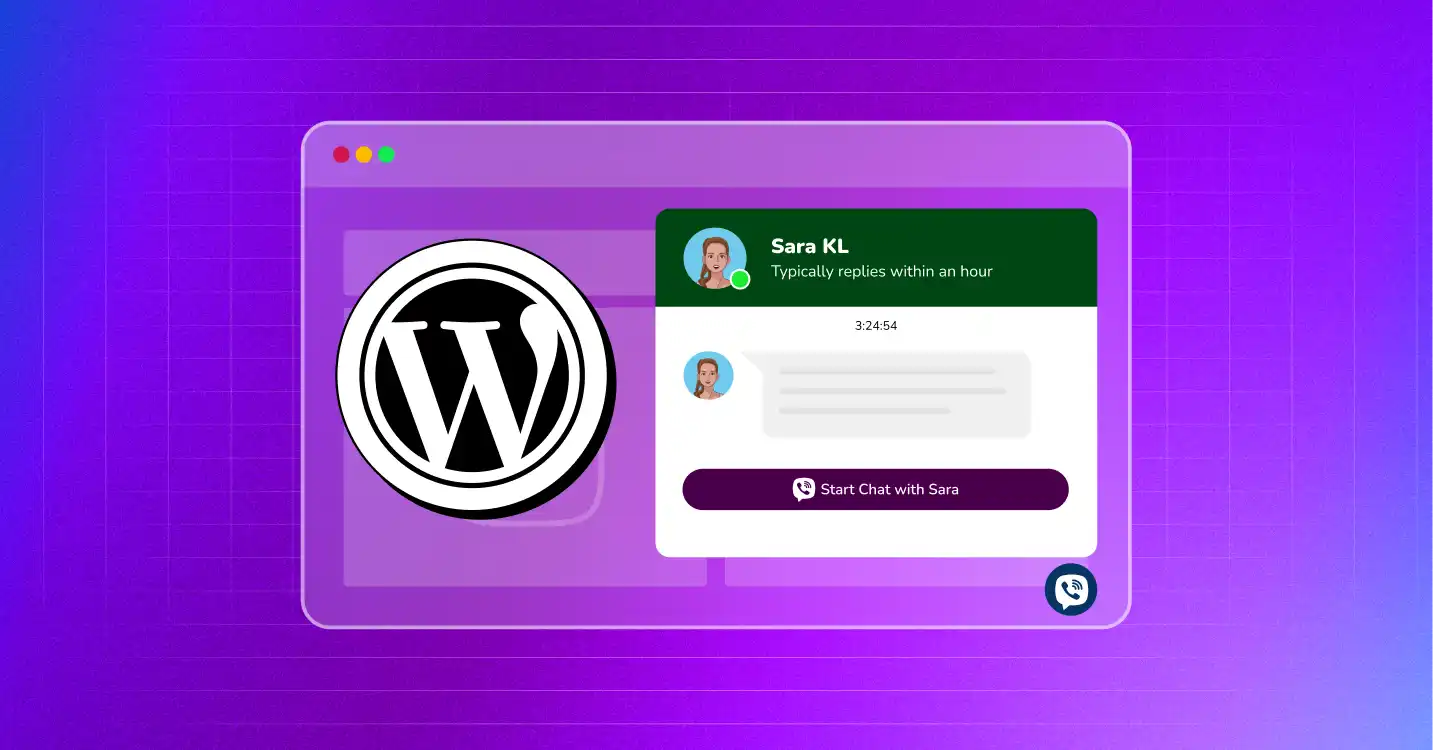
Chat Header
Next is the Chat Header. Here, you can see three changeable items: Profile Name, Caption, and Profile Picture upload option.
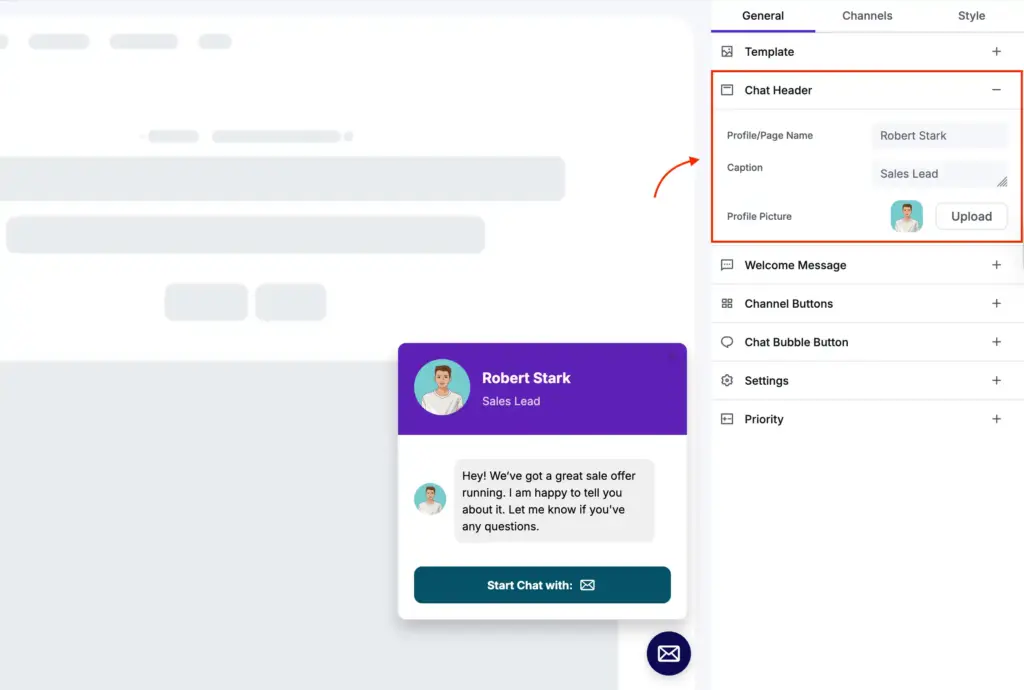
Here’s the list of customization options that you can do from this section:
- From the pointed Profile/Page Name, you can add a name, or you may change/edit it.
- The next is the Caption. From here, you can change the Caption; for example, instead of “Typically replies within an hour,” you can add something else.
- In addition, your business definitely has a unique identity that can be placed in the placeholder of a Profile Picture.
So you can change your profile picture or add a new one that suits your business.
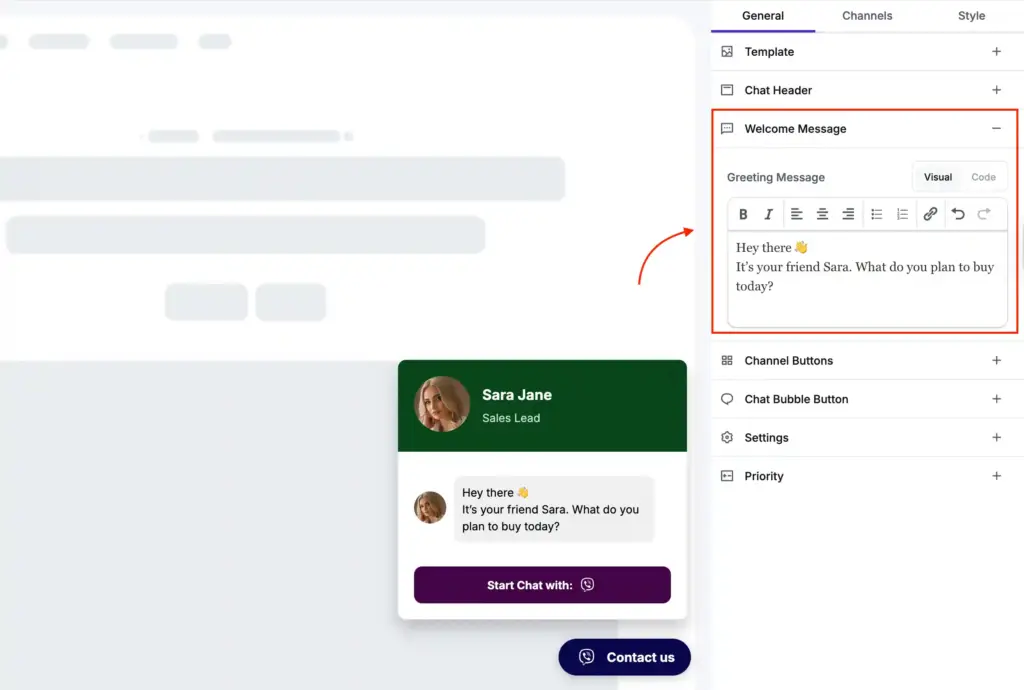
Welcome Message
In this section, you have the option to change your greeting message.
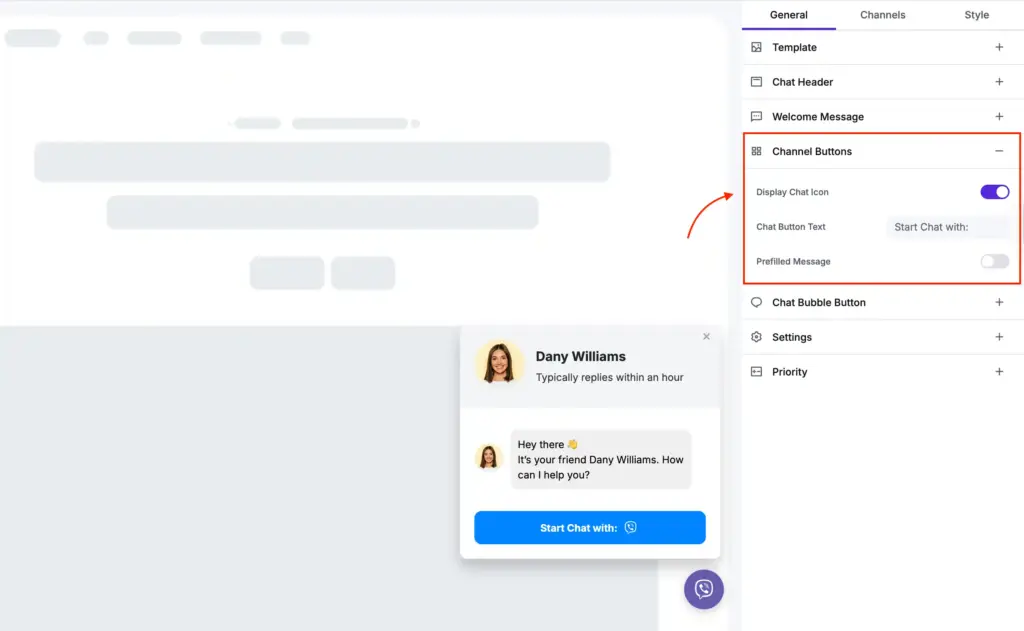
Channel Buttons
Next is the Channel Buttons. Here, you can change two settings: Display Chat Icon and Chat Button Text. And the Prefilled Message is currently available for the WhatsApp chat widget only.
- First of all, you can turn on/off the Display Chat Icon.
Secondly, in the Chat Button Text, you can replace the default text with a new customized text.
Chat Bubble Button
Next, you can change your Viber chat widget’s Chat Bubble Button.
Once you click, you’ll find options for changing the Bubble Icon.
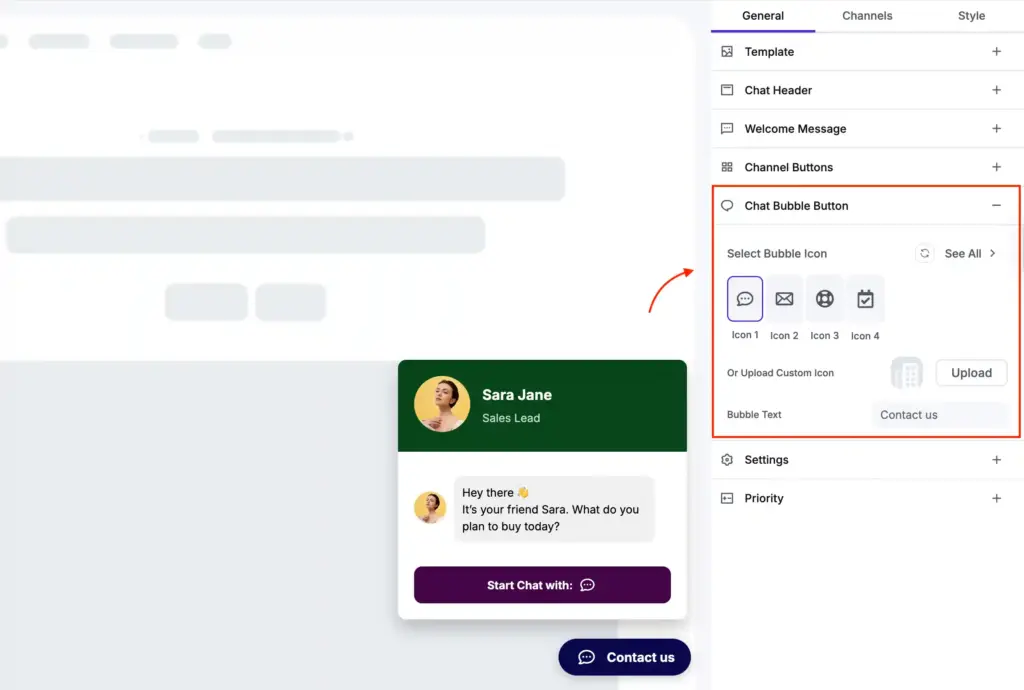
You can choose an icon from the given options or upload a new one from the Upload Custom Icon option.
Next, you can write a Bubble Text, such as “Want to talk?” “Contact us” or something else.
Settings
Now, if you click on Settings, a drop-down menu with multiple options will appear, and you can gain more control over your Viber chat widget customization.
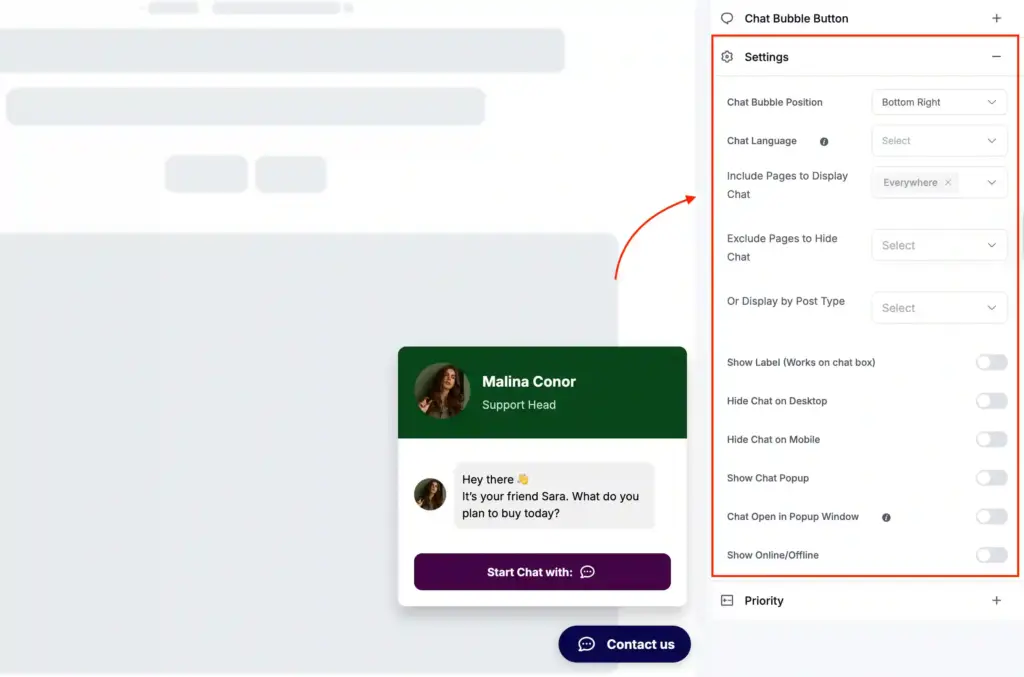
From the option in the Settings, you can:
- Select positions for your chat bubble
- Choose from multiple languages
- Include/exclude pages where the chat bubble appearance
- Schedule the time and date to show whether you are online or offline
- Hide chat on any particular type of device and more
Style
Style is a major element in how any brand displays its products and services. When you connect with your customers with Viber chat widgets, you have many options to play with the designs.
To start with, click on the Style button in the top right corner.
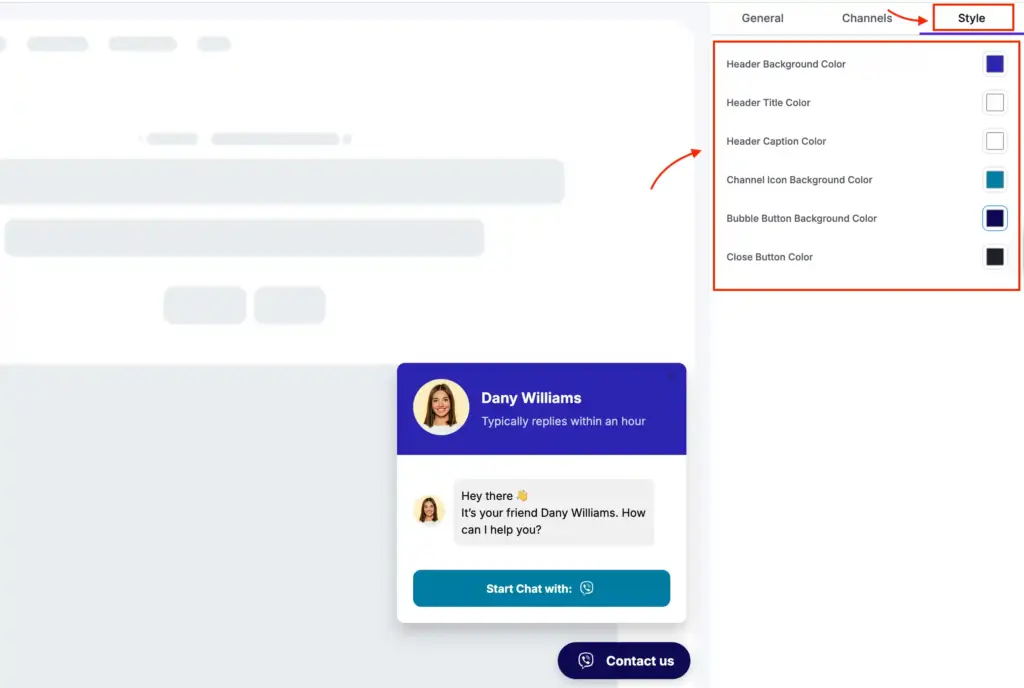
Here, you’ll find four color-changing sections:
- Header Background Color
- Header Title Color
- Header Caption Color
- Channel Icon Background Color
- Bubble Button Background Color
- Close Button Color
Turn conversation into conversion with Viber
The online market is crowded and consumers usually have many alternatives. So, if you are not ready to listen or respond on time, you risk losing potential customers.
That’s where Viber chat on a WordPress site can help. It lets users connect with you through the platform they already trust and feel comfortable. And with proper support, this comfort will grow into conversion.

Get exclusive social media marketing tips and tutorials in your inbox!
With WP Social Ninja, setting the Viber chat widget up on your WordPress website becomes so easy. You can add and customize your widget in minutes and keep your site ready for incoming conversations.
Now, all you have to do is connect with the right customers at the right time.

Subscribe To Get
Weekly Email Newsletter
Connect, Customize, and Display Social Feeds, Reviews, and Chat widgets


Trending Posts
-
-
-
 Mashfik Upal Aumy


Leave a Reply