


How to Embed a Twitter (X) Feed on Your Website


A live Twitter feed on your WordPress site keeps your pages fresh and shows visitors you are active. With WP Social Ninja, you can embed a Twitter feed on WordPress in a few clicks, no code, and style it to match your site.
One important thing has changed, so read the next section before you start. X (Twitter) updated its API, and that affects which feeds you can pull.
This guide covers the current setup end-to-end, so you get a working Twitter feed for WordPress without hitting a dead end halfway through.
TL;DR:
- WP Social Ninja embeds an X (Twitter) feed on WordPress with no code, then lets you filter and style it to match your site.
- Because of X’s API changes, only the User Timeline feed works now. Home Timeline, Hashtag, and Mentions feeds are no longer supported.
- To pull a User Timeline, you must connect your own X developer app on a paid API tier. Check X’s current pricing before you commit.
- The flow: connect your account, choose User Timeline and enter a username, pick a layout and template, filter the posts, adjust the display settings, and embed with a shortcode or block.
Read this first: what the X (Twitter) API change means
Due to X (Twitter) API changes, the plugin now supports the User Timeline feed only. The old Home Timeline, Hashtag, and Mentions feeds are no longer available. If you have seen older tutorials promising a hashtag or mentions feed, that is out of date.
To display a User Timeline, you also need to connect your own X (Twitter) developer app, because X now charges for API access. WP Social Ninja’s in-app notice puts this at around $100/month. X changes its API pricing often, so confirm the current cost and tiers on the official X API page before you commit.
That is the honest state of Twitter feeds on WordPress in 2026. It is still very doable; you just connect your own app first. Here is the full walkthrough.
Why embed a Twitter feed on your website
A tweet’s active life is short. Most of the engagement a post earns happens within the first 15 to 20 minutes, then it slides down the timeline and rarely resurfaces. Embedding your feed on your website fixes that. You keep your best tweets, or tweets on a specific topic, visible for as long as you want, so content that would have vanished on X keeps working for you. Here is what that gets you.
Increase engagement
Embedding your Twitter feed is one of the simplest ways to lift on-site engagement and traffic. Show your customers’ tweets and your own posts on your pages, and you give visitors fresh, real content to react to.
A positive tweet about your product becomes a proof point the moment you surface it on your site. People trust what they can see you doing in public, so the more of your activity they see, the more likely they are to interact or share it with their own followers.
Boost your social following
An embedded feed is a bridge from your website to your X profile and your other channels. A visitor who reads an interesting post in your feed can follow you in one click, without leaving your site.
Someone who found you through Facebook and later lands on your site may leave following you on X too. That is more reach and a better conversion rate from traffic you already have.
Build brand credibility
Buyers pick brands that look active and trusted online. A live Twitter feed on your WordPress site is quiet proof that your brand is present and engaged.
Use it to show your wins, happy customers, and the momentum you are building, all in your audience’s own words rather than your marketing copy.
Show real social proof
Social proof keeps visitors on your page. If you collect praise, retweets, and mentions on X, surface them on your site as testimonials people can see.
When visitors read genuine, positive responses from real customers, they trust you faster and stay longer. It is one of the cheapest and most believable endorsements you can put on a page.
How to embed a Twitter feed on WordPress with WP Social Ninja
Once your X app is connected, the rest is point-and-click. Here is the full process, from linking your account to filtering and styling the feed. Follow the steps in order, since a few settings depend on connecting your source first.
Step 1: Connect your X (Twitter) account
Open the X (Twitter) Configuration panel in WP Social Ninja. If you have connected before, you will see your account listed under Your Connected Account with a “Successfully Connected” status.
To link a new profile, click Connect new account and follow the prompts to authorize your X developer app. Once connected, click Add New Template to start building your feed.
If you get stuck, the Read Documentation link at the bottom of that panel goes straight to the setup docs.
Step 2: Choose your feed source
Open the Source panel under the General tab. This is where you tell the Twitter feed plugin for WordPress which feed to pull.
Set Feed Type to User Timeline. You will notice the menu still lists Home Timeline, Hashtag, and Mentions, but those are no longer supported because of the API change, so User Timeline is the one to use.
Enter the User Name of the X profile you want to display, then click Fetch to pull the tweets. The Total Feed field controls how many posts are retrieved.
[IMAGE: Source panel with Feed Type dropdown open on User Timeline]
At the top of the editor, you will also see the shortcode (for example
Step 3: Pick a layout and template
Open the Template panel to shape how your Twitter feed on WordPress looks.
Choose a Layout Type: Standard for clean rows, Masonry for a Pinterest-style stacked grid, or Carousel for a scrolling slider. Then pick a design under Select a Template, such as Classic Tweet, which mirrors the familiar X post style. The live preview updates instantly, so try each layout and see what fits your page.
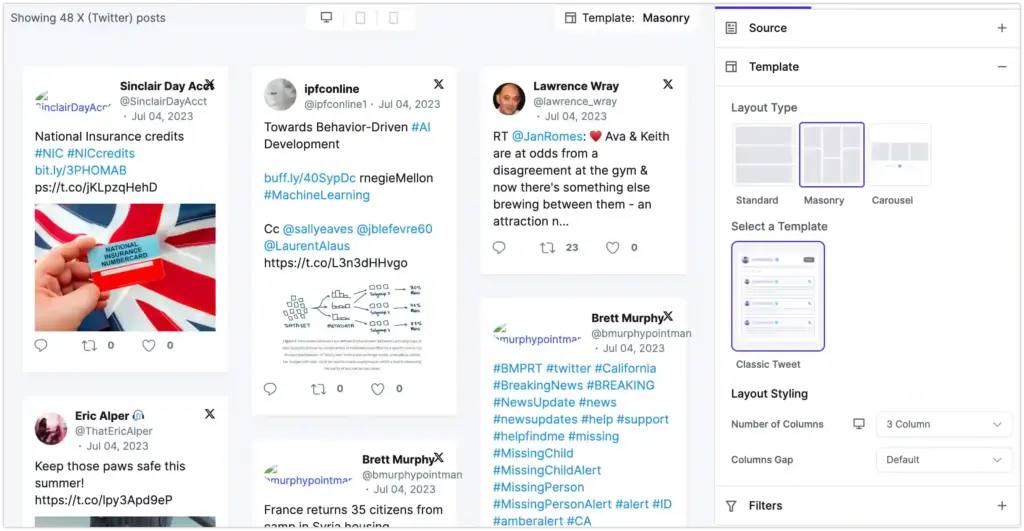
Use the desktop, tablet, and mobile preview icons at the top to check the Twitter feed widget for WordPress on every screen size.
Step 4: How to filter your Twitter feed
Open the Filters panel. This is how you keep your feed clean and on-brand instead of showing every post.
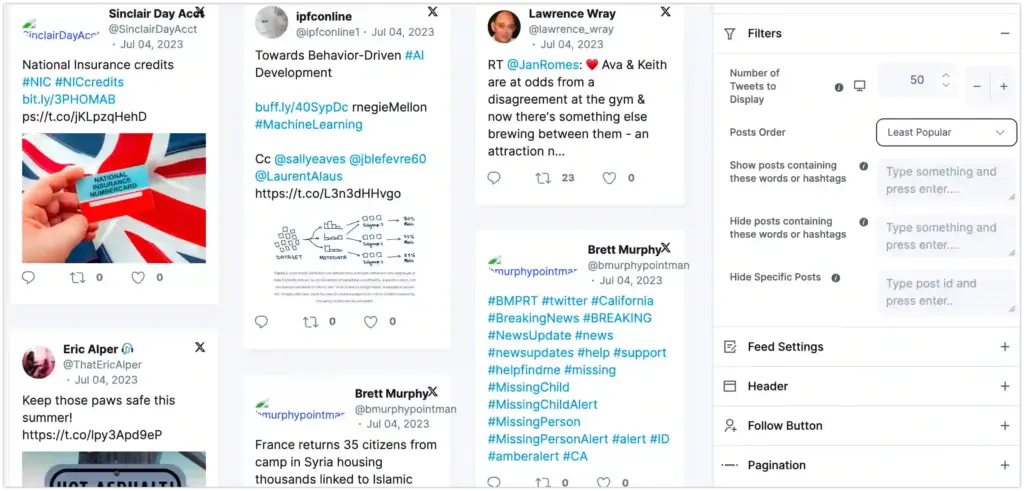
- Number of Tweets to Display: Set how many posts appear, for example, 50.
- Posts Order: Show Newest first, or another order that suits your page.
- Show posts containing these words or hashtags: Type keywords or hashtags to display only posts that mention them. This is the closest way to build a topic-focused feed now that the dedicated hashtag feed is gone.
- Hide posts containing these words or hashtags: Type words or hashtags you want to keep out of the feed.
- Hide Specific Posts: Paste a post ID to remove an individual tweet.
Knowing how to filter a Twitter feed is what separates a tidy, relevant feed from a noisy one. Use “show posts containing” with a campaign hashtag to spotlight a launch, or “hide posts containing” to keep replies and off-topic posts out.
Step 5: Adjust the feed settings
Open the Feed Settings panel to control what appears on each tweet card. Every item here is a simple toggle.
Turn on or off the avatar image, author name, username, date, and the X (Twitter) logo, and choose whether to show the tweet text. You can also decide how tweet actions open with Open Tweet Actions (for example, in a new tab), and toggle the Reply, Retweet, and Like actions.
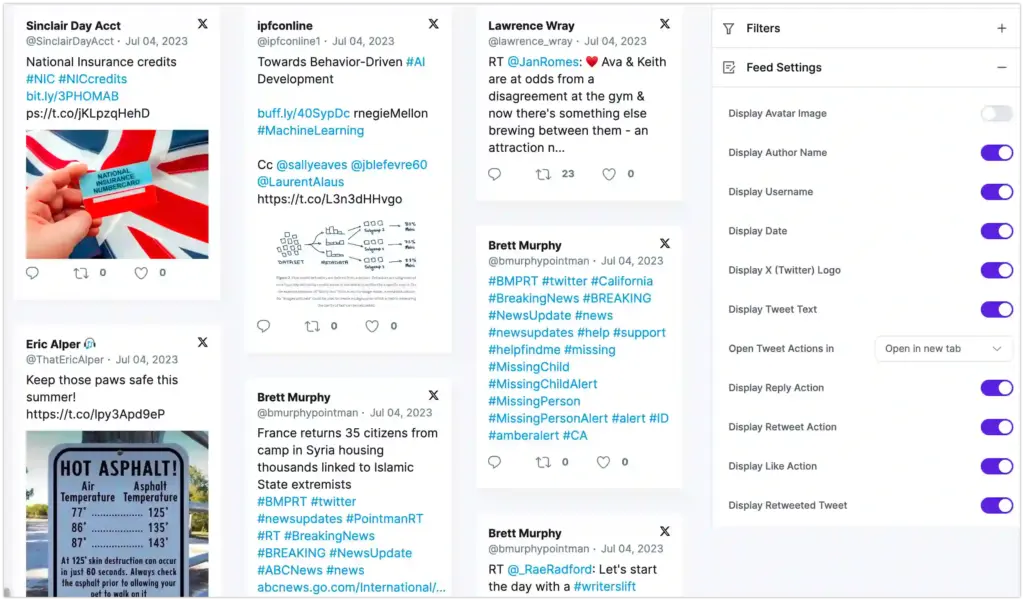
Further down, control the richer content: retweeted tweets, quoted tweets, images, videos, and GIFs, plus the X (Twitter) Card and Player Card for link and media previews.
Turn off what you do not need. A leaner card loads faster and looks cleaner in a Twitter feed in WordPress.
Step 6: Set up the header
Open the Header panel to control the profile summary above your feed.
Toggle Display Header to show or hide the whole bar, then pick what appears in it: Banner Image, Avatar Image, Name, Username, Location, Description, and the Tweets, Following, and Followers counts. Showing follower counts adds a quick trust signal for visitors.
[IMAGE: Header panel with the profile display toggles]
Step 7: Add a Follow button
Open the Follow Button panel to invite visitors to follow you on X.
Turn on Display Follow Button, set the Follow Button Position to Header, Footer, or Both, and write your own Button Text. This is an easy way to turn feed viewers into followers.
[IMAGE: Follow Button panel with position dropdown open]
Step 8: Choose your pagination
Open the Pagination panel to control how visitors move through the feed. Pick an option like Load More so the feed starts compact and expands on click, which keeps long feeds from stretching your page.
Step 9: Style it and embed the feed
Switch to the Style tab to fine-tune colors, spacing, and the wrapper size so the feed matches your theme. Preview it across desktop, tablet, and mobile.
When it looks right, click Save. Then place the feed by pasting the shortcode into any post, page, or widget area, or use the WP Social Ninja block in the editor. Your Twitter feed for WordPress is now live.
Last words
That is the full, current way to embed a Twitter feed on your WordPress website with WP Social Ninja, from connecting your X app to filtering and styling the feed.
The API change added one setup step, but the result is the same: a clean, on-brand feed that keeps your site active.
Win your customers’ hearts with exceptional features
Discover how WP Social Ninja can assist you in designing outstanding customer experiences.

For more, take a look at these:

Subscribe To Get
Weekly Email Newsletter
Connect, Customize, and Display Social Feeds, Reviews, and Chat widgets












Leave a Reply