Collecting customer reviews is one of the best ways to build trust and increase sales. By default, WooCommerce gives you a simple review form, but it’s limited — no image uploads, no extra fields, and no flexibility.
With WP Social Ninja, you can connect Fluent Forms to collect reviews in a smarter way. This unlocks two powerful use cases:
- WooCommerce reviews with Fluent Forms → Replace the standard WooCommerce form with a Fluent Form.
- Custom reviews and ratings with Fluent Forms → Collect standalone reviews anywhere on your site, such as testimonials or service feedback.
Both methods share the same basic setup: you’ll create a form, integrate it, design a template, and then decide whether to link it with WooCommerce or display it as a custom review feed.
Why Collect Reviews with Fluent Forms? #
Here’s why Fluent Forms + WP Social Ninja is better than the default WooCommerce setup:
- Add custom fields like review title, product photo, or ratings.
- Collect reviews beyond WooCommerce products, e.g., for services, memberships, or courses.
- Customize how the “Write a Review” button looks and works.
- Display reviews beautifully inside WP Social Ninja templates.
Example: If you sell perfumes, you could add an “Upload your photo” field so customers can show how they use the product. If you run an online course, you could use the same system to collect detailed testimonials from students.
Step 1: Create a Review Form in Fluent Forms #
First, you need a form where users can submit their reviews.
- Go to Fluent Forms → Add New.
- Choose a Blank Form or use a template.
- Add the fields you want for reviews. For example:
- Name → Who is leaving the review.
- Email → Optional but useful for verification.
- Review Title → A short headline for the review.
- Review Text → The main review content.
- Hidden Field → Add a Hidden field (this step is required). Then, from the input customization section, set the Default Value to this shortcode:
{embed_post.ID}. - Rating → Add a star rating field (You will get a Social Ninja Rating input field in Fluent Forms free version)
- Name → Who is leaving the review.
- Save the form.
- Copy the Form Shortcode ID — you’ll need it later to connect with WP Social Ninja.
Step 2: Connect Fluent Forms with WP Social Ninja #
Next, you’ll link Fluent Forms to WP Social Ninja so that submitted reviews can be displayed in templates.
- Go to Flunet Forms → Forms → Settings & Integrations.
- Click on Configure Integration → Add New Integration and click to WP Social Ninja Integration.
- While setting up the integration, you’ll be asked to choose a Source. This is important because it tells WP Social Ninja where the reviews belong.
For a complete guide on Fluent Forms integration with WP Social Ninja, see this documentation.

Step 3: Create a Review Template in WP Social Ninja #
Now you’ll design how the reviews will appear on your site.
- Go to WP Social Ninja → Templates → Add New Template.
- Select Reviews as the template type.
- Under Source → Platforms, choose where the reviews come from:
- WooCommerce → Reviews tied to your products.
- WooCommerce → Reviews tied to your products.
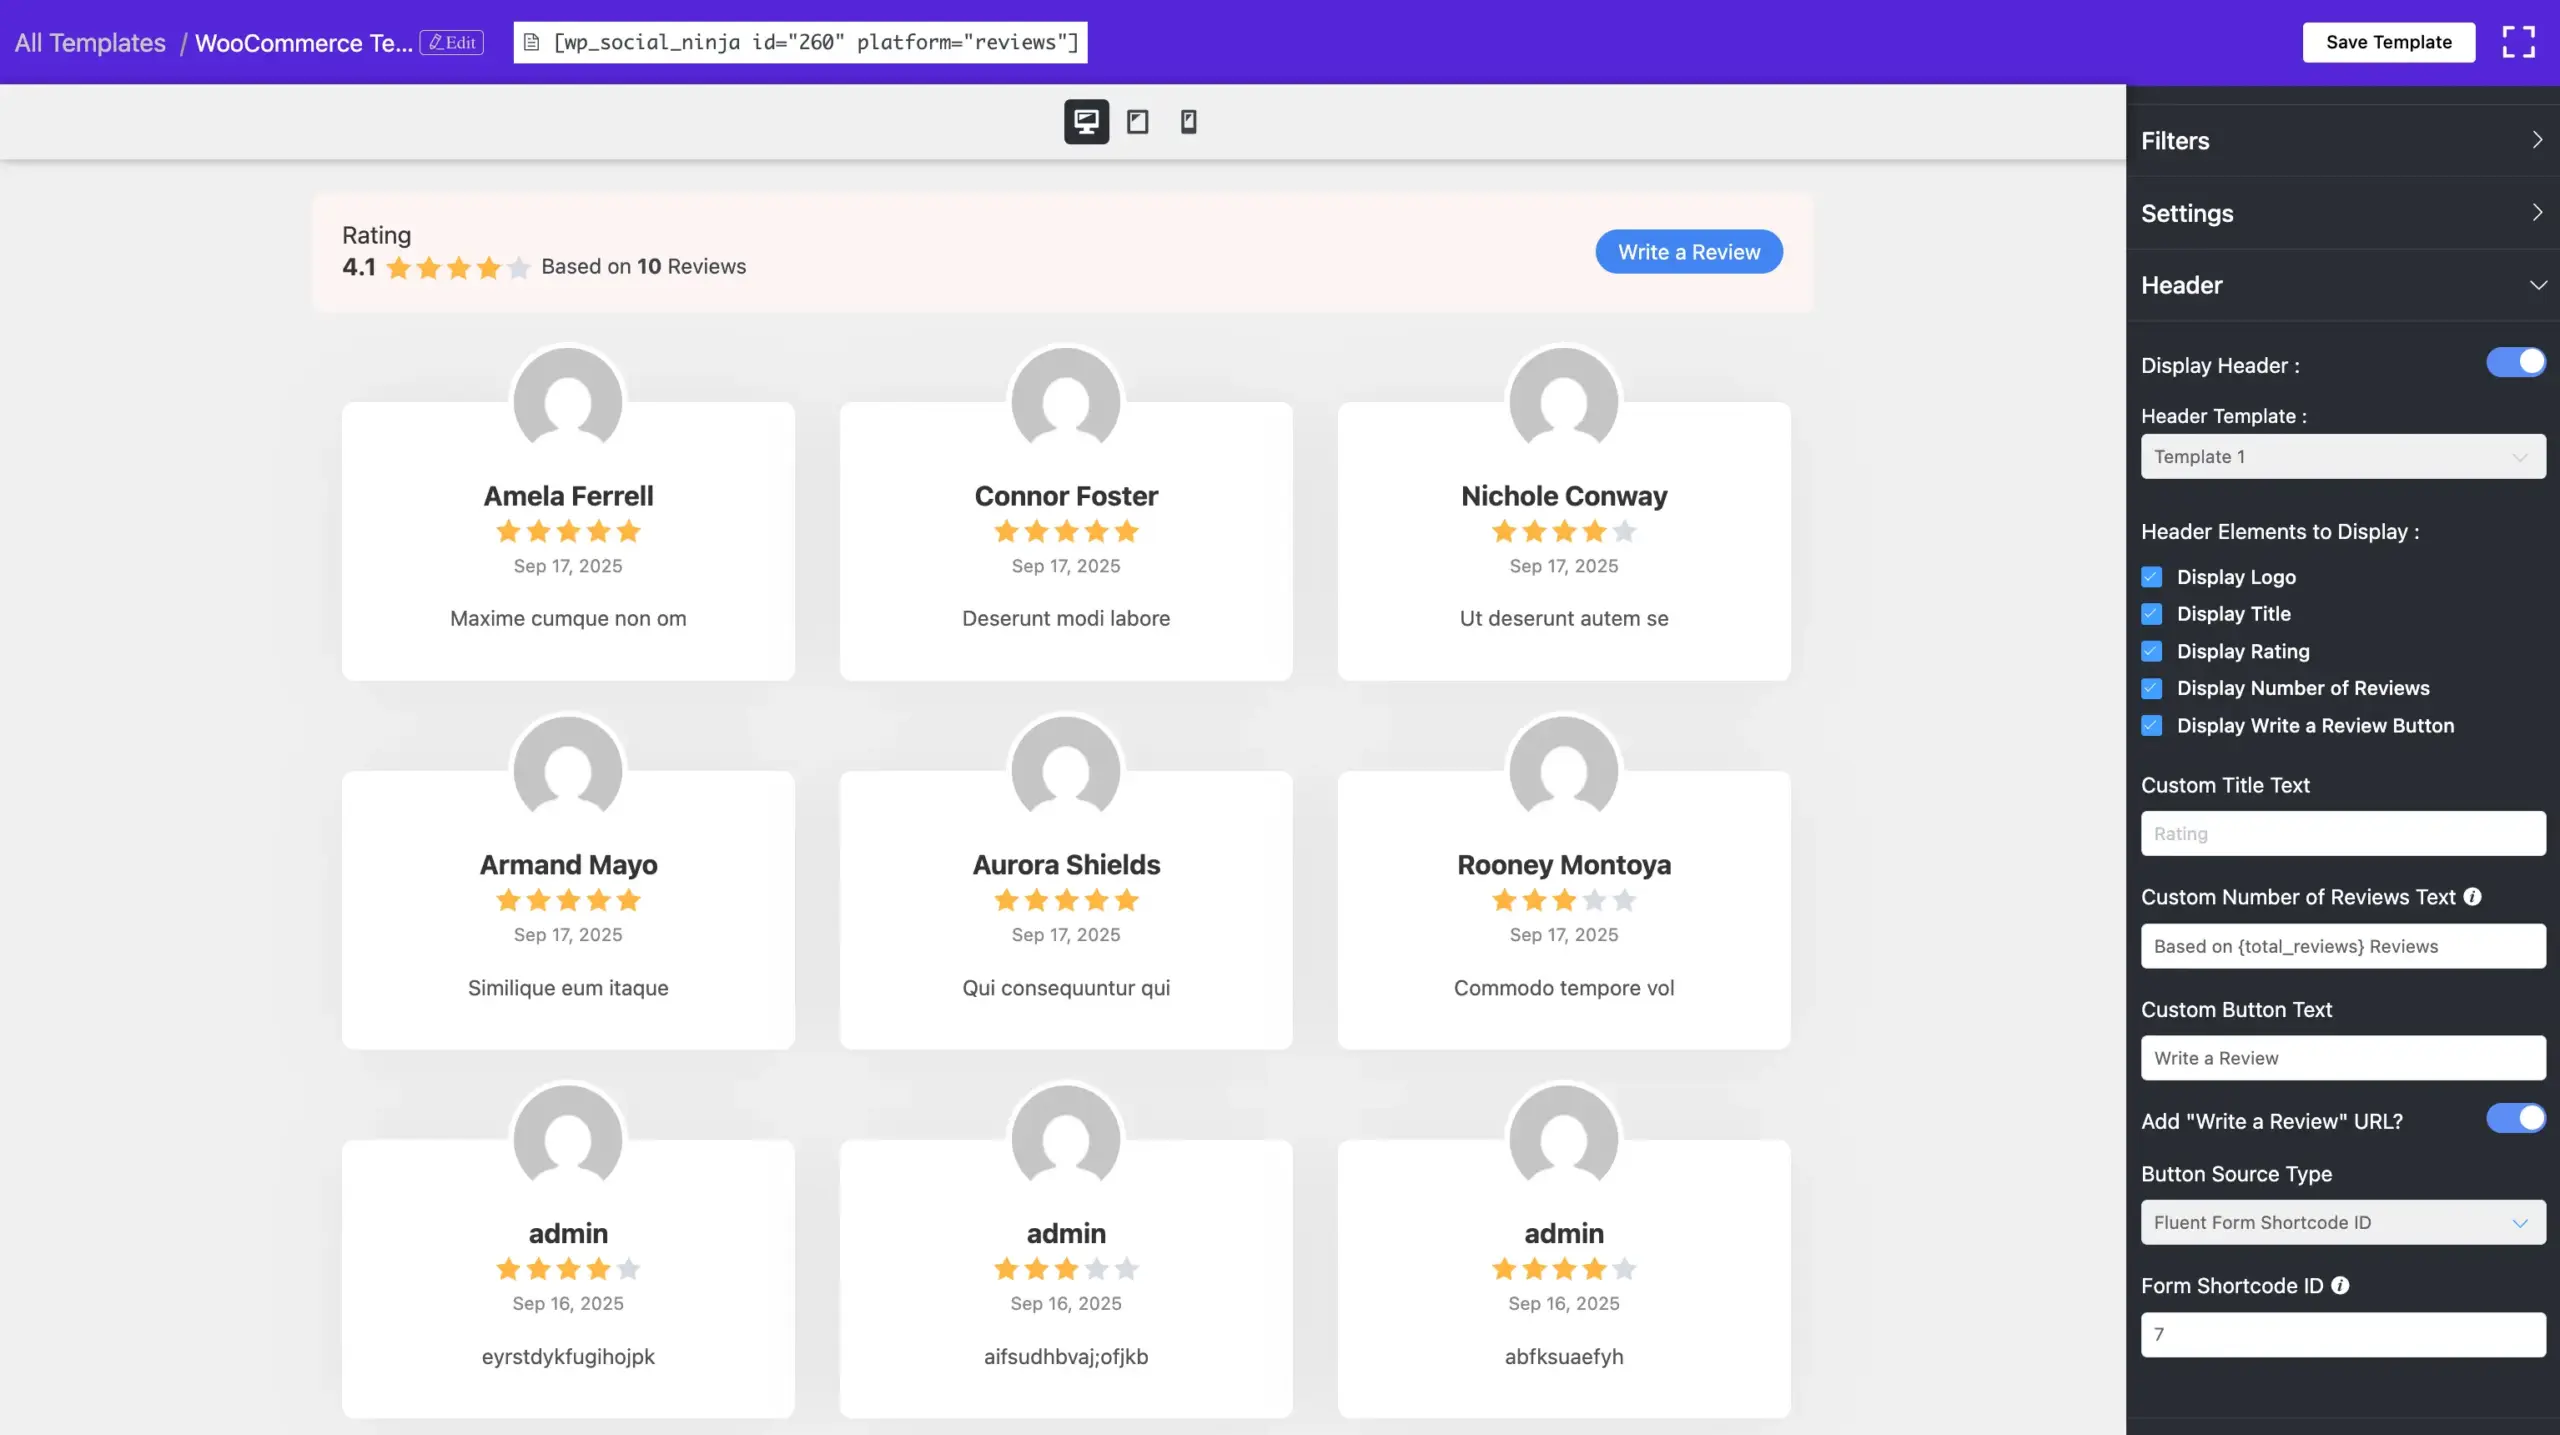
- Scroll to the Header section:
- Toggle Display Header ON.
- Pick a Header Template (Template 1 or Template 2).
- Enable Write a Review.
- Under Button Source Type, select Fluent Form Shortcode ID.
- Paste the Form ID from your Fluent Form.
- Toggle Display Header ON.
At this point, your Write a Review button is ready. When users click it, your Fluent Form will open for them to submit reviews.
Read the documentation to understand fully how review templates work.
Step 4: Apply Your Setup #
Once your form and template are ready, the final step depends on how you want to apply it. You can set the review form globally for all products linked to a WooCommerce template, or configure it individually for specific products. Both methods work global setup for all products at once, or product-level setup for finer control.
WooCommerce Global Review Settings #
Go to WP Social Ninja → Settings → Reviews Platform → WooCommerce Settings to manage how reviews are collected and displayed across all WooCommerce products. These settings apply globally, but you can still override them on individual product pages.
- Auto Syncing – Automatically fetch new WooCommerce reviews. Choose how often to check (e.g., daily).
- Make WP Social Ninja Default – Replace the standard WooCommerce reviews with your selected Social Ninja template.
- Hide Review Count / Title – Toggle to hide the total review count or the “Reviews” heading.
- Template Placement – Decide whether reviews display inside the WooCommerce Reviews tab or outside it.
- Reviews Form – Choose between the default WooCommerce form or your Fluent Form via WP Social Ninja.
- Default Template – Select which review template will be applied to all WooCommerce products.
Note: These settings only affect products that are connected to a WooCommerce Review Template in WP Social Ninja.
To learn more, follow this documentation.
WooCommerce Product Specific Settings #
- Go to Products → Edit Product in WooCommerce.
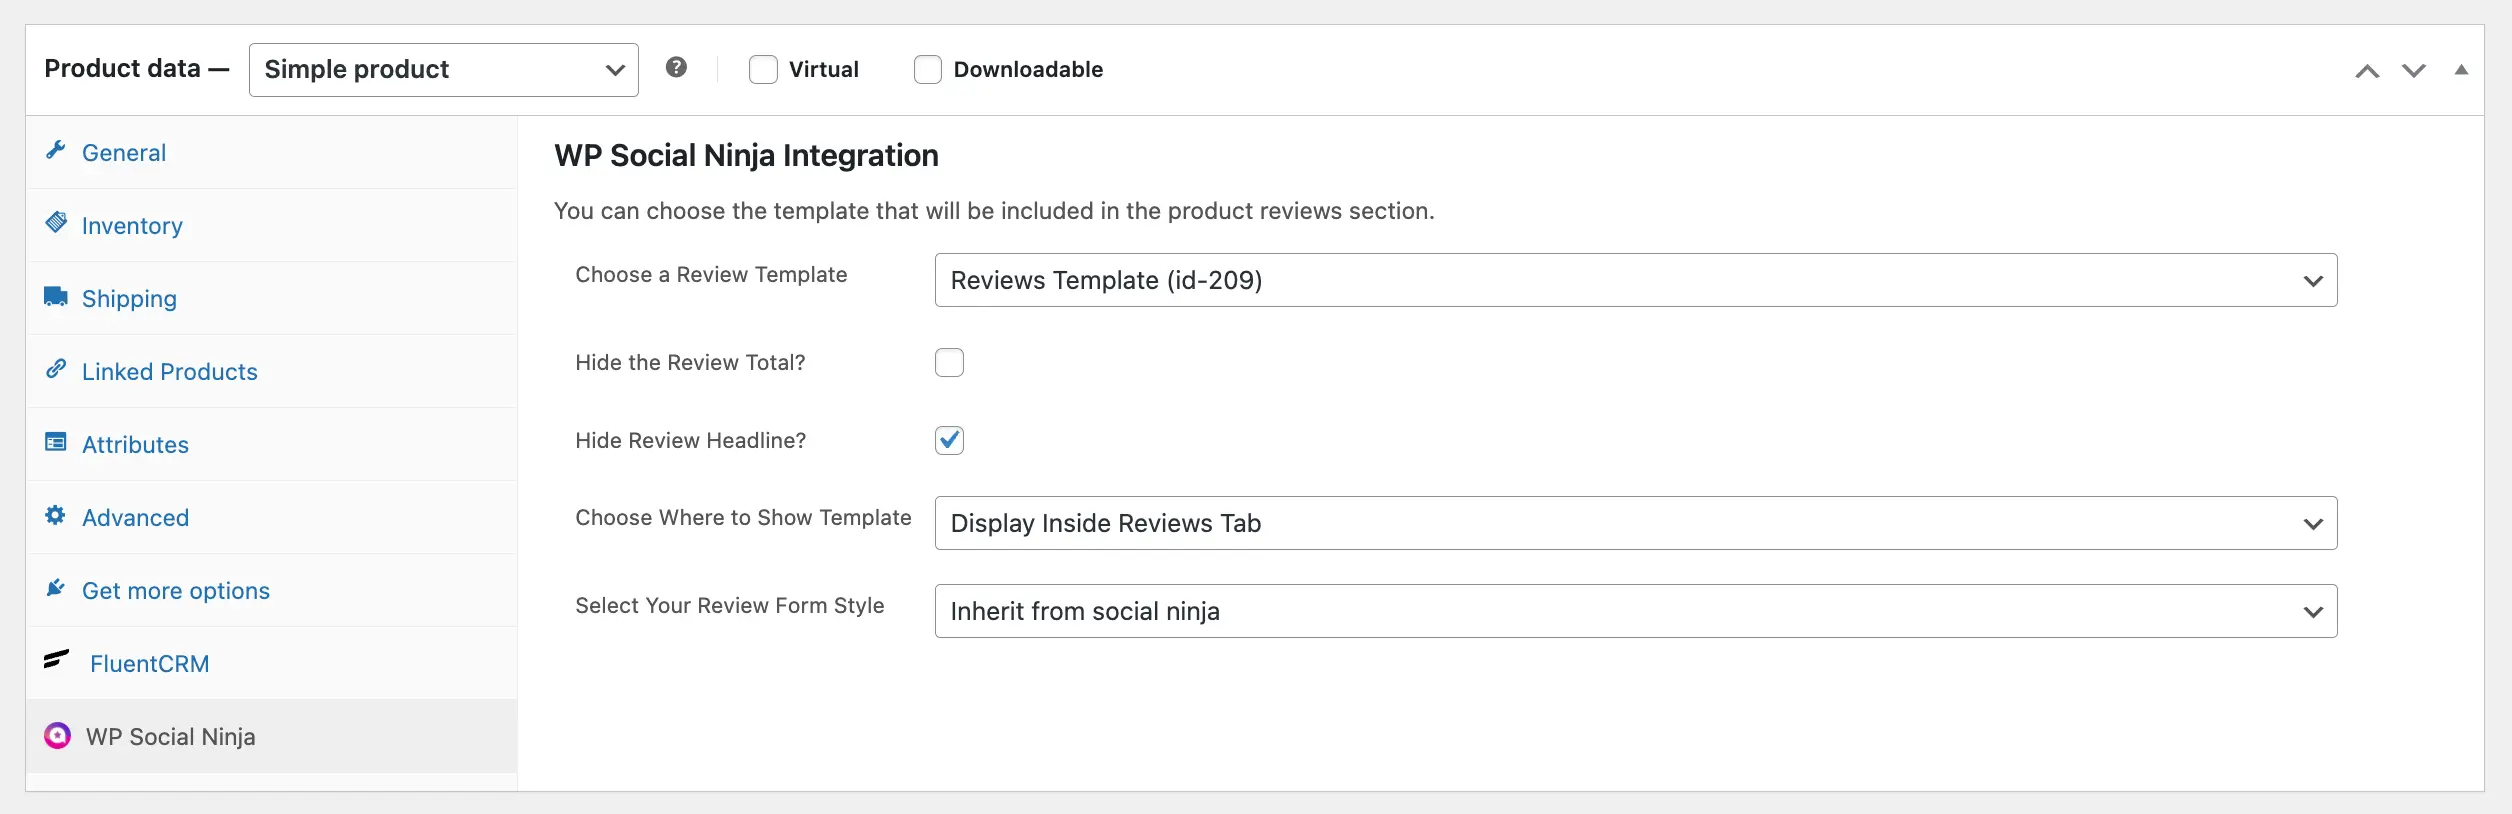
- Scroll to the WP Social Ninja Integration section.
- Under Reviews Form, select Inherit from WP Social Ninja.
- Save the product.
Now, on that product page, the review section will display your Fluent Form instead of the default WooCommerce form.
Check out the documentation for a full guide on integrating WooCommerce with Fluent Forms.
Collect Custom Reviews with Fluent Forms (Pro Only) #
If you’re not using WooCommerce, or if you want reviews on pages like “Case Studies”:
- Use the Custom Review Template you created earlier in WP Social Ninja.
- Place it anywhere with the shortcode:
[wp_social_ninja id="TEMPLATE_ID" platform="reviews"]- Publish the page or post.
Visitors will now see the reviews section along with a Write a Review button. When clicked, your Fluent Form opens, and their submission is stored and displayed in the template.
Example: You run an online coaching program. On your “Student Testimonials” page, you add the shortcode for your custom review template. Students can click Write a Review, leave their feedback, and their testimonial appears directly on the page.
Final Thoughts #
With this setup, you get the best of both worlds:
- For WooCommerce: Replace the limited review box with a customizable Fluent Form.
- For Custom Use Cases: Collect feedback, testimonials, or ratings anywhere on your site using WP Social Ninja Pro.
Your customers will have a smoother way to share their experiences, and you’ll have more control over how reviews are collected and displayed.
No more boring forms. With Fluent Forms + WP Social Ninja, reviews look professional, are easy to manage, and help you build trust at scale.


